Tools / Power Tools
SKIL PWRCORE 20™ Battery, Drill, and Impact Driver User Manual
Comprehensive user guide for SKIL PWRCORE 20™ batteries, chargers, and compatible 20V drill and impact drivers. Includes safety, charging, operation, and maintenance instructions.
Quick answers from the manual
Quick answer
- This manual provides safety, operation, and maintenance instructions for SKIL PWRCORE 20™ batteries, chargers, and compatible 20V drill and impact drivers. p. 1, 13, 74, 142
Key actions
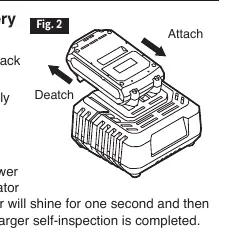
- Attach/detach battery pack p. 14, 75, 143
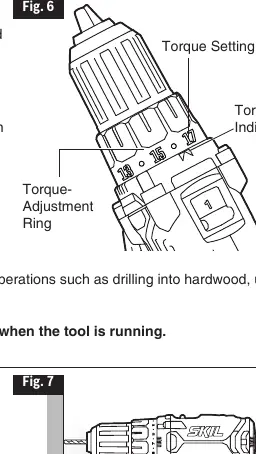
- Adjust torque (Drill Driver) p. 78
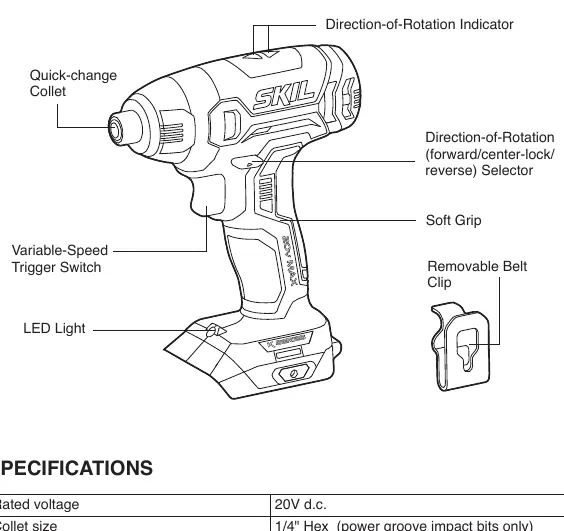
- Install/remove bits p. 79, 146
First start
- Fully charge the battery before first use. p. 14, 35, 57
Problems and fixes
Tool will not start
Charge battery, check installation, or contact service center.
p. 84, 148
LED flashes rapidly
Release trigger and cool tool.
p. 84, 148Maintenance and reset
- Remove battery before cleaning or maintenance. p. 17, 38, 83, 148
Technical specifications
| Parameter | Value | Meaning | Pages |
|---|---|---|---|
| Battery Voltage | 20 V | Operating voltage | p. 13, 34, 54 |
| Drill Driver Speed | 0-420/0-1450 /min | No-load speed | p. 74 |
| Impact Driver Speed | 0-2500 /min | No-load speed | p. 142 |
Where to find it in the PDF
- Battery System p. 13, 14, 15, 16
- Drill Driver p. 74, 75, 76, 77
- Impact Driver p. 142, 143, 144, 145
Table of contents
Manual images
Click an image to enlargeQuick guide from the manual
This manual covers the operation and safety of the SKIL PWRCORE 20™ battery system, including compatible 20V Drill Drivers and Impact Drivers. Always read all safety warnings before use. Ensure the battery is fully charged before its first use. When not in use, lock the direction-of-rotation selector in the center (OFF) position to prevent accidental starts.
Battery System
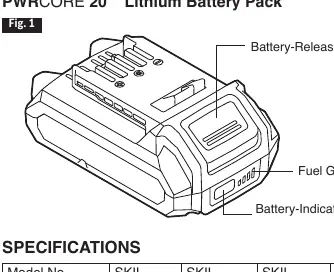
The PWRCORE 20™ battery pack features a fuel gauge. Press the battery-indicator button to check the current capacity. If the first LED flashes slowly, the battery is low and needs charging. If the first and third LEDs flash rapidly, the battery is too hot and needs to cool down under airflow. Charge only with compatible SKIL chargers (SC535801, QC536001).
Drill Driver Operation
The drill driver features a 17+1 clutch setting. Rotate the torque-adjustment ring to select the desired torque. Use the drill mode (icon) to lock the clutch for heavy-duty work. The two-speed gearbox switch on top allows selection between LO (1) for high torque/heavy-duty work and HI (2) for faster, lighter drilling. The variable-speed trigger switch controls the speed based on pressure applied.

Impact Driver Operation
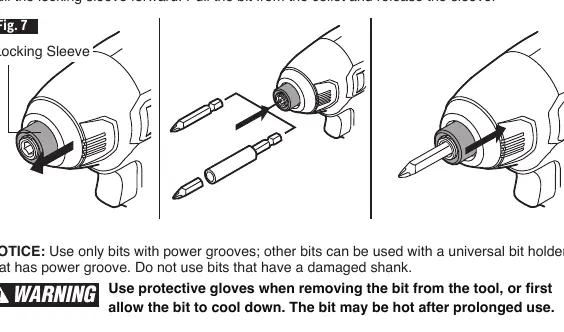
The impact driver uses a quick-change collet for easy bit installation. Pull the locking sleeve forward, insert the bit as far as it will go, and release the sleeve to lock it. Use only bits with power grooves or a universal bit holder with a power groove.
Maintenance and Troubleshooting
Periodically inspect the tool for damaged or loose parts. Clean the tool using compressed dry air; do not use pointed objects to clean openings. If the tool will not start, check if the battery is depleted, not installed correctly, or if the switch is burned out. If the LED worklight flashes rapidly, the tool is overloaded or overheated; release the trigger and allow it to cool.
Manufacturer information
SKIL
Practical help
Common problems
Tool will not start
Check if the battery is depleted, ensure it is installed correctly, or have the switch replaced by an authorized service center.
LED worklight flashes rapidly
The tool is overloaded or overheated. Release the trigger and allow the tool to cool under airflow.
Bit cannot be installed (Impact Driver)
Ensure the bit fits the sleeve or use a suitable adapter.
Before use
- Fully charge the battery before first use
- Wear safety goggles or glasses with side shields
- Ensure the battery is locked and secured to the tool
- Check for damaged or missing parts
- Set the direction-of-rotation selector to the desired position
Images and diagrams
- Fig 1: Battery components including fuel gauge and release button
- Fig 2: Attaching and detaching the battery pack
- Fig 3: Direction-of-rotation selector positions
- Fig 6: Torque adjustment ring settings
- Fig 8: Chuck removal procedure
Model compatibility
- Batteries can only be charged with SKIL SC535801 or QC536001 chargers.
- Impact driver requires 1/4" hex power groove impact bits.

Manual page author
Emily Carter
User documentation editor
Prepares concise manual descriptions and highlights the most useful setup, operation, and maintenance information for readers.