Lighting / Fixtures
Skydance L1(WZ) RF+ZigBee 0/1-10V Dimmer Controller User Guide
Quick guide for the Skydance L1(WZ) RF+ZigBee 0/1-10V Dimmer Controller, covering wiring, pairing with ZigBee/RF devices, and dimming settings.
Table of contents
Manual images
Jump to the sectionQuick guide from the manual
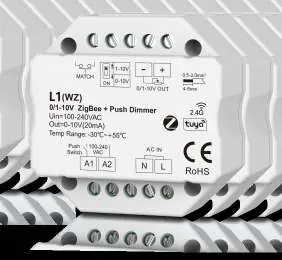
The Skydance L1(WZ) is a 0/1-10V dimmer controller that supports both ZigBee and RF 2.4G control. It is designed for dimming 0-10V or 1-10V LED drivers. Key features include app control via Tuya, voice control compatibility (Alexa, Google Assistant), and 256-level smooth dimming.
Wiring and Installation
The device is designed for standard wall junction box installation. Ensure power is disconnected before wiring.
- AC Input: Connect AC L and AC N to the power supply (100-240V AC).
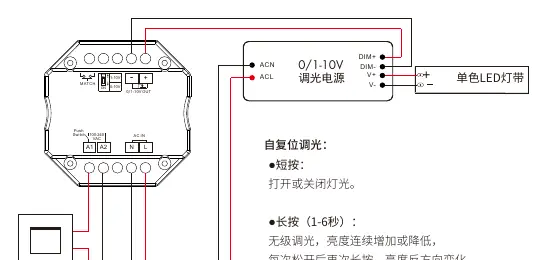
- 0/1-10V Output: Connect the DIM+ and DIM- terminals to the 0/1-10V dimmable LED driver.
- Push Switch: Connect a push switch to terminals A1 and A2 for manual dimming control.
Note: When connecting multiple LED drivers to one dimmer, ensure the total current does not exceed 20mA. Use wires with a cross-section of 0.75mm².
Manual Dimming Operation
If a push switch is connected:
- Short press: Turn the light on or off.
- Long press (1-6 seconds): Adjust brightness continuously. The brightness direction changes with each subsequent long press.
ZigBee App Connection
To connect to the Tuya Smart App:
- Long press the 'Match' key for 2 seconds to reset the ZigBee network.
- Long press for 5 seconds or perform 5 quick short presses to enter pairing mode. The blue LED indicator will flash rapidly.
- Once connected, the blue LED will stop flashing, and the device will appear as 'ZB-DIM' in the app.
RF Remote Pairing
You can pair the L1(WZ) with RF remotes using two methods:
- Using the Match Key: Short press the 'Match' key on the L1(WZ), then immediately press the zone key on the RF remote.
- Using Power-on: Power the device off and on. Immediately press the zone key on the remote 3 times. The light will flash 3 times to confirm pairing.
To delete all paired remotes, long press the 'Match' key on the L1(WZ) for 10 seconds until the indicator flashes 5 times.
Dimming Settings
The device supports both 0-10V and 1-10V dimming curves. Use the switch on the device to select the appropriate mode based on your LED driver requirements.
Practical help
Common problems
Device not pairing with ZigBee network
Ensure the device is in pairing mode (blue LED flashing rapidly). If not, long press the 'Match' key for 5 seconds or perform 5 quick short presses.
Dimming range is incorrect
Verify that the switch on the device is correctly set to either 0-10V or 1-10V mode to match your specific LED driver.
Multiple drivers not dimming correctly
Ensure the total number of connected 0/1-10V LED drivers does not exceed 50 units and the total current is within 20mA.
Before use
- Verify input voltage is 100-240V AC.
- Ensure the LED driver is compatible with 0/1-10V dimming.
- Check that the wire cross-section is 0.75mm².
- Confirm the installation environment temperature is between -30°C and +55°C.
Specs in practice
- 0/1-10V (20mA)
- The output signal capacity; do not exceed 20mA total current for connected drivers.
Images and diagrams
- The wiring diagram shows the connection for AC power, the 0/1-10V output to the LED driver, and the optional push switch.
- The system connection diagram illustrates how the L1(WZ) acts as a bridge between the ZigBee gateway/WiFi router and the LED drivers.
Model compatibility
- Compatible with Tuya Smart App.
- Supports voice control via Amazon Alexa and Google Assistant.
- Works with RF 2.4G remotes.

Manual page author
Michael Turner
Technical manual editor
Reviews PDF manuals for structure, safety notes, and practical product details so readers can find the right information quickly.