Lighting / Fixtures
Sunco Lighting Smooth Downlight 4-inch
Quick installation guide for the Sunco Lighting Smooth Downlight 4-inch. Includes step-by-step wiring instructions, connector types (TP24/E26), and technical specifications.
Table of contents
Quick installation guide
This guide provides instructions for installing the Sunco Lighting Smooth Downlight 4-inch. Ensure you have the correct connector type (TP24 or E26) before beginning the installation process.
Components
- TP24 Connector
- E26 Base
Installation steps
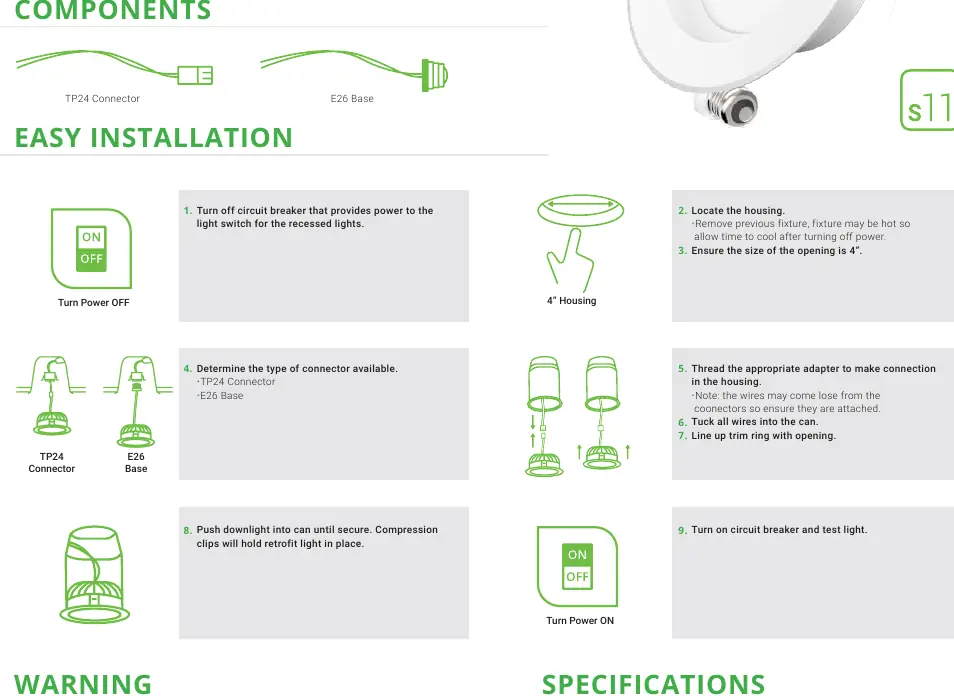
- Turn off the circuit breaker that provides power to the light switch for the recessed lights.
- Locate the housing. If removing a previous fixture, allow it to cool down before handling.
- Ensure the size of the opening is 4 inches.
- Determine the type of connector available (TP24 or E26).
- Thread the appropriate adapter to make the connection in the housing. Ensure the wires are securely attached to the connectors.
- Tuck all wires into the can.
- Line up the trim ring with the opening.
- Push the downlight into the can until secure. The compression clips will hold the retrofit light in place.
- Turn on the circuit breaker and test the light.
Safety warnings
All electrical connections must be in accordance with local and National Electric Code (N.E.C.) standards. Consult a qualified electrician if you are unfamiliar with proper electrical wiring connections. Do not alter, relocate, or remove wiring during installation. Do not make or alter any open holes in an enclosure of wiring or electrical components during kit installation.
Specifications
- Voltage: 120V
- Wattage: 11W
- Suitable for: Damp locations
- Housing material: Polycarbonate
- Weight: 0.33lbs
- Warranty: 7 years
Practical help
Common problems
Fixture is hot
Allow time to cool after turning off the power before removing the previous fixture.
Wires loose
Ensure wires are securely attached to the connectors when threading the adapter into the housing.
Before use
- Turn off the circuit breaker
- Ensure the opening size is 4 inches
- Identify the connector type (TP24 or E26)
Specs in practice
- Suitable for Locations
- Damp locations
Images and diagrams
- The installation involves connecting either a TP24 or E26 adapter to the housing.
- Compression clips are used to secure the light into the can.
Model compatibility
- Requires a 4-inch opening.
- Compatible with TP24 and E26 connectors.

Manual page author
Michael Turner
Technical manual editor
Reviews PDF manuals for structure, safety notes, and practical product details so readers can find the right information quickly.