Garden / Tillers & Cultivators
Operator's Manual for SuperHandy 209CC Engine Tiller
Comprehensive operator's manual for the SuperHandy 209CC Engine Tiller (Model GUO093). Includes detailed assembly instructions, safety guidelines, operation procedures, maintenance schedules, and troubleshooting solutions.
Table of contents
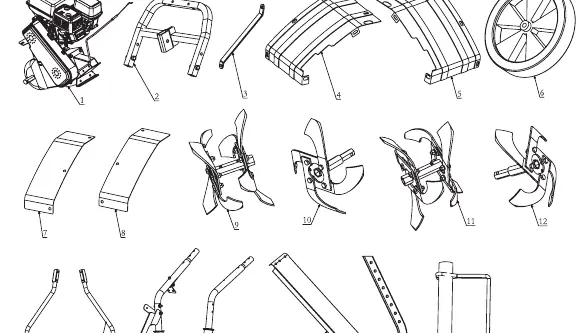
Manual images
Click an image to enlargeQuick guide from the manual
The SuperHandy 209CC Engine Tiller is a gasoline-powered machine designed for soil rototilling. Before operating, ensure the engine and gearbox are filled with oil, as they are shipped drained. Always wear appropriate safety gear, including eye and hearing protection, gloves, and sturdy footwear. Never operate the machine indoors or in poorly ventilated areas due to carbon monoxide hazards.
Safety Guidelines
- Personal Safety: Do not operate under the influence of drugs or alcohol. Wear long pants, boots, and gloves. Keep hair and clothing away from moving parts.
- Fuel Safety: Fuel is highly flammable. Always stop the engine and allow it to cool before refueling. Never refuel indoors.
- Operation Safety: Keep hands and feet away from tilling blades. Do not operate on hard surfaces like concrete. Always park on a solid, level surface.
Assembly Instructions
The tiller comes partially assembled. Follow these steps to complete the setup:
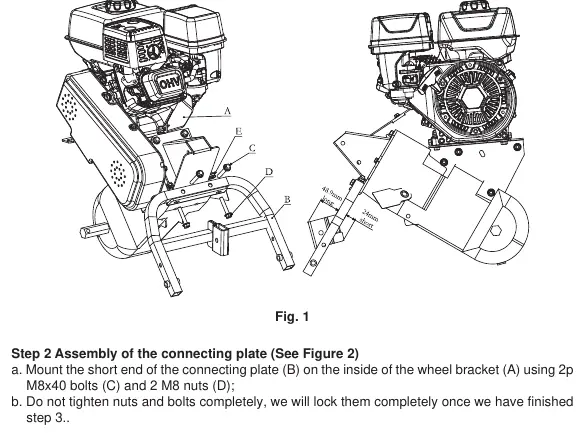
- Step 1-3: Assemble the wheel bracket, connecting plate, and fenders to the engine and frame kit.
- Step 4: Attach the wheels to the wheel bracket using the provided bolts, washers, and nuts.
- Step 5: Install the left and right outer fenders.
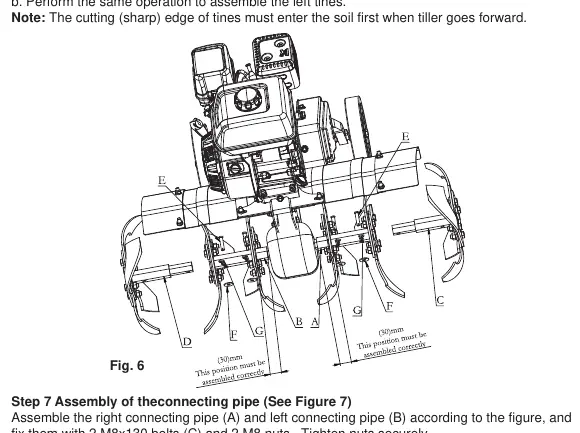
- Step 6: Assemble the tines to the gearbox output shaft, ensuring the sharp edge enters the soil first.
- Step 7: Attach the connecting pipes.
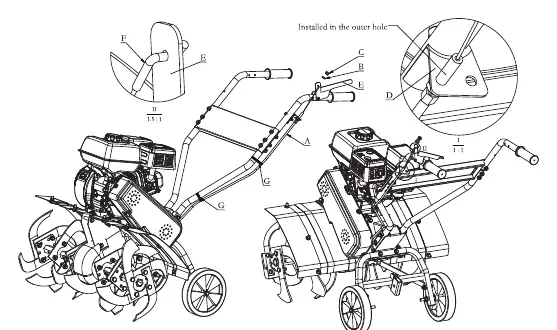
- Step 8: Install the handles and handle fixing plate.
- Step 9: Connect and adjust the clutch cable.
- Step 10: Insert and lock the depth rod.
Operation
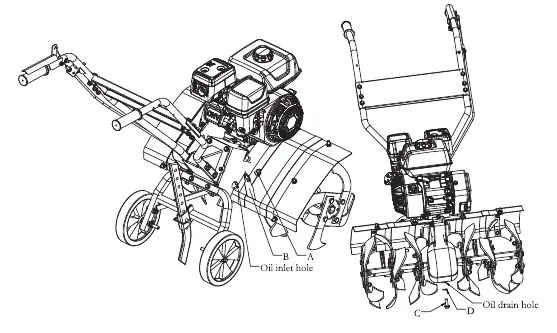
Adding Oil: The engine and gearbox are shipped without oil. You must add engine oil (refer to Engine Manual) and 0.2 gallons of gear oil to the gearbox before starting.
Starting: Move the fuel valve to ON, set the choke to CLOSE (for cold starts), move the throttle 1/3 toward FAST, turn the engine switch to ON, and pull the starter.
Tilling: Set the throttle to FAST for normal tilling. Adjust the depth rod to control tilling depth (7" to 14"). If the machine jumps, allow it to move forward faster; if it digs in one spot, rock the handles side to side.
Maintenance

- Preventive: Keep the machine clean, check for loose hardware, and lubricate moving parts. Do not use a pressure washer.
- V-Belt: Check tension after the first 20 hours and every 50 hours thereafter. Deflection should be 9mm to 13mm.
- Gearbox: Check/refill gear oil each time. Replace gear oil after the first month/90 hours, then every 3 months/50 hours or annually/300 hours.
Troubleshooting
If the engine fails to start, check for disconnected spark plug wire, lack of fuel, or incorrect choke/throttle settings. If the tines do not engage, check for foreign objects, missing clevis pins, or a worn/stretched belt.
Practical help
Common problems
Engine fails to start
Check spark plug wire, fuel level, fuel valve position, and choke setting.
Engine overheats
Check engine oil level, clean air cleaner, and ensure air flow is not restricted.
Tiller moves forward during starting
Ensure the tine clutch control lever is in the neutral position.
Tines do not engage
Check for foreign objects in tines, missing clevis pins, or worn/stretched belt.
Before use
- Fill engine sump with oil (drained for shipping).
- Fill gearbox with 0.2 gal. gear oil (drained for shipping).
- Check fuel level.
- Ensure all nuts, bolts, and fasteners are tightened.
- Check that the spark plug wire is securely connected.
- Clear the work area of debris and ensure good lighting.
Specs in practice
- Displacement
- 209CC engine capacity.
- Tilling Width
- Adjustable between 21 inches and 27 inches.
- Tilling Depth
- Adjustable between 7 inches and 14 inches.
- Product Weight
- 130 lbs.
Images and diagrams
- Figure 1-2: Wheel bracket and connecting plate assembly.
- Figure 6: Tines assembly sequence.
- Figure 9: Clutch cable installation.
- Figure 14: Cable tension adjustment.
- Figure 15: Gearbox oil maintenance points.
Model compatibility
- Use only attachments and accessories approved by the manufacturer.
- Do not use on soil with large stones, roots, or other hard impurities.

Manual page author
David Miller
Documentation analyst
Organizes user manual content into clear summaries, with attention to model details, product context, and everyday usability.