Lighting / Industrial Lighting
Superior Life LED Stealth Fixtures Installation Instructions
Comprehensive installation guide for Superior Life LED Stealth Fixtures. Includes step-by-step mounting instructions for trunnion, slip fitter, and pole configurations, wiring diagrams, and sensor installation procedures.
Table of contents
Manual images
Click an image to enlargeImportant Information
The Superior Life LED Stealth Fixtures require a top-mounted shorting cap or an optional twist-lock photocell to operate. Installation must be performed by a qualified licensed electrician in accordance with the National Electrical Code and local requirements. Ensure the power is disconnected at the fuse or circuit breaker box before beginning any installation or maintenance.
Safety Warnings
- Risk of Fire or Electrical Shock: Turn off electrical power before wiring. Verify supply voltage matches the luminaire label.
- Risk of Injury: Avoid direct eye exposure to the light source while it is on. Keep small parts away from children.
- General Precautions: Do not expose wiring to sharp edges or sheet metal. Do not cover any part of the fixture to prevent overheating. Suitable for wet locations.
Mounting Instructions
The fixtures support multiple mounting configurations. Ensure all connections are capped with UL-approved wire connectors.
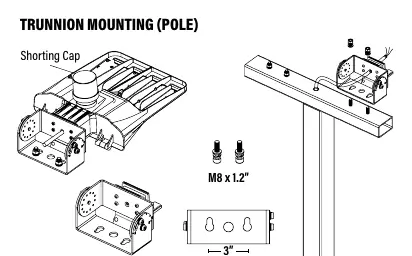
Trunnion Mounting (Pole and Wall)
For pole mounting, use the provided M8 x 1.2 screws. For wall mounting, drill a 0.3-inch hole into the wall and secure using M10 x 2.4 expansion bolts. Place wires into the box and secure the back board of the fixture.
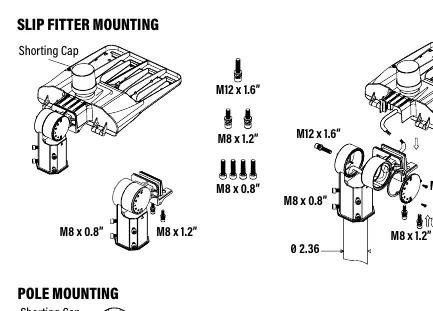
Slip Fitter Mounting
Adjust the fixture angle by rotating the screw 3 times counterclockwise. The fixture can be adjusted between 90-270 degrees (180-degree range). Secure using the provided M12 x 1.6 and M8 x 0.8 screws.
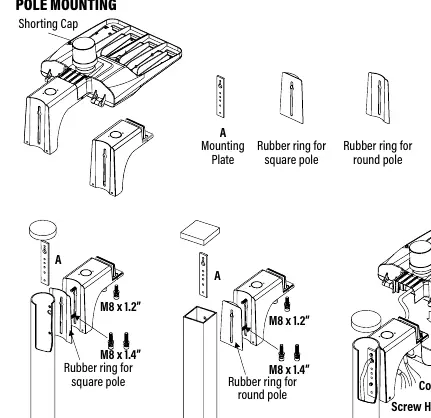
Pole Mounting
Use the appropriate rubber ring for either square or round poles. Secure the mounting plate to the pole using M8 x 1.4 screws, then attach the fixture to the bracket. Ensure the bracket cover is pushed up and fastened securely.
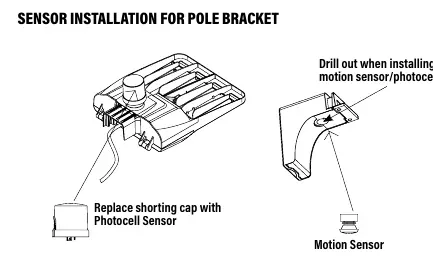
Sensor Installation
To install a motion sensor or photocell, replace the existing shorting cap with the desired sensor unit. Ensure the sensor base is properly connected to the fixture wiring as indicated in the provided diagrams.
Practical help
Common problems
Fixture does not turn on
Ensure the top-mounted shorting cap or an optional twist-lock photocell is correctly installed.
Wiring damage or abrasion
Ensure wiring is not exposed to edges of sheet metal or other sharp objects during installation.
Before use
- Verify that the supply voltage is correct by comparing it with the luminaire label.
- Ensure power is disconnected at the fuse or circuit breaker box.
- Confirm that a qualified licensed electrician is performing the installation.
- Check that all wiring connections are capped with UL-approved wire connectors.
- Ensure the mounting surface is suitable for the fixture type (pole or wall).
Specs in practice
- Shorting Cap
- A required component that completes the circuit if no photocell is installed.
- Wet Locations
- The fixture is rated for outdoor use in environments exposed to rain or moisture.
Images and diagrams
- Trunnion Mounting: Illustrates the hardware required for pole and wall mounting, including bolt sizes.
- Slip Fitter Mounting: Shows the adjustment range (90-270 degrees) and screw locations.
- Pole Mounting: Details the use of rubber rings for square vs. round poles.
- Sensor Installation: Shows the wiring path for photocell and motion sensors.
Model compatibility
- Requires top-mounted shorting cap or optional twist-lock photocell to operate.
- Suitable for wet locations.

Manual page author
Emily Carter
User documentation editor
Prepares concise manual descriptions and highlights the most useful setup, operation, and maintenance information for readers.