Home Appliances / Kitchen Utensils
Thermos Mug, Tumbler, and Hydration Bottle Care and Use Guide
A comprehensive care and use guide for Thermos mugs, tumblers, and hydration bottles. Includes assembly instructions for 360-degree, slide-lock, and hydration lids, cleaning tips, and essential safety warnings.
Quick answers from the manual
Quick answer
- This guide provides instructions for cleaning, assembling, and safely using Thermos mugs, tumblers, and hydration bottles. It covers three lid types: 360 Degree, Slide Lock, and Hydration lids. p. 1, 2
Key actions
- Wash all parts with warm, soapy water before first use. p. 1, 5
- Remove the lid before microwaving the container. p. 2, 6
First start
- Wash all parts with warm, soapy water and allow to dry completely. p. 1, 5
Problems and fixes
Leakage
Ensure gaskets are properly seated and not worn.
p. 2, 3Where to find it in the PDF
- General Care p. 1
- 360 Degree Lid Assembly p. 1
- Slide Lock Lid Assembly p. 2
- Hydration Lid Assembly p. 2
- Warnings p. 2, 3
- Warranty p. 4
Table of contents
Manual images
Click an image to enlargeQuick guide from the manual
This guide covers the care, assembly, and safe usage of various Thermos mugs, tumblers, and hydration bottles. Before first use, wash all parts with warm, soapy water. Do not leave contents in the container for longer than 24 hours. Hand washing is recommended for all parts to ensure thorough cleaning, although many parts are top-rack dishwasher safe.
General Care
To maintain the finish and integrity of your product:
- Wash all parts with warm, soapy water and rinse thoroughly.
- Allow all parts to dry completely before storage.
- Do not use abrasive cleaners, scrubbers, or bleach.
- Do not use sharp utensils inside the container.
- Hand washing is recommended over dishwasher use to prevent damage from harsh detergents and hot water.
Assembly and Use
360 Degree Lid
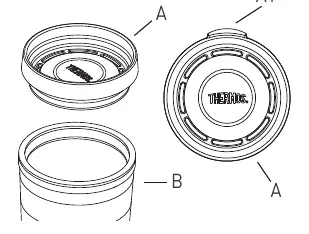
- Remove lid (A) by pushing upwards on tab (A1) at the back.
- Wash lid separately.
- Fill container (B) with contents, leaving space for the lid to avoid overflow.
- Push lid (A) onto the container until secure.
Slide Lock Lid
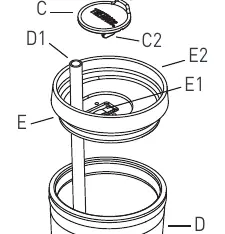
- Remove lid (E) by pushing up on tab (E2).
- Remove slider (C) by squeezing tabs (C2) through the grooves on the underside of the lid.
- Wash parts separately and re-assemble by snapping the slider (C) into place (ensure tab C1 is near the back).
- Fill container (D) and secure lid (E).
- Push slider (C) to expose the drink opening (E1).
Hydration Lid
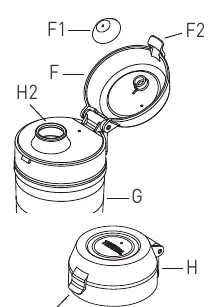
- Remove lid (H) by twisting counterclockwise.
- Open lid cover (F) by pushing up on tab (F2) until locked open.
- Remove spout gasket (F1) and o-ring gasket (H1) for cleaning.
- Wash all parts and re-assemble, ensuring gaskets are properly seated.
- Fill container (G) and secure lid (H) by twisting clockwise.
- Flip lid cover (F) to drink; close firmly after use.
Safety Warnings
- Hot Liquids: Hydration lids and straws are NOT for use with hot liquids. Hot liquids can cause burns.
- Microwave Use: Remove lid before microwaving. Do not microwave for more than 30 seconds at a time. Do not microwave empty containers.
- Carbonated Drinks: Do not use for carbonated drinks or dry ice, as this may cause forceful ejection of the lid or contents.
- Spoilage: If contents are left longer than 24 hours, open with caution. Point the opening away from yourself and others to avoid injury from potential pressure buildup.
Warranty
Thermos L.L.C. provides a one-year limited warranty against defects in material or workmanship. This does not cover ordinary wear and tear, color fading, or damage from abuse, neglect, or improper maintenance. Do not return the product to the retailer; contact Thermos Warranty Service directly at [email protected] or visit www.thermos.com.
Official resources from the manual
Practical help
Common problems
Product leaking
Check that all gaskets (H1, F1) are present, properly seated, and not worn or misaligned.
Container difficult to open
Do not use tools to force the container open. If it cannot be opened by hand, dispose of it at a local waste facility.
Contents spoiled or under pressure
If contents have been stored for over 24 hours, open with extreme caution, pointing the opening away from yourself and others.
Before use
- Wash all parts with warm, soapy water.
- Ensure all gaskets are properly seated.
- Test the temperature of contents before consuming.
- Do not overfill the container; leave space for the lid.
- Check for 'DO NOT MICROWAVE' stickers on decorated containers.
Specs in practice
- Microwave limit
- Do not microwave for more than 30 seconds at a time.
- Storage limit
- Do not leave contents in the container for longer than 24 hours.
Images and diagrams
- 360 Degree Lid: A (lid), A1 (tab), B (container).
- Slide Lock Lid: C (slider), C1 (tab), C2 (tabs), D (container), E (lid), E1 (opening), D1 (straw).
- Hydration Lid: F (cover), F1 (spout gasket), F2 (tab), H (lid), H1 (o-ring gasket), G (container).
Model compatibility
- Hydration lids and straws are for cold liquids only.
- Not all containers are microwave safe; check for specific warnings on the product.

Manual page author
David Miller
Documentation analyst
Organizes user manual content into clear summaries, with attention to model details, product context, and everyday usability.