Lighting / Outdoor Lighting
User Manual for Timeguard LEDMR10WHMS3K 10W LED Wall/Ceiling Light
Quick guide for the Timeguard LEDMR10WHMS3K 10W LED Wall/Ceiling Light with Microwave Sensor. Includes installation steps, wiring diagrams, sensor configuration (Time, Lux, Sensitivity), and troubleshooting tips.
Table of contents
Manual images
Click an image to enlargeQuick Guide from the Manual
This document provides installation and operating instructions for the Timeguard LEDMR10WHMS3K 10W LED Wall/Ceiling Light with Microwave Sensor. Key tasks include mounting the unit at an optimal height of 2.5 meters, wiring the unit according to the provided diagram, and configuring the sensor settings (Time, Lux, and Sensitivity) using a flat-blade screwdriver.
Safety
- Ensure the mains supply is switched off and fuses are removed or the circuit breaker is turned off before installation or maintenance.
- Installation should be performed by a qualified electrician in accordance with current IEE wiring and Building Regulations.
- Ensure the total load on the circuit does not exceed the rating of the circuit cable, fuse, or circuit breaker.
- This is a Class II luminaire and must not be earthed.
Technical Specifications
- Power: 230V AC 50 Hz
- Lamp: 10W LED (Non-replaceable)
- Lumen Output: 800lm
- Colour Temperature: 3000K
- Sensor Frequency: 5.8GHz
- Detection Angle: 360°
- Detection Range: 1 to 8m (radius)
- Time Delay: 10 seconds to 30 minutes
- Dusk Level: 10 to 2000 Lux
- IP Rating: IP44 (suitable for restricted external applications)
- Operating Temperature: -15°C to +45°C
Selecting a Location
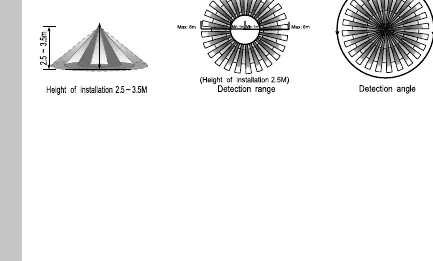
- For optimum performance, mount the unit at a height of 2.5 metres.
- Avoid installing in locations with metal material in front of the sensor, as this will interfere with operation.
- The microwave sensor may exhibit unusual behaviour during extreme weather conditions; this is normal and not a fault.
Installation
- Switch off the mains supply.
- Install an isolating switch to allow for easy maintenance.
- Remove the diffuser by turning it 45 degrees anti-clockwise.
- Select a cable entry point and drill if necessary, ensuring internal components are not damaged.
- Mark and drill mounting holes, ensuring no pipes or cables are behind the surface.
- Secure the mains cable through the entry point using a cable gland or grommet to maintain the IP rating.
- Fix the luminaire to the wall or ceiling.
- Terminate the cable into the terminal block, ensuring correct polarity.
- Set the sensor adjustments (TIME, LUX, SENS) using a thin flat-blade screwdriver.
- Reposition the lens and twist clockwise to close.
Connection Diagram
Connect the 230V AC 50Hz mains supply to the terminals as follows:
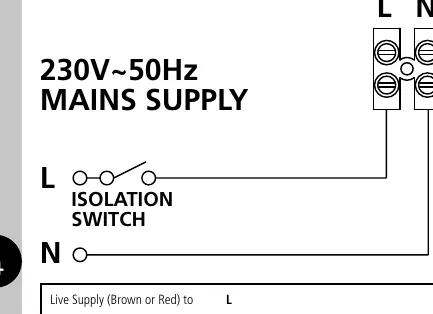
- Live Supply (Brown or Red): Connect to L
- Neutral Supply (Blue or Black): Connect to N
Setting Up
The unit features three adjusters located beneath the diffuser/lens:
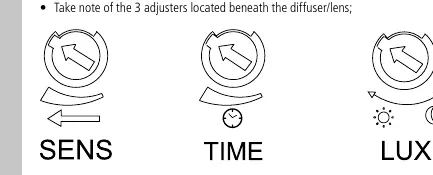
- TIME: Controls how long the light remains ON after motion ceases (10 seconds to 30 minutes).
- LUX: Determines the darkness level required for the unit to operate (10 to 2000 Lux).
- SENS: Determines the detection range (1m to 8m radius).
Walk Test Procedure:
- Turn the power ON. The lamp will illuminate for 2 seconds and extinguish.
- The unit will operate during the day and night for 10 seconds per activation to allow for testing.
- Walk across the detection zone to confirm the sensor coverage.
Troubleshooting
- Light will not switch ON: Check LUX setting, verify mains connection, or replace the fitting if faulty.
- Light is permanently ON: Reduce SENS and TIME settings; check for continuous movement in the zone.
- Light activates without movement: Ensure the unit is mounted securely and check for small objects or hidden movement in the vicinity.
Guarantee
This product includes a 3-year guarantee against defective material or manufacture. For the first year, return to the supplier with proof of purchase. For years 2 and 3, contact the Timeguard helpline at 020 8450 0515.
Practical help
Common problems
Light will not switch ON
Check LUX setting is not set to the wrong level; ensure mains supply is connected and switched ON.
Light is permanently ON
Reduce SENS and TIME control settings; check for continuous movement within the detection zone.
Light activates without noticeable movement
Ensure the unit is mounted securely; check for small objects or movement behind walls/in the immediate vicinity.
Before use
- Ensure mains supply is switched off.
- Consult a qualified electrician for installation.
- Verify mounting height is 2.5m for optimal coverage.
- Check that the total circuit load is within limits.
- Ensure no metal material is in front of the installation location.
Specs in practice
- Detection Range
- Adjustable radius from 1m to 8m.
- Dusk Level (Lux)
- Ambient light threshold for activation, from 10 Lux (dusk) to 2000 Lux (daylight).
Images and diagrams
- Wiring: Connect Live (Brown/Red) to L and Neutral (Blue/Black) to N.
- Detection: 360-degree coverage pattern with a 2.5m mounting height.
Model compatibility
- Class II construction: Do not earth the luminaire.
- Not suitable for installation where metal objects obstruct the sensor.

Manual page author
Emily Carter
User documentation editor
Prepares concise manual descriptions and highlights the most useful setup, operation, and maintenance information for readers.