Industrial / Cooling Units
User Manual for TradeQuip 1031T Portable Industrial Spot Cooling Air Conditioner
Quick guide for the TradeQuip 1031T Portable Industrial Spot Cooling Air Conditioner. Includes installation steps, safety warnings, maintenance tips, and troubleshooting.
Table of contents
Manual images
Click an image to enlargeImportant Information from the Manual
This document provides essential instructions for the safe operation and maintenance of the TradeQuip 1031T Portable Industrial Spot Cooling Air Conditioner. This unit is designed for industrial or trade workshop environments and is not suitable for household use. Always ensure the unit is placed on a level, solid surface and maintains a minimum clearance of 600mm from surrounding objects.
Safety Precautions
Read all instructions before use. Failure to follow these guidelines may result in injury or damage to the equipment.
- Refrigerant R32: This unit uses flammable refrigerant. Only qualified technicians should service the refrigerant loop.
- Electrical Safety: Use a dedicated 10A rated socket. Do not use extension cords unless they are rated for a minimum of 30A. Always disconnect power before maintenance.
- Environment: Do not use in areas with volatile substances, rain, or snow. Operate within a temperature range of 18°C to 45°C.
- Handling: Do not move the unit while it is running. Always set the castor brakes to the locked position during operation.
Installation
Proper installation is required for efficient operation.
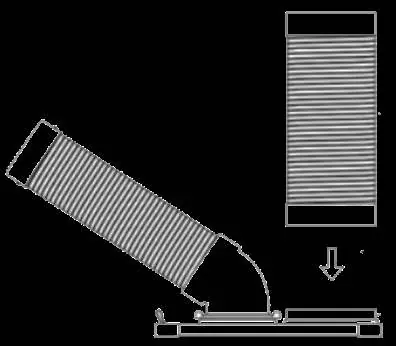

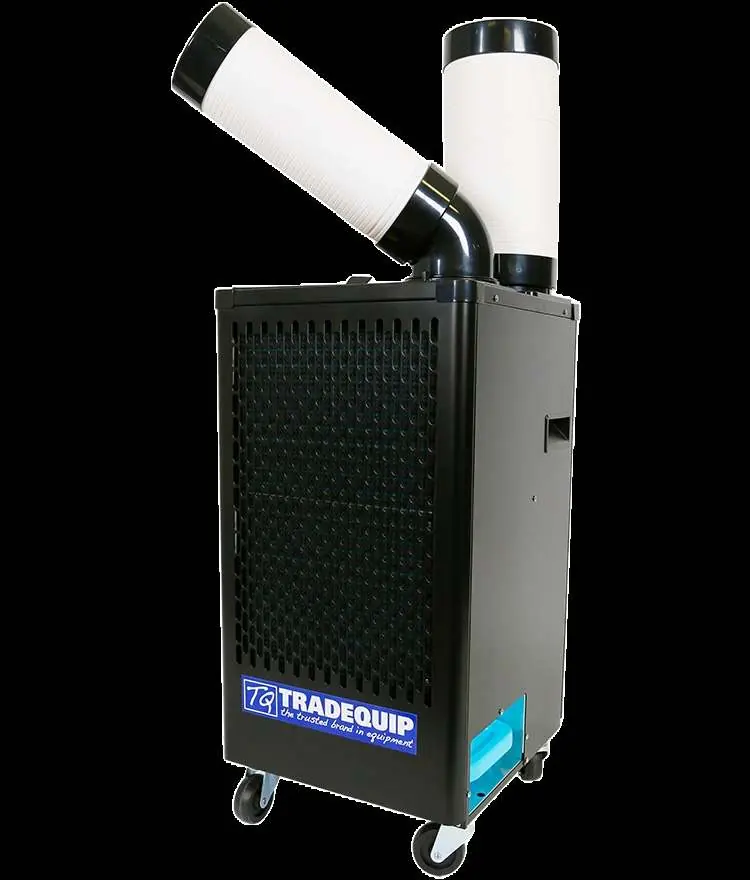
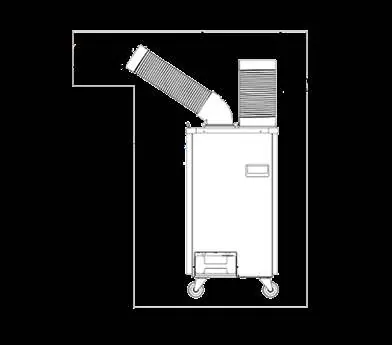
- Elbow Installation: Align the notches in the detachable elbow base on the machine, insert, and rotate anti-clockwise until it locks.
- Cold Vent Duct: Align the notches into the detachable elbow, insert, and rotate left until it locks.
- Hot Exhaust Duct: Insert the hot exhaust duct pipe into the heat vent.
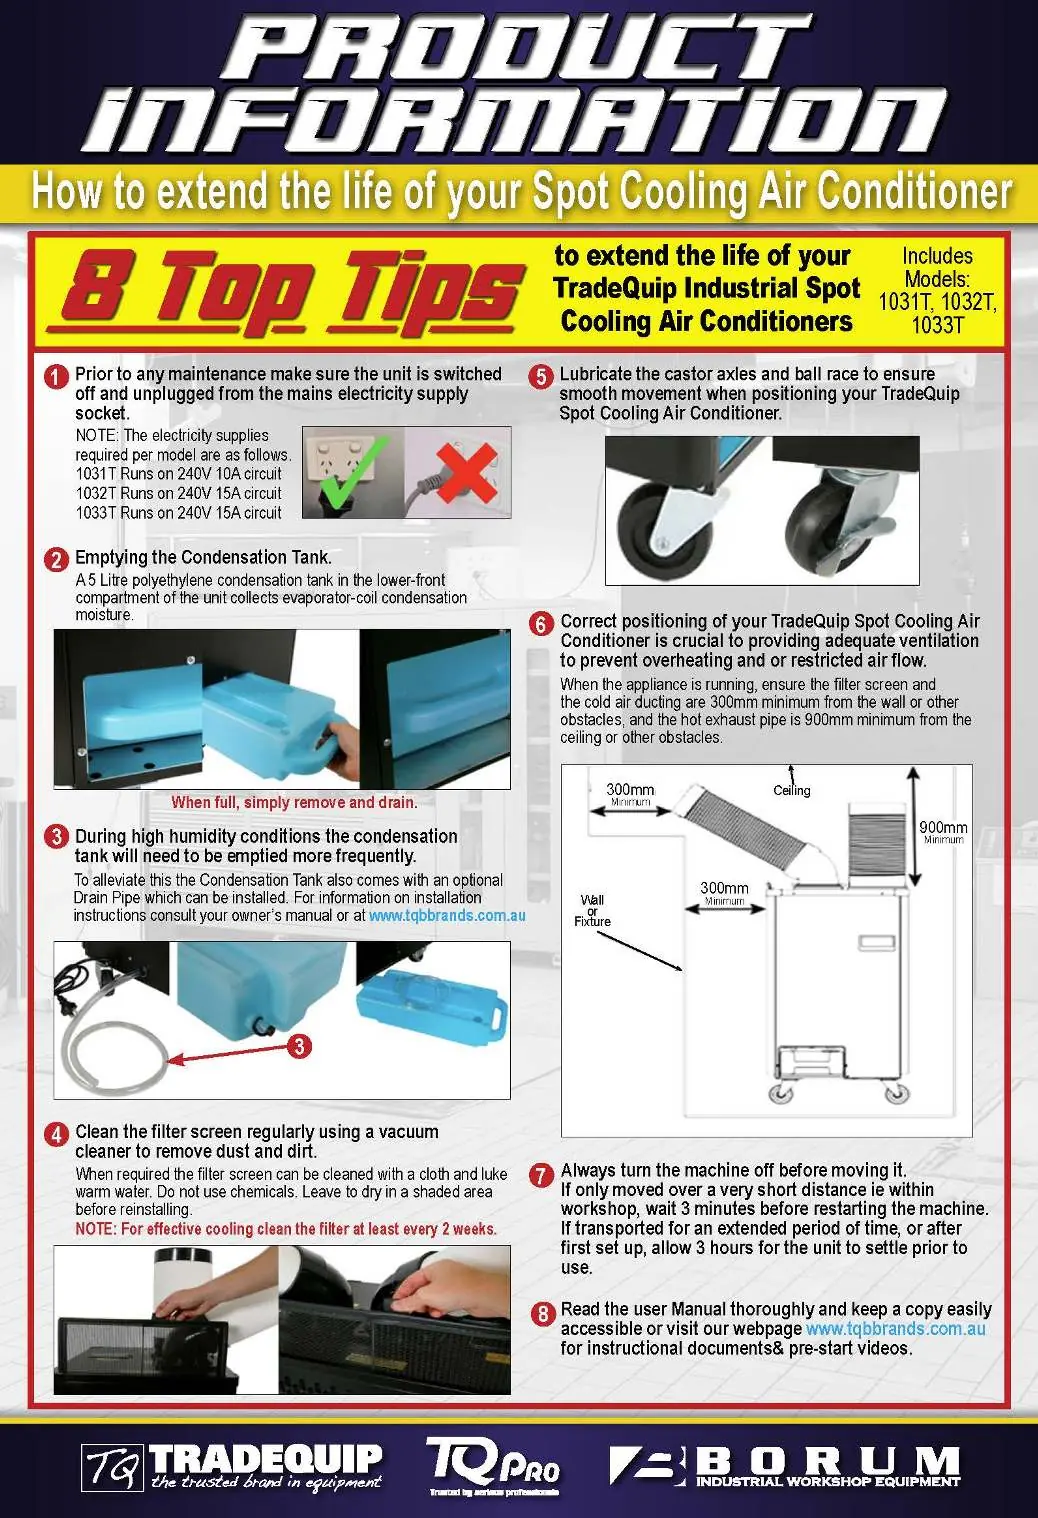
- Clearance: Ensure the filter screen and cold air ducting are at least 300mm from walls or obstacles. The hot exhaust pipe must be at least 900mm from the ceiling or other obstacles.
Operation
Before starting, ensure the unit has been in an upright position for at least 3 hours. Check the power cord and plug for damage.
- Unlock castor wheels and position the unit.
- Check the power cord and plug for dust or damage.
- Rotate the control dial to start the compressor and fan.
- Use the control switch to adjust fan speed (Low/High).
- Rotate the dial to '0' to switch the appliance off.
Maintenance
Regular maintenance ensures longevity and efficiency.
- Filter Screen: Clean regularly using a vacuum cleaner. If necessary, wash with a cloth and lukewarm water. Do not use chemicals. Clean at least every 2 weeks.
- Condensation Tank: The 5L tank collects moisture. When full, remove, drain, and replace. Do not move the machine if the tank is full.
- Storage: Store in a dry, level location in an upright position. Ensure the condensation tank is empty before storage.
Troubleshooting
If the unit fails to operate, check for a loose power cable or a burnt fuse. If water leakage occurs, ensure the drain pipe is not clogged, the water tank is correctly positioned, or the tank is not full. If the compressor overload protector activates, the machine will blow non-refrigerated air; contact a service technician if this happens frequently.
Technical Parameters
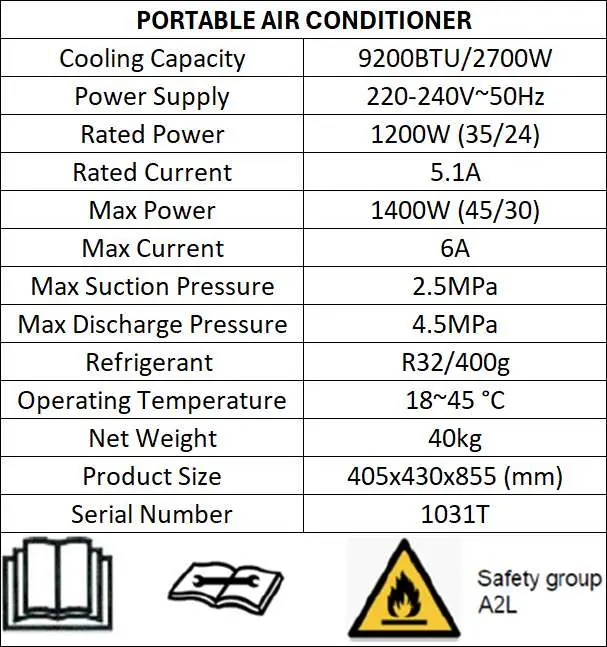
- Cooling Capacity: 9200BTU / 2700W
- Power Supply: 240V / 50Hz / 10A
- Refrigerant: R32 / 400g
- Operating Temperature: 18°C - 45°C
- Weight: 40kg
Manufacturer information
TradeQuip
Practical help
Common problems
Unit will not start
Check if the power cable is loose or if the fuse is burnt. Ensure the power supply is connected.
Water leakage
Check if the drain pipe is clogged, the water tank is full, or if the tank is not positioned correctly.
Compressor not cooling
Check if the heat exchange surface is blocked, external temperature is too high, or if the compressor overload protector has been activated.
Before use
- Inspect for cracked, loose, or missing parts.
- Ensure the unit has been upright for at least 3 hours.
- Verify the power supply is 240V/50Hz/10A.
- Place on a level, solid surface.
- Ensure 600mm clearance in all directions.
- Check that the filter screen is clean.
Specs in practice
- Cooling Capacity
- 9200BTU/2700W, indicating the cooling power of the unit.
- Power Supply
- 240V/50Hz/10A, requires a dedicated 10A rated socket.
Images and diagrams
- The unit features a cold vent duct and a hot exhaust duct that must be installed correctly.
- The condensation tank is located in the lower-front compartment and must be emptied when full.
- The electrical schematic shows the fan motor and compressor connections.
Model compatibility
- Intended for industrial or trade workshop/office environments.
- Not suitable for household use.
- Not suitable for drying clothes or cooling food.

Manual page author
Michael Turner
Technical manual editor
Reviews PDF manuals for structure, safety notes, and practical product details so readers can find the right information quickly.