Toys / Model Accessories
Installation Guide for Traxxas LED Underbody Light Kit
Quick installation guide for the Traxxas LED Underbody Light Kit. Includes step-by-step mounting instructions, wiring diagrams, and tool requirements for models 10590-BLUE, 10590-GRN, 10590-RED, and 10590-WHT.
Table of contents
Manual images
Click an image to enlargeInstallation Overview
This guide provides instructions for installing the Traxxas LED Underbody Light Kit on compatible chassis. Ensure the battery is disconnected before beginning the installation process. Always route wire harnesses away from moving parts and heated surfaces to prevent damage.
Tools Required
- 2.5mm hex wrench
- 2.0mm hex wrench
- 5.5mm nut driver
Kit Contents
- LED underbody light assemblies (left & right)
- 3-volt accessory power supply
- Telemetry expander mount
- LED power harness
- Various screws (3x20mm CCS, 3x23mm CCS, 3x10mm BCS)
- M3x0.5 nylon locknuts
- Zip ties
Installation Steps
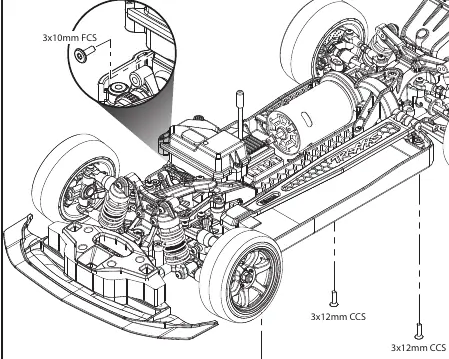
- Remove existing hardware: Remove the 3x12mm CCS (3) from the underside of the chassis and the 3x10mm FCS (1) from the servo. Keep the 3x10mm FCS for reuse in step 2.
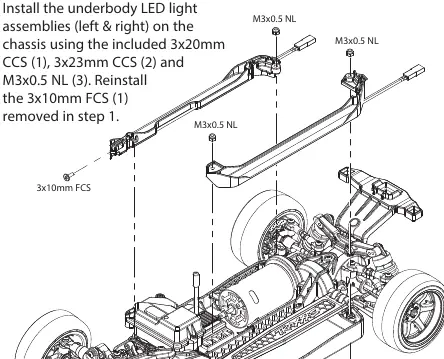
- Install LED assemblies: Mount the left and right LED underbody light assemblies onto the chassis using the included 3x20mm CCS (1), 3x23mm CCS (2), and M3x0.5 NL (3). Reinstall the 3x10mm FCS removed in step 1.
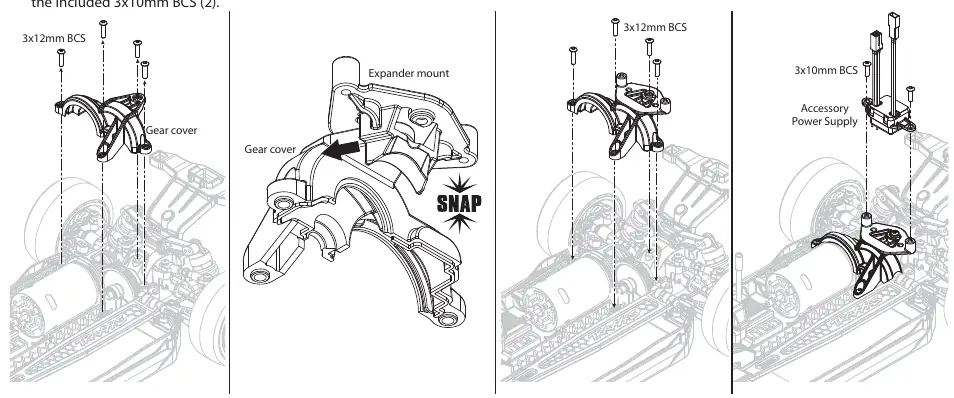
- Install power supply: Install the expander mount on the chassis. Secure the 3-volt accessory power supply onto the expander mount using the included 3x10mm BCS (2).
Wiring and Connections
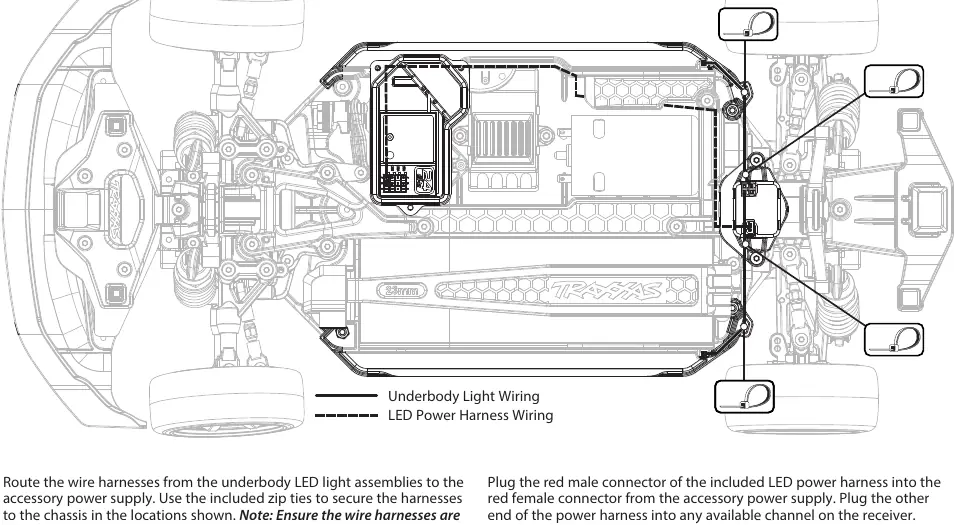
Route the wire harnesses from the LED assemblies to the accessory power supply. Use the provided zip ties to secure the harnesses to the chassis. Plug the black male connectors from the accessory power supply into the black female connectors from the LED assembly wire harnesses. Connect the red male connector of the LED power harness into the red female connector of the accessory power supply, then plug the other end into any available channel on the receiver.
Technical Support
If you have questions or need technical assistance, call Traxxas at 1-888-TRAXXAS (1-888-872-9927) for U.S. residents only. You may also contact support via email at [email protected].
Practical help
Common problems
Lights do not turn on
Ensure the battery is connected and the power harness is plugged into an available channel on the receiver.
Wire harness damage
Ensure wire harnesses are kept away from moving parts and heated surfaces to prevent damage.
Before use
- Verify all kit contents are present
- Ensure you have a 2.5mm hex wrench, 2.0mm hex wrench, and 5.5mm nut driver
- Disconnect the battery before starting installation
Images and diagrams
- The wiring diagram shows the routing path for the LED harnesses along the chassis.
- The diagram indicates where to use zip ties to secure the wiring.
Model compatibility
- Compatible with Traxxas models requiring the 10590 series LED kit (10590-BLUE, 10590-GRN, 10590-RED, 10590-WHT).

Manual page author
Emily Carter
User documentation editor
Prepares concise manual descriptions and highlights the most useful setup, operation, and maintenance information for readers.