Toys / Model Accessories
Installation Guide for Traxxas 10998-GRN LED Underbody Light Kit
Quick installation guide for the Traxxas 10998-GRN LED Underbody Light Kit. Includes step-by-step mounting instructions, wiring diagrams, and connection procedures for your RC vehicle.
Table of contents
Manual images
Click an image to enlargeQuick Installation Overview
This guide provides instructions for installing the LED Underbody Light Kit on your Traxxas vehicle. The kit includes the LED nerf bar assemblies, a 3-volt accessory power supply, and the necessary wiring harnesses. Ensure you have a 2.5mm hex wrench before beginning.
Kit Contents and Tools
- LED nerf bar underbody light assemblies (left & right)
- 3-volt accessory power supply
- LED power harness
- Power Y-harness
- 3x12mm cap screws (2)
- Zip ties (4)
- Y-Harness Splitter
- Tools needed: 2.5mm hex wrench
Installation Steps
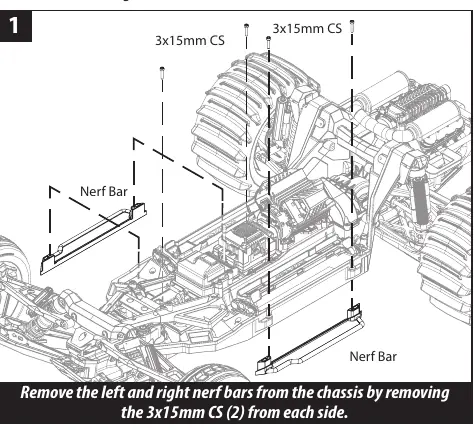
- Remove Nerf Bars: Remove the left and right nerf bars from the chassis by removing the 3x15mm cap screws (2) from each side.
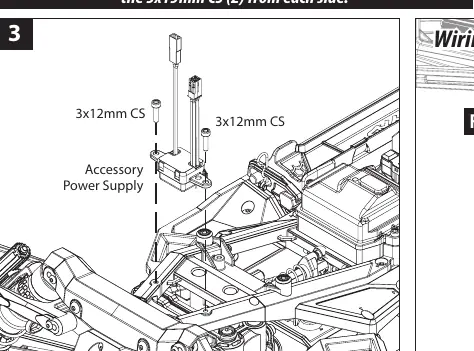
- Install Power Supply: Install the included 3-volt Accessory Power Supply on the front chassis top brace using the included 3x12mm cap screws (2).
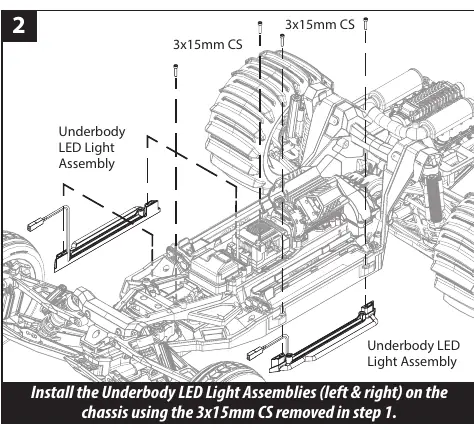
- Install Light Assemblies: Install the Underbody LED Light Assemblies (left & right) on the chassis using the 3x15mm cap screws removed in step 1.
Wiring and Connections
Follow these steps to connect the lighting system to your vehicle's receiver:
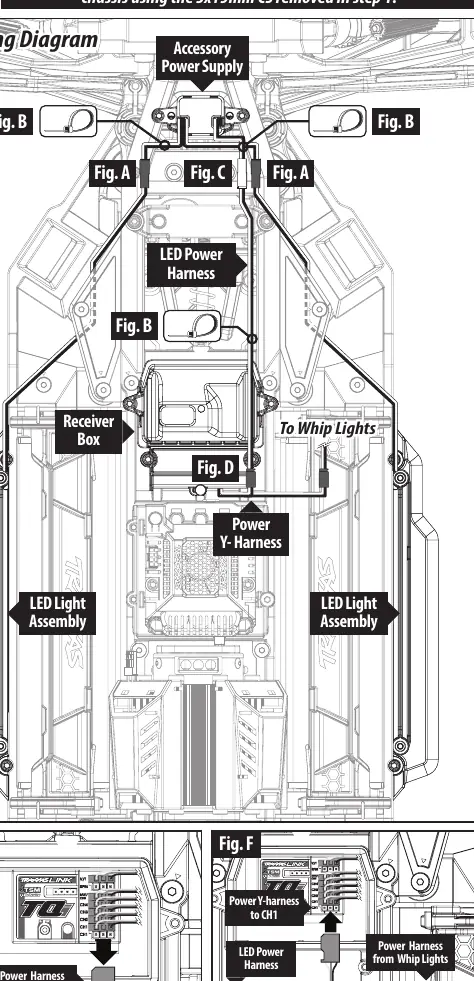
- Fig. A: Plug the male connectors from the Accessory Power Supply into the female connectors from the underbody LED light assembly wires.
- Fig. B: Use the included zip ties to secure the wires to the chassis. Ensure wires are kept away from moving parts and heated surfaces.
- Fig. C: Plug the red male connector from the LED Power Harness into the red female connector from the Accessory Power Supply.
- Fig. D: Plug the other end of the LED Power Harness into the included Power Y-harness.
- Fig. E & F: Remove the connector from the CH1 port of the receiver. Plug the Power Y-Harness into the CH1 port of the receiver. Do not use the RPM port. Plug the previously removed connector from the CH1 port into the Power Y-harness.
The accessory power supply and LED underbody lights will turn on when the electronic speed control is turned on. Always disconnect the battery when not in use.
Compatibility
If you have already installed or plan to install the Shock-Mounted Underbody Lights (Part #10999), use the included Y-harness to leave one male connector from the Accessory Power Supply available for the Shock-Mounted Underbody Lights.
Practical help
Common problems
Lights do not turn on
Ensure the Power Y-Harness is correctly connected to the CH1 port of the receiver and the battery is connected.
Wires interfering with vehicle movement
Use the included zip ties to secure all wires to the chassis, ensuring they are away from moving parts and heated surfaces.
Before use
- Verify you have a 2.5mm hex wrench.
- Disconnect the battery from the vehicle before starting installation.
- Check that all kit contents are present (LED assemblies, power supply, harnesses, screws, zip ties).
- Identify the CH1 port on your receiver.
Specs in practice
- 3-volt accessory power supply
- The voltage rating for the included power module.
Images and diagrams
- The wiring diagram illustrates the connection path from the Accessory Power Supply, through the LED Power Harness and Power Y-Harness, to the receiver's CH1 port.
- The diagram highlights the specific mounting locations for the power supply and light assemblies.
Model compatibility
- Compatible with Shock-Mounted Underbody Lights (Part #10999). Use the included Y-harness to connect both systems.

Manual page author
Emily Carter
User documentation editor
Prepares concise manual descriptions and highlights the most useful setup, operation, and maintenance information for readers.