Power / Energy Storage Systems
User Manual for TWS FlexiBlock 12V 100Ah Lite Battery
Quick guide for the TWS FlexiBlock 12V 100Ah Lite battery. Learn about installation, parallel and series connections, LED status indicators, maintenance, and troubleshooting.
Table of contents
Manual images
Click an image to enlargeQuick Guide
The TWS FlexiBlock 12V 100Ah Lite is a LiFePO4 battery designed for motive and stationary applications. It features an integrated Battery Management System (BMS) for protection, IP67 water and dust resistance, and supports both parallel and series configurations. Always ensure the battery is fully charged before initial use and handle with care.
What's in the Box
- 1x TWS FlexiBlock Battery
- 2x Power Cables
- 2x M8 Bolts
- Communication Cables
Battery Installation
Safety Warnings: Do not install or service unless trained. Verify polarity before wiring to avoid damage. Use a torque of 9 N.m for cable connections.
Single Battery
Install the CAN impedance matching connector and identify the battery terminals (P+ and P-).
Parallel Connection (Max 8 units)
- Place all batteries as required.
- Install the CAN impedance matching connector on the last battery in the chain.
- Connect communication cables between all batteries.
- Trigger the system to assign IDs: Select the master battery and press the Key button for at least 5 seconds until the LED blinks.
- Wait for the system to complete the setup (all LEDs flash 3 times).
- Connect the positive/negative parallel wires to the P+/P- terminals.
Series Connection (Max 3 units)
- Ensure all batteries are fully charged to 100% SOC before connecting.
- Install the CAN impedance matching connector on the last battery.
- Connect communication cables.
- Trigger the system to assign IDs (press Key button for 5 seconds).
- Connect the positive/negative series harness.
Battery Operation
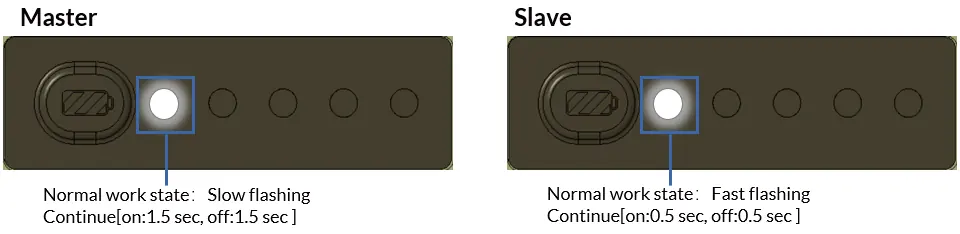
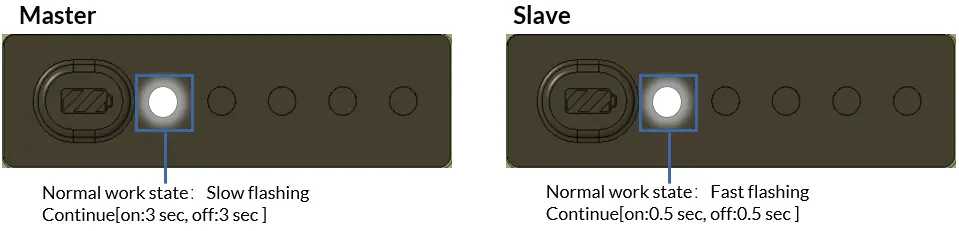
The battery features a Key button and LED indicators for SOC (State of Charge) and working status. Pressing the Key button triggers all batteries to display their SOC. Master and Slave batteries are identified by their blinking patterns during normal operation.

Maintenance and Disposal
- Storage: Store in a dry, well-ventilated area (15-25°C). If stored for long periods, keep at 60% SOC and discharge/recharge every 3 months.
- Temperature: Do not charge, discharge, or heat the battery if the temperature is at or below -20°C.
- Disposal: Do not place in ordinary garbage. Dispose of via a specialized battery recycling company.
Troubleshooting
If a protection alert is triggered, disconnect the battery and wait before restarting.
- Key button does not trigger LED: Charge the battery immediately (over-discharge).
- Cannot charge below -10°C: Connect the charger and wait 5-10s; the battery will automatically heat up to -7°C.
- No output in extreme temps: Disconnect the load and let the battery cool/warm; it will recover automatically.
- Short circuit: Remove the short circuit and wait 60 seconds for automatic recovery.
Specifications
- Nominal Voltage: 12.8V
- Nominal Capacity: 100Ah
- Ingress Protection: IP67
- Weight: 12.9 ± 0.1 kg
- Cycle Life: 6000 cycles (Retention ≥ 70%)
Practical help
Common problems
Key button does not trigger LED display
The battery is over-discharged. Please charge the battery immediately.
Cannot charge below -10°C
Connect the charger and wait 5-10 seconds. The battery will automatically heat up to -7°C to enable charging.
No output in high/low temperature environments
Disconnect the battery from the load and let it cool or warm up. It will recover automatically.
Battery short circuit occurs
Immediately remove the short circuit and wait 60 seconds for automatic recovery.
Before use
- Check battery and accessories for damage upon opening.
- Verify electrical specifications are compatible with your system.
- Ensure battery is fully charged to 100% SOC before series connection.
- Prepare a torque wrench (9 N.m recommended for terminals).
- Keep the battery away from flame and liquid.
Specs in practice
- Nominal Voltage
- 12.8V
- Nominal Capacity
- 100Ah
- Ingress Protection
- IP67 (Water and dust proof)
Images and diagrams
- Master battery: Slow flashing LED (1.5s on/off).
- Slave battery: Fast flashing LED (0.5s on/off).
- CAN connector: Must be installed on the last battery in a parallel or series chain.
Model compatibility
- Parallel connection: Max 8 units.
- Series connection: Max 3 units.
- Do not mix different battery models (e.g., 5kWh and 2kWh) in parallel.

Manual page author
Emily Carter
User documentation editor
Prepares concise manual descriptions and highlights the most useful setup, operation, and maintenance information for readers.