Automotive / Lighting Accessories
User Manual for VEVOR Automotive Tail Light Assemblies 03SDBTBK/03SDBTRD
Quick guide for installing and maintaining VEVOR Automotive Tail Light Assemblies (models 03SDBTBK and 03SDBTRD). Includes step-by-step replacement instructions, compatibility details, and troubleshooting for condensation.
Table of contents
Manual images
Click an image to enlargeQuick guide from the manual
This document provides instructions for the installation and maintenance of VEVOR Automotive Tail Light Assemblies. Important: The original reversing lamps from your vehicle must be retained and installed on the new light assembly, as they are not included with this product. Professional installation at a car modification service shop is highly recommended.
Safety Precautions
- Wear ANSI-approved safety goggles and heavy-duty work gloves during assembly.
- Keep the assembly area clean, well-lit, and free of bystanders.
- Do not attempt assembly if tired or under the influence of alcohol, drugs, or medication.
- Ensure the product is properly and completely assembled before use.
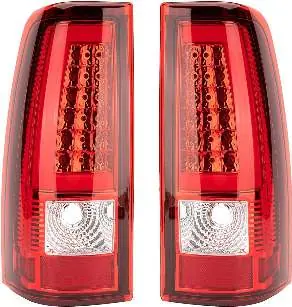
Specifications and Compatibility
Specifications:
- Material: PC+PMMA
- Rating: DC12V
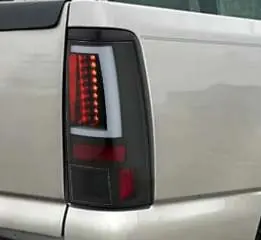
- Light Source: LED
- Position: RH/LH
Suitable Vehicles:
- 2003-2006 Chevrolet Silverado 1500, 1500 HD
- 2003-2006 Chevrolet Silverado 2500, 2500 HD
- 2004-2006 Chevrolet Silverado 3500
- 2007-2007 Chevy Classic (2-Door Regular Cab, 4-Door Extra Cab, 4-Door Crew Cab)
Installation Guide
The installation procedure for the RH side is the same as for the LH side.
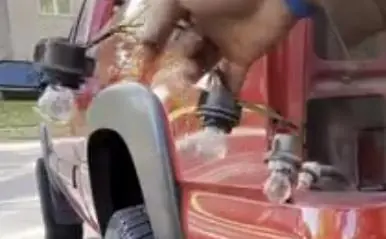
Step 1: Remove Existing Tail Light
- Open the tailgate and remove the 2 mounting screws.
- Remove the original factory taillight assembly and all taillight sockets and bulbs.
- Remove all light bulbs from the old assembly, but keep the original reversing light bulb to install on the new unit.
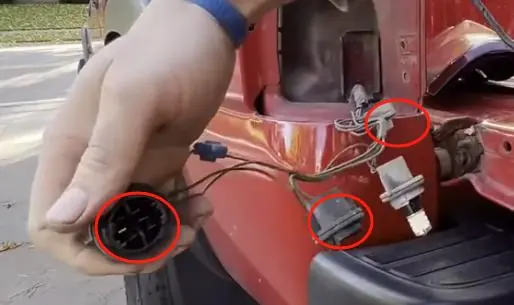
Step 2: Install the New Taillight
- Connect the harness terminal of the new light to the terminal block of the car (excluding the original reverse bulb).
- Screw the harness terminal base into the lamp house.
- Connect the taillight harness and seat the new taillight assembly into place.
- Test the light to ensure everything works correctly.
- Reinstall the 2 mounting screws.
Troubleshooting
If you experience condensation in the taillights, follow these steps:
- Large temperature changes: Check that all vents are free from blockages. Turn on the lights for 20 minutes to raise the temperature and evaporate condensation.
- Leaking seals: Remove bulbs to allow moisture to evaporate. Use a hairdryer to speed up the process.
- Persistent moisture: If seals on bulb sockets are leaking, place a moisture-absorbing silica-gel desiccant packet inside the taillight.
Manufacturer information
VEVOR
Practical help
Common problems
Condensation inside the taillight
Check vents for blockages, run lights for 20 minutes to evaporate moisture, or use a silica-gel desiccant packet.
Moisture due to leaking seals
Remove bulbs to allow moisture to evaporate, use a hairdryer to dry the housing, and ensure seals are properly seated.
Before use
- Wear ANSI-approved safety goggles.
- Wear heavy-duty work gloves.
- Ensure the assembly area is clean and well-lit.
- Keep bystanders away from the work area.
- Verify vehicle compatibility (2003-2007 Chevy Silverado/Classic).
- Retain the original reversing light bulb from the old assembly.
Specs in practice
- Light Source
- LED technology.
Images and diagrams
- The manual provides visual steps for removing the two mounting screws on the tailgate.
- Illustrations show the harness connection process and where to seat the new assembly.
- Images demonstrate the removal of the original factory assembly.
Model compatibility
- Compatible with 2003-2006 Chevrolet Silverado 1500, 1500 HD, 2500, 2500 HD, 3500.
- Compatible with 2007 Chevy Classic.
- Original reversing lamp must be retained and installed on the new light assembly.

Manual page author
Michael Turner
Technical manual editor
Reviews PDF manuals for structure, safety notes, and practical product details so readers can find the right information quickly.