Automotive / Lighting Accessories
User Manual for Vevor 15YKL Automotive Tail Light Assemblies
Get started with your Vevor 15YKL Automotive Tail Light Assemblies. This guide covers installation steps for GMC Yukon 2015-2020, troubleshooting condensation issues, and safety precautions.
Table of contents
Manual images
Click an image to enlargeQuick Guide
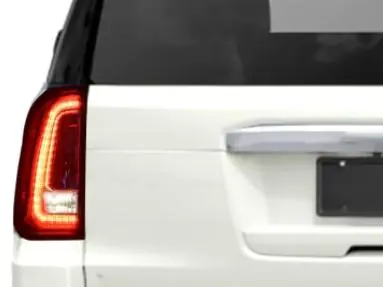
This manual provides instructions for the installation and maintenance of the Vevor 15YKL Automotive Tail Light Assemblies. The product is designed for the GMC Yukon (2015-2020). It is highly recommended to have the installation performed by a professional car modification service shop. Always ensure the vehicle is off and the area is safe before beginning.
Safety Precautions
- Read and understand the entire manual before operating or servicing.
- Keep children away from the product; it is not a toy.
- Wear ANSI-approved safety goggles and heavy-duty work gloves during assembly.
- Keep the assembly area clean, well-lit, and free of bystanders.
- Do not attempt assembly if tired or under the influence of alcohol, drugs, or medication.
Specifications
- Model: 15YKL
- Material: ABS+PC+PMMA
- Rating: DC12V
- Position: LH (Left Hand)
- Color: Red
- Light Source: LED and Halogen lamp
- Compatibility: GMC Yukon 2015-2020
Package List
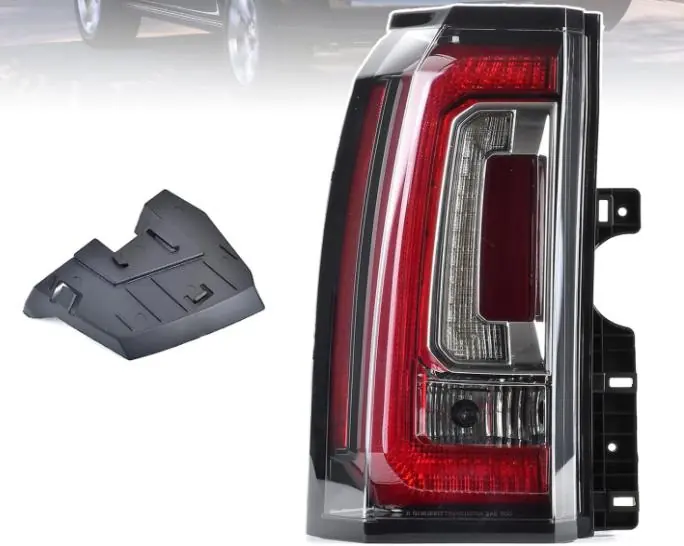
- Tail Light Assemblies (x1)
- Manual (x1)
- Bracket (x1)
Installation Procedure
Step 1: Remove Existing Tail Light
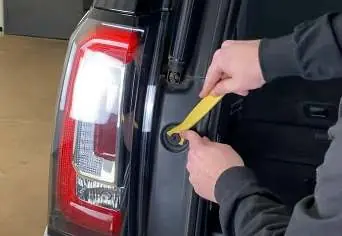
- Remove the retainer clip. If you do not have a trim removal tool, a claw hammer may be used carefully.
- Remove the panel covering the assembly.
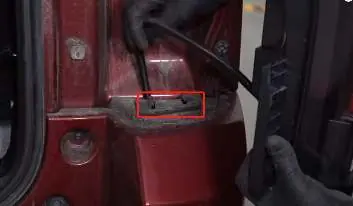
- Remove the two screws; the assembly should slide off.
- Locate the connector underneath the vehicle near the back bumper. Use a pick or screwdriver to push back the lock tab and disconnect the wiring harness.
Step 2: Install the New Taillight
- Connect the new taillight harness. Ensure the tab on the bottom lines up with the bottom of the vehicle and the two pins on the side are aligned. Push firmly until fully seated.
- Reinstall the two screws and tighten them securely.
- Replace the cover, lock it in place, and reinsert the retainer clip.
- Reconnect the connector, ensuring it clicks into place, then push down on the lock. Test the lights before finalizing.
Troubleshooting
If you experience condensation in the taillights, check the following:
- Temperature Changes: Ensure all vents are free from blockages. Turn on the lights for 20 minutes to raise the temperature and evaporate condensation.
- Leaking Seals: If seals on bulbs or sockets are leaking, remove the bulbs to allow moisture to evaporate. You may use a hairdryer to speed up the process.
- Moisture Accumulation: If hot air turns into moisture, consider placing a moisture-absorbing silica-gel desiccant packet inside the taillight housing.
Contact Information
Sanven Technology Ltd. Address: Suite 250, 9166 Anaheim Place, Rancho Cucamonga, CA 91730
Manufacturer information
VEVOR
Practical help
Common problems
Condensation in taillight due to temperature changes
Ensure vents are clear and turn on lights for 20 minutes to evaporate moisture.
Moisture due to leaking seals
Remove bulbs to allow moisture to evaporate; use a hairdryer to speed up the process.
Persistent moisture
Place a moisture-absorbing silica-gel desiccant packet inside the taillight housing.
Before use
- Verify vehicle compatibility (GMC Yukon 2015-2020).
- Wear ANSI-approved safety goggles.
- Wear heavy-duty work gloves.
- Ensure the work area is clean and well-lit.
- Have a trim removal tool or claw hammer ready.
Images and diagrams
- The manual provides visual steps for removing the retainer clip, panel, and screws.
- Visuals illustrate the location of the wiring harness connector underneath the vehicle.
- Images show the alignment of the harness pins and the locking mechanism for the connector.
Model compatibility
- Compatible with GMC Yukon 2015-2020 models.
- The installation procedure for the RH (Right Hand) side is the same as the LH (Left Hand) side.

Manual page author
Michael Turner
Technical manual editor
Reviews PDF manuals for structure, safety notes, and practical product details so readers can find the right information quickly.