Automotive / Motorcycle Accessories
Vevor Outboard Propeller Installation Guide
Learn how to install and maintain your Vevor outboard propeller. This guide covers safety precautions, compatibility with Yamaha engines, and step-by-step installation instructions.
Table of contents
Manual images
Click an image to enlargeQuick guide from the manual
This document provides installation instructions for Vevor pressed-in type outboard propellers. Before starting, ensure the engine is in neutral, the ignition is off, and spark plug leads or ignition coil leads are removed to prevent accidental starting. This manual covers the installation process and compatibility for specific Yamaha engine models.
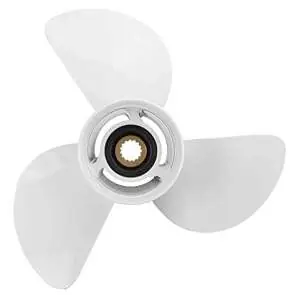
Product Overview
The propeller is constructed from sturdy aluminum alloy with a built-in rubber hub designed for cushioning and protecting the engine gearbox and driveshaft. Larger diameters provide more control and power, while higher pitch increases the top speed of the boat.

Product Parameters
- 3x13-1/2x15-W: 13 1/2 Diameter, 15 Pitch, 15 Tooth Splines
- 3x14x11-W: 14 Diameter, 11 Pitch, 15 Tooth Splines
- 3x13-1/4x17-W: 13 1/4 Diameter, 17 Pitch, 15 Tooth Splines
Compatibility
These propellers are suitable for specific Yamaha engines with a 4-1/4" gearcase, ranging from 50-130HP. Compatible models include various T50, 60hp, 70hp, F70, 75hp, F75, 80hp, F80, 85hp, 90hp, F90, F100, 115hp, F115, and 130hp engines produced from 1984 onwards.
Installation Methods
- Uninstall the existing old propeller from the engine shaft. Remove the split pin, flat washer (if present), spacer, and the old propeller. Keep the thrust washer on the shaft.
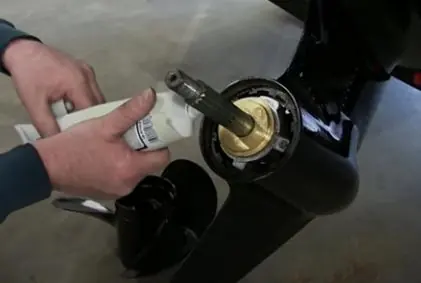
- Grease the propeller shaft.
- Slide the new propeller onto the shaft.
- Place the spacer (use your existing spacer) on the propeller over the shaft.
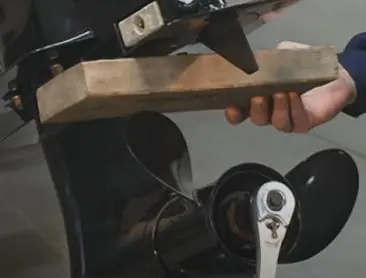
- Tighten the nut (use your existing nut) and install the split pin. Consult your engine/drive manual for the proper torque specifications.
Manufacturer information
VEVOR
Practical help
Common problems
Missing hardware
The propeller kit does not include the spacer or nut; you must reuse your original factory accessories.
Compatibility
Verify your engine model and gearcase size (4-1/4 inch) against the compatibility list provided in the manual.
Before use
- Shift engine into neutral position
- Turn ignition off
- Remove spark plug leads or ignition coil leads
- Inspect propeller for damage before installation
Specs in practice
- Tooth Splines
- Number of splines connecting the propeller to the driveshaft.
Images and diagrams
- The manual includes photos showing the greasing of the propeller shaft.
- Visual steps demonstrate sliding the propeller onto the shaft and tightening the nut.
Model compatibility
- Designed for Yamaha engines with 4-1/4 inch gearcase.
- Compatible with 50-130HP engines.

Manual page author
Emily Carter
User documentation editor
Prepares concise manual descriptions and highlights the most useful setup, operation, and maintenance information for readers.