Lighting / Fixtures
Installation Guide for VIZULO Heron LED Exterior Luminaire
Quick installation and maintenance guide for the VIZULO Heron LED exterior luminaire, including mounting steps, electrical connection diagrams, and safety requirements.
Table of contents
Manual images
Jump to the sectionQuick guide from the manual
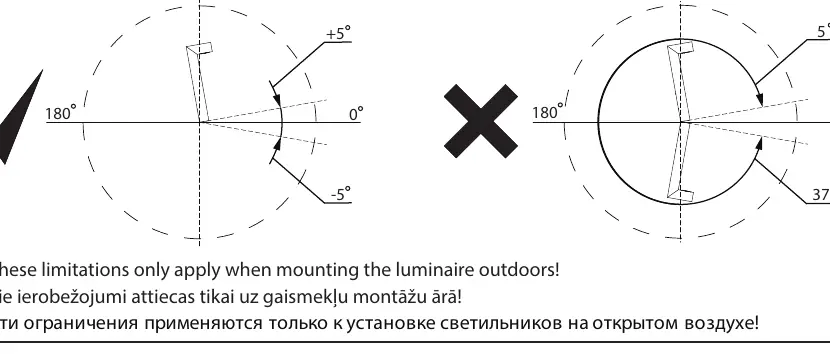
This document provides essential installation and maintenance instructions for the VIZULO Heron LED exterior luminaire. The luminaire is designed for outdoor use and must be installed by a qualified, certified person in accordance with national safety regulations. Key limitations include strict mounting angles (within +/- 5 degrees relative to the ground) and a prohibition on installation during precipitation.
Mounting and installation
The luminaire can be mounted with or without a flange. The luminaire itself can serve as a stencil for marking mounting holes. The installation process involves:
- Drilling holes of the specified diameter into a concrete base.
- Inserting wedge screws into the concrete.
- Placing the luminaire onto the screws and securing it with nuts.
- Unscrewing the back panel to access the electrical connection area.
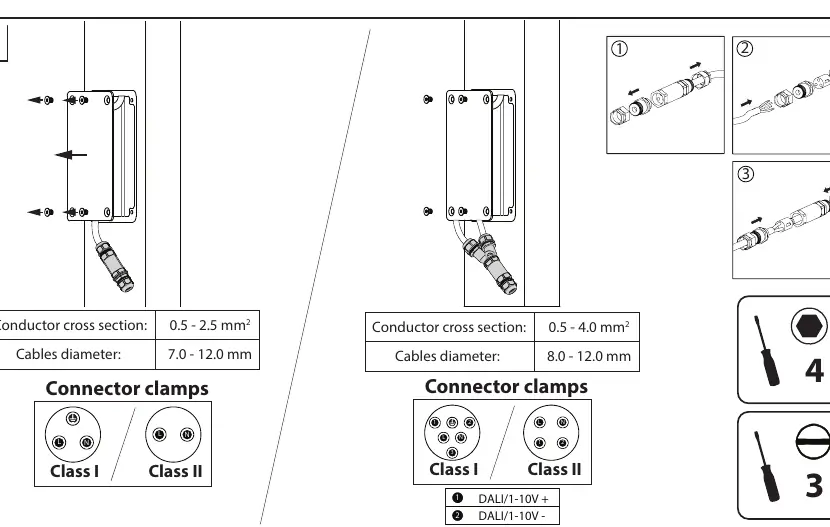
Electrical connection
Ensure the luminaire is disconnected from the electrical grid before opening or performing any work. The connection area supports conductor cross-sections of 0.5 - 2.5 mm² or 0.5 - 4.0 mm² depending on the configuration, with cable diameters between 7.0 - 12.0 mm or 8.0 - 12.0 mm. Ensure correct wiring for Class I or Class II configurations as indicated on the connector clamps.
Safety and maintenance
Do not touch LED modules or place tools on them, as physical damage voids the warranty. The luminaire should be cleaned only with a damp cloth or sponge using diluted household detergent. Spare parts, including LED modules, lenses, and drivers, must be VIZULO-authorized and ordered based on the information found on the luminaire label. It is recommended to perform component replacements indoors to prevent water ingress.
Practical help
Common problems
Warranty voided
Warranty is void if installed during precipitation, if unauthorized control systems/drivers are used, if mounted at incorrect angles, or if LED modules are physically damaged.
Water ingress during repair
It is advised to perform component replacements (LED modules, lenses, drivers) indoors to avoid water entering the luminaire.
Before use
- Verify the luminaire is in good technical condition.
- Study the label containing technical parameters before starting work.
- Ensure the mounting location allows for the correct angle (+/- 5 degrees).
- Confirm the power supply matches the 220-240V AC requirement.
- Ensure the installer is a qualified and certified person.
Specs in practice
- Operating Temperature
- Min -40°C, Max +50°C (or +35°C depending on configuration).
Images and diagrams
- The mounting angle must be within +/- 5 degrees relative to the ground.
- The luminaire base can be used as a stencil for drilling holes.
- Electrical connection requires opening the back panel and following the specific Class I or Class II wiring diagram.
Model compatibility
- Only use VIZULO authorized spare parts and accessories.
- Ensure the control system is authorized by VIZULO.

Manual page author
Emily Carter
User documentation editor
Prepares concise manual descriptions and highlights the most useful setup, operation, and maintenance information for readers.