Garden / Lawn Mower Accessories
Installation Guide for Xtreme Mulch Kits 19A30046 and 19A30047
Installation guide for Xtreme mulch kits 19A30046 and 19A30047. Includes step-by-step instructions for blade replacement and mulch plug installation for 42-inch and 46-inch mower decks.
Quick answers from the manual
Quick answer
- This manual provides installation instructions for Xtreme Mulch Kits 19A30046 and 19A30047 on 42-inch and 46-inch mower decks. p. 1
Key actions
- Blade installation p. 1
- Mulch plug installation p. 1
Technical specifications
| Parameter | Value | Meaning | Pages |
|---|---|---|---|
| Torque | 70-90 ft-lbs (95-122 N-m) | Tightening torque for blade hex nut | p. 1 |
Where to find it in the PDF
- Installation Instructions p. 1
Table of contents
Manual images
Click an image to enlargeQuick guide from the manual
This document provides installation instructions for Xtreme Mulch Kits 19A30046 and 19A30047. These kits are designed for 42-inch and 46-inch two-blade cutting decks with "S" shaped spindles. Always refer to your tractor's Operator's Manual for deck removal procedures and compatibility verification.
Safety Precautions
- Park the tractor on a firm, level surface.
- Set the parking brake.
- Place the PTO in the disengaged (OFF) position.
- Stop the tractor's motor and remove the ignition key to prevent unintended starting.
- Always wear heavy leather work gloves when handling cutting blades to prevent injury.
Blade Installation
1. Remove the deck from beneath the tractor and gently flip it over to expose the underside.
2. Use a 15/16" wrench to hold the hex nut on top of the spindle assembly while loosening the hex nut and washer securing the blade. A block of wood may be placed between the deck housing and the cutting edge of the blade to assist in breaking the nut loose.
3. When reinstalling blades, ensure the wings are pointing upward toward the top of the deck.
4. Important: Align the "S" shaped cutout on the Xtreme mulch blade with the matching "S" shape on the spindle for a secure fit.
5. Tighten the hex nut to 70-90 ft-lbs (95-122 N-m).
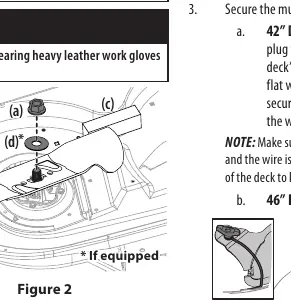
Mulch Plug Installation
1. Pivot the chute deflector upward and remove the protective cover from the pin on the deck surface.
2. Pivot the discharge chute upward.
3. Insert the mulch plug rod into the hole on the bracket (or deck wheel bracket on equipped models).
4. Position the rear of the mulch plug over the pin on the deck surface.
5. Ensure the bottom edge of the mulch plug is installed on the inside of the lip of the deck opening.
6. Secure the mulch plug:
- 42" Deck: Slide the mulch plug wire over the pin on the deck surface, position the flat washer over the wire, and secure with the wing knob. Ensure the wire is positioned inside the lip of the deck.
- 46" Deck: Secure the mulch plug with the wing knob.
Ensure the wing knob is snug after installation.
Practical help
Common problems
Blade not fitting securely
Ensure the "S" shaped cutout on the mulch blade is aligned with the matching "S" shape on the spindle.
Mulch plug loose or unstable
Ensure the wing knob is snug and the wire is positioned inside the lip of the deck opening.
Before use
- Park tractor on a firm, level surface
- Set parking brake
- Disengage PTO
- Stop engine and remove ignition key
- Wear heavy leather work gloves
Images and diagrams
- Figure 2 shows the blade removal and installation process, including the use of a wood block to hold the blade.
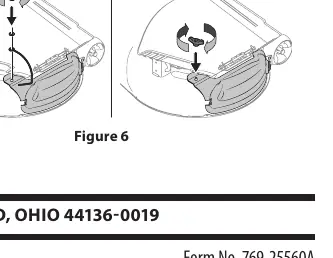
- Figure 6 illustrates the final securing of the mulch plug for both 42-inch and 46-inch decks.

Manual page author
Michael Turner
Technical manual editor
Reviews PDF manuals for structure, safety notes, and practical product details so readers can find the right information quickly.