Garden / Lawn Mowers
Installation Manual for Cub Cadet 42-inch Mulch Kit 19A70041100
Step-by-step installation guide for the Cub Cadet 42-inch Mulch Kit (19A70041100). Includes instructions for blade replacement, torque specifications, and mulch plug installation procedures.
Quick answers from the manual
Quick answer
- This manual provides instructions for installing the 42-inch Mulch Kit (19A70041100) on compatible Cub Cadet tractors, including blade replacement and mulch plug installation. p. 1, 2
Key actions
- Install blades p. 1
- Install mulch plug p. 2
Technical specifications
| Parameter | Value | Meaning | Pages |
|---|---|---|---|
| Torque | 90-110 ft-lb | Tightening torque for blade spindle hex flange nut | p. 1 |
Where to find it in the PDF
- Blade Installation p. 1
- Installing the Mulch Plug p. 2
Table of contents
Manual images
Click an image to enlargeQuick guide from the manual
This kit is designed for select 42-inch two-blade cutting decks. Before beginning installation, ensure the tractor is on a firm, level surface, the parking brake is set, the PTO is disengaged (OFF), the motor is stopped, and the ignition key is removed. Always wear heavy leather work gloves when handling sharp cutting blades.
Carton Contents
Before starting, verify all parts are present:
- Two Mulching Blades (742-0616A)
- One Deck Mulch Plug Assembly (631-05195A)
- One Wing Knob (720-04122)
- One Flat Washer (736-0159)
- One Mulch Plug Wire (747-06686)
Blade Installation
- Remove the cutting deck from beneath the tractor as instructed in your tractor’s Operator’s Manual.
- Gently flip the deck over to expose its underside.
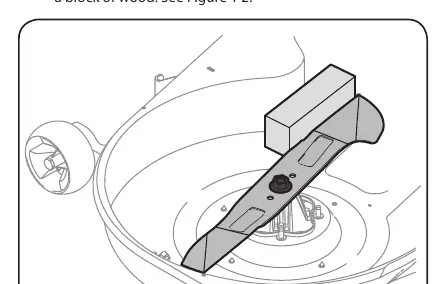
- Stabilize one of the cutting blades with a blade lock tool or a block of wood.
- Remove the hex flange nut that secures the blade to the spindle. Note: The hex flange nuts have a right-handed (normal) thread pattern. Do not force them in the opposite direction.
- Repeat steps 3 and 4 on the other cutting blade.
- Replace the blades with the blades included in the kit. Ensure each blade is installed with the side marked "Bottom" (or with a part number stamped in it) facing the ground when the mower is in the operating position.
- Use a torque wrench to tighten each blade spindle’s hex flange nut to between 90 ft-lb and 110 ft-lb.
Installing the Mulch Plug
- Pivot the chute deflector upward and remove the protective cover from the pin found on the deck’s surface.
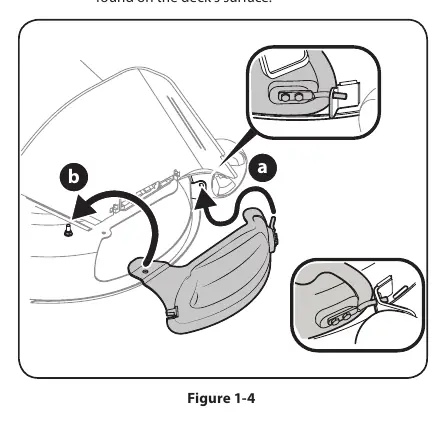
- To install the mulch plug, pivot the discharge chute upward:
- Insert the mulch plug rod into the hole found on the bracket (or deck wheel bracket, on models so equipped).
- Position the rear of the mulch plug over the pin found on the deck’s surface.
- Ensure the bottom edge of the mulch plug is installed on the inside of the lip of the deck opening.
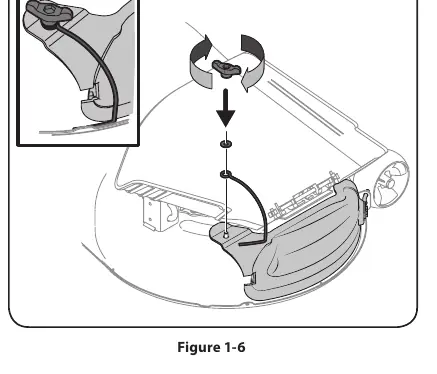
- Slide the mulch plug wire (747-06686) over the pin on the deck’s surface, position the washer over the wire, and secure the mulch plug with the wing knob.
- Ensure the wing knob is snug, and the wire is positioned inside the lip of the deck to keep the mulch plug securely in place.
Manufacturer information
Cub Cadet
Practical help
Common problems
Nuts are difficult to remove
Ensure you are turning in the correct direction; the hex flange nuts have a right-handed (normal) thread pattern. Do not force them in the opposite direction.
Mulch plug not secure
Ensure the wing knob is snug and the wire is positioned inside the lip of the deck to keep the plug in place.
Before use
- Place tractor on a firm, level surface
- Set the parking brake
- Disengage the PTO (OFF position)
- Stop the motor and remove the ignition key
- Wear heavy leather work gloves
Images and diagrams
- Figure 1-1: Carton contents identification
- Figure 1-2: Blade stabilization and removal
- Figure 1-3: Chute deflector pivot
- Figure 1-4: Mulch plug rod insertion
- Figure 1-5: Mulch plug lip alignment
Model compatibility
- Designed for use with select 42-inch two-blade cutting decks. Refer to your tractor's Operator's Manual to assure compatibility.

Manual page author
David Miller
Documentation analyst
Organizes user manual content into clear summaries, with attention to model details, product context, and everyday usability.