Lighting / Fixtures
Zevni Mavis 14.1-inch 2-Light Vanity Light
Quick installation guide for the Zevni Mavis 14.1-inch 2-Light Vanity Light (Model A04696). Includes wiring diagrams, mounting steps, safety warnings, and maintenance tips.
Table of contents
Manual images
Click an image to enlargeQuick guide from the manual
This document provides installation and safety instructions for the Zevni Mavis 14.1-inch 2-Light Vanity Light. Before beginning, ensure the power is turned off at the main circuit breaker. The installation should be performed by a licensed electrician. The fixture is designed for 120V systems with a maximum wattage of 40W per bulb.
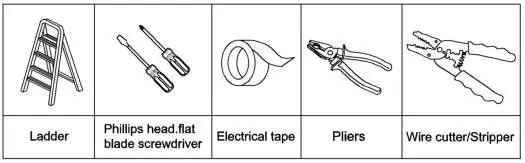
Required Tools: Ladder, Phillips head/flat blade screwdriver, electrical tape, pliers, and wire cutter/stripper.
Parts included
Ensure all parts are present before starting assembly:
- Green ground screw (1)
- Mounting plate (1)
- Back plate (1)
- Screws (4)
- Arm (1)
- Socket (2)
- Glass shade (2)
- Socket ring (2)
- Mounting screws (2)
- Plastic wire connectors (3)
Installation instructions
Follow these steps to install your vanity light:
- Power Off: Turn off electricity at the main fuse or circuit breaker box and the wall switch.
- Preparation: Ensure the mounting surface is clean, dry, flat, and strong enough to support the lamp.
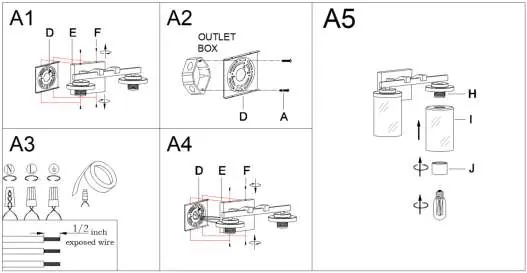
- Mounting Plate: Pass supply wires through the mounting plate (D) and secure it to the outlet box using mounting screws (A).
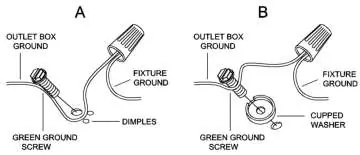
- Wiring: Connect the fixture ground wire to the outlet box ground wire using the green ground screw. Connect the supply wires (black/red to black, white to white) using plastic wire connectors. Wrap connectors with electrical tape and ensure no wire strands are exposed. Tuck all wires into the outlet box.
- Fixture Assembly: Position the back plate (E) and mounting plate (D) in place, then secure them using screws (F).
- Shades and Bulbs: Unscrew the socket rings (J) from the sockets (H). Place the glass shades (I) on the sockets and secure them with the socket rings. Install bulbs (not included), ensuring they do not exceed the maximum recommended wattage.
Cleaning and maintenance
To clean the fixture, wipe it with a soft cloth. Clean the glass shades using a mild, non-abrasive cleaner or soap. Do not use abrasive materials such as scouring pads, powders, steel wool, or abrasive paper, as these can damage the surface.
Manufacturer information
ZEVNI
Practical help
Common problems
Fixture does not light up
Verify that the power is turned on at the circuit breaker, check that all wire connections are secure, and ensure bulbs are properly installed and functional.
Exposed wire strands
Ensure wires are tightly joined with plastic connectors and wrapped with electrical tape. Carefully tuck all wires into the outlet box to prevent short circuits.
Before use
- Turn off main power at the circuit breaker
- Ensure mounting surface is clean, dry, and flat
- Verify voltage is 120V
- Gather required tools (ladder, screwdriver, pliers, wire cutter)
- Confirm all parts (A-J) are present
Images and diagrams
- Wiring diagram shows how to connect ground wires to the green screw and supply wires using plastic connectors.
- Assembly steps illustrate the sequence of mounting the plate, connecting wires, and attaching the glass shades.
Model compatibility
- Requires 120V power supply.
- Not suitable for use with abrasive cleaners.

Manual page author
Michael Turner
Technical manual editor
Reviews PDF manuals for structure, safety notes, and practical product details so readers can find the right information quickly.