Lighting / Outdoor Lighting
User Manual for Aigostar LED Floodlight
Comprehensive user guide for Aigostar LED Floodlight. Includes installation instructions, wiring diagrams, remote control operation, safety warnings, and technical specifications for 10W to 100W models.
Quick answers from the manual
Quick answer
- This manual covers the installation and operation of Aigostar LED Floodlights (10W-100W). It requires a qualified electrician for installation and supports remote control operation for color and timer settings. p. 1
Key actions
- Install the floodlight by mounting the bracket and connecting a 3x1.0mm² cable. p. 1
- Use the remote control to adjust colors, set timers, and change lighting modes. p. 1
First start
- Ensure power is disconnected, mount the unit, connect the 3x1.0mm² cable, and turn on the power. p. 1
Show 4 more answers Show less
Problems and fixes
Light not working
Check power supply and wiring connections.
p. 1Maintenance and reset
- Disconnect power before any maintenance. p. 1
Technical specifications
| Parameter | Value | Meaning | Pages |
|---|---|---|---|
| Voltage | 220-240V | Operating voltage | p. 1 |
| Protection | IP65 | Ingress protection rating | p. 1 |
| Remote Range | 6m | Maximum control distance | p. 1 |
Where to find it in the PDF
- Specifications and Installation p. 1
Table of contents
Manual images
Click an image to enlargeQuick guide from the manual
This manual provides instructions for the installation and operation of Aigostar LED Floodlights. The device is designed for outdoor use and is available in 10W, 20W, 30W, 50W, and 100W variants. Installation must be performed by a qualified electrician. Ensure the power is disconnected before starting any work.
Safety warnings
- Installation must be performed by a qualified electrician or service agent.
- Ensure the power supply is disconnected before installation or maintenance.
- Do not open the housing of the luminaire.
- If the external flexible cable or cord of this luminaire is damaged, it must be replaced by the manufacturer or their service agent.
- The luminaire is rated IP65, suitable for outdoor environments.
- Operating temperature range is -20°C to +40°C.
Installation
Follow these steps to install the floodlight:
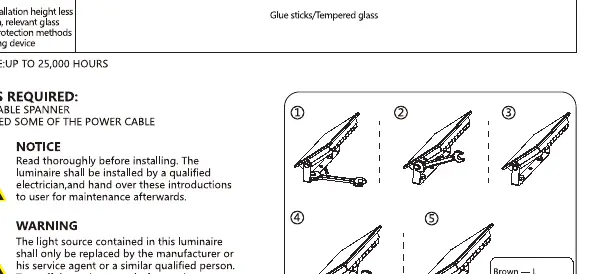
- Ensure the power is disconnected.
- Loosen the bolts on both sides of the bracket.
- Adjust the mounting angle of the floodlight.
- Tighten the bolts on both sides of the bracket.
- Connect the power cable (use a 3x1.0mm² cable).
- Turn on the power to ensure the light is working.
The installation height should be at least 5 meters, and appropriate methods for fixing the device to the wall must be used.
Operation
The floodlight can be controlled via a switch or the included remote control. The remote allows for:
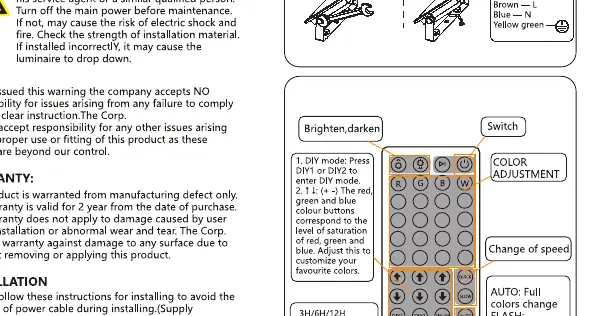
- DIY modes: Adjusting color levels (Red, Green, Blue).
- Color adjustment: Changing colors and saturation.
- Timer: Setting a 3h, 6h, or 12h timer.
- Modes: Flash, Fade, Jump, and Auto color-changing sequences.
Technical specifications
The floodlight operates on 220-240V / 50-60Hz. All models feature an IP65 protection rating and use LED 2835 technology. The housing is made of aluminum die-casting. The remote control has a range of 6 meters.
Manufacturer information
Aigostar
Practical help
Common problems
Light does not turn on
Check if the power supply is connected correctly and the circuit breaker is on.
Remote control not responding
Ensure the battery is functional and there is a clear line of sight to the sensor.
Before use
- Ensure the power supply is disconnected.
- Verify the voltage is 220-240V.
- Use a 3x1.0mm² cable for connection.
- Check that the mounting surface is stable.
- Ensure the installation height is at least 5 meters.
Show more Show less
Specs in practice
- Operating Temperature
- -20°C to +40°C; do not use outside this range.
- Remote Range
- Maximum distance of 6 meters.
Images and diagrams
- The installation diagram shows loosening the bracket bolts, adjusting the angle, tightening the bolts, and connecting the wiring.
- The remote control diagram illustrates the color adjustment buttons, timer settings, and mode selection buttons.
Model compatibility
- Suitable for outdoor use.
- Requires a 3x1.0mm² power cable.

Manual page author
David Miller
Documentation analyst