Documents / Warranty Safety
AL-KO 18V Cordless Leaf Blower User Guide
Quick guide for the AL-KO 18V Cordless Leaf Blower, including assembly, operation, battery charging, and troubleshooting steps.
Table of contents
Manual images
Jump to the sectionQuick guide from the manual
This document provides essential information for the safe and efficient operation of the AL-KO 18V Cordless Leaf Blower. Always ensure the device is fully assembled before use and only use the specified lithium-ion batteries and chargers.
Assembly
The leaf blower must be fully assembled before operation:
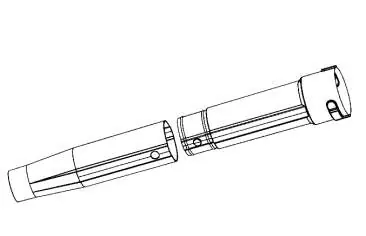
- Align the upper blowing tube with the lower blowing tube so the cam and hole are aligned. Push them together until the cam clicks into place.
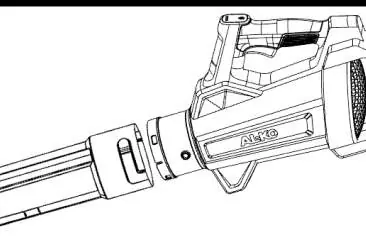
- Align the assembled blowing tube with the blower fitting, ensuring the longitudinal groove and cam are aligned. Push the tube onto the fitting until it stops, then turn it 90° until the cam engages.
Operation
Before starting, ensure a secure footing. Press the ON/OFF switch to start the blower. To increase speed, press and hold the Turbo button; release it to return to normal speed. Release the ON/OFF switch to turn the device off.
Battery and Charging
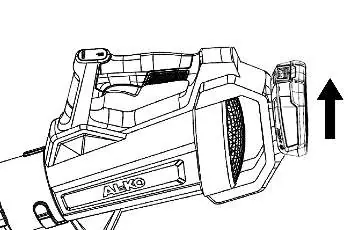
Insert the battery from above onto the battery rail until it clicks into place. To remove, press and hold the unlock button on the battery and pull it out. Check the charge status using the indicator on the control panel (3 segments = full, 1 segment flashing = almost empty).
Maintenance and Care
Remove the battery after each use and check for damage. Keep the device clean and dry. Do not spray with water. Regularly check electrical contacts for corrosion and clean with a fine wire brush if necessary, applying contact spray if needed.
Troubleshooting
If the device does not blow, check for blockages in the attachment or intake grille. If the motor does not start, ensure the battery is charged and correctly inserted, or allow it to cool down/warm up if it is outside the operating temperature range.
Manufacturer information
AL-KO
Practical help
Common problems
Device does not blow
Check for blockages in the attachment or intake grille and clean them.
Motor does not start
Charge the battery, ensure it is correctly inserted, or allow it to reach operating temperature.
Motor cuts out
Wait for the motor protection switch to reset or clean the ventilation slots.
Before use
- Ensure the device is fully assembled.
- Check that all screws, nuts, and bolts are tight.
- Wear hearing protection and safety goggles.
- Ensure the battery is fully charged.
- Check that the intake grille is free of debris.
Specs in practice
- Max Air Speed
- 45 m/s.
- Max Air Volume
- 450 m³/h.
Images and diagrams
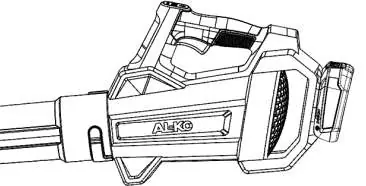
- Page 3, Fig 01: Overview of components including handle, switches, and tubes.
- Page 3, Fig 02: Assembly of the upper and lower blowing tubes.
- Page 3, Fig 03: Attaching the blowing tube to the blower unit.
- Page 3, Fig 04/05: Inserting and removing the battery pack.
Model compatibility
- Compatible with AL-KO 18V Li-Ion batteries (B50 Li, B75 Li, B100 Li, B125 Li).
- Compatible with AL-KO chargers (C50 Li, FC100 Li).

Manual page author
David Miller
Documentation analyst
Organizes user manual content into clear summaries, with attention to model details, product context, and everyday usability.