Electronics / Cameras
User Manual for Amcrest 1080P HD Webcam AWC201-B
Quick guide for the Amcrest 1080P HD Webcam (AWC201-B). Learn how to set up, connect, and troubleshoot your device for video calls.
Table of contents
Manual images
Click an image to enlargeQuick guide from the manual
This guide provides essential information for setting up and using your Amcrest 1080P HD Webcam. The device is plug-and-play and does not require additional software for basic operation. All adjustments to video quality or settings are handled directly through your third-party video calling software.
Product Overview
The webcam consists of the following components:
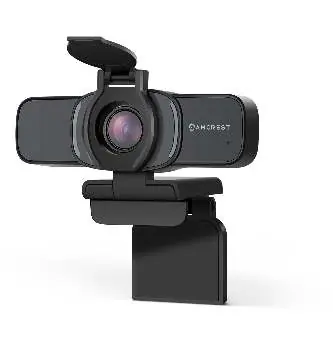
- 1080P HD Lens
- Microphone
- Activity LEDs
- Flexible Clip/base
- Tripod Attachment
- Privacy Cover
Setting Up Your Webcam
The webcam features a rotatable clip base for versatile mounting options:
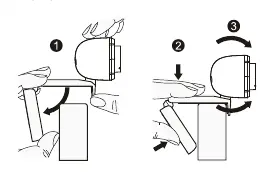
- Monitor Placement: Open the clip base and place it onto the top of your monitor, ensuring the foot of the clip is flush with the back of the monitor.
- Desktop Placement: Close the base of the clip and place the webcam directly on your desktop.
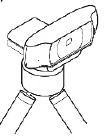
- Tripod Placement: The base includes a standard 1/4 inch female tripod screw. Align it with the male end of your tripod and twist to secure.
Connecting the Webcam
The webcam is compatible with both Windows and Mac computers. To connect:
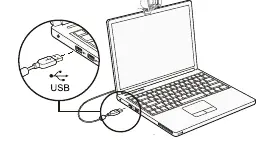
- Plug the USB cord of the webcam into an available USB port on your computer.
- Wait approximately 1 minute for the device to be automatically recognized and installed.
Video Calling
To use the webcam for video calls, ensure you have a video calling application installed (e.g., Skype, Microsoft Teams). Both parties require a computer with speakers/headset, a microphone, and an internet connection capable of 1080P streaming.
Troubleshooting and FAQ
If you encounter issues, follow these steps:
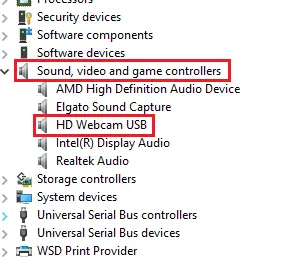
- Verification: On Windows, check Device Manager under 'Sound, video and game controllers' for 'HD Webcam USB'. On Mac, check 'Photo Booth' in Applications.
- Microphone Issues: If the microphone is recognized but not working, navigate to Device Manager, right-click 'HD Webcam USB', select 'Uninstall device', then unplug and replug the webcam to reinstall the driver.
- Flickering/Cutting Out: This often indicates inadequate power. Try connecting the webcam to a different USB port, preferably one on the back of the computer connected directly to the motherboard.
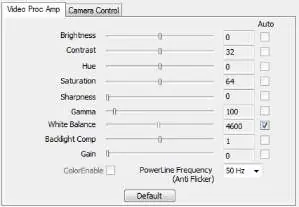
- Adjusting Settings: Use the settings menu within your specific video calling software to adjust brightness, contrast, hue, saturation, and other parameters.
Manufacturer information
Amcrest
Practical help
Common problems
Webcam not recognized or installed
Wait at least 1 minute after plugging in. Verify connection in Device Manager (Windows) or Photo Booth (Mac).
Microphone not working
Uninstall the device in Device Manager, unplug the USB cable, and plug it back in to trigger a fresh driver installation.
Video feed flickering or cutting out
The webcam may not be receiving enough power. Connect the USB cable to a port on the back of the computer.
Before use
- Ensure the privacy cover is open.
- Verify your computer has speakers or a headset.
- Check that your internet connection supports 1080P streaming.
- Ensure the webcam is securely mounted on a monitor, desktop, or tripod.
Specs in practice
- 1/4 inch tripod screw
- Standard mount size compatible with most camera tripods.
Images and diagrams
- The product overview diagram identifies the lens, microphone, activity LEDs, clip base, tripod mount, and privacy cover.
- Placement diagrams illustrate how to mount the camera on a monitor and a tripod.
Model compatibility
- Compatible with both Windows and Mac computers.
- No additional software required; settings are managed via third-party applications.

Manual page author
David Miller
Documentation analyst
Organizes user manual content into clear summaries, with attention to model details, product context, and everyday usability.