Electronics / Security Cameras
User Manual for Amcrest SmartHome 1080p Wi-Fi Deterrent Camera
Quick guide for the Amcrest SmartHome 1080p Wi-Fi Deterrent Camera. Learn how to install, set up the app, configure motion detection, manage cloud storage, and troubleshoot your device.
Table of contents
Manual images
Click an image to enlargeQuick guide from the manual
This guide provides essential information for setting up and operating your Amcrest SmartHome 1080p Wi-Fi Deterrent Camera. Before beginning, ensure you have a 2.4GHz Wi-Fi network available, as this device does not support 5GHz. The camera requires a 5V, 2.0A USB power connection. For local storage, a Class 10 or higher microSD card (up to 128GB) formatted to FAT32 is required.
Device overview
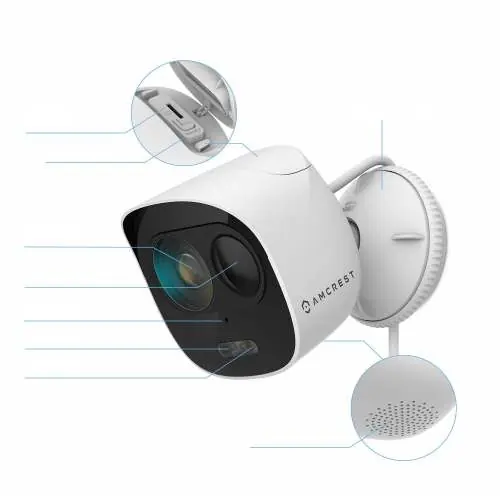
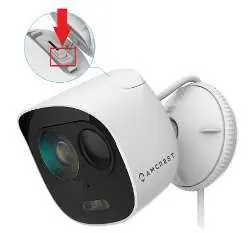
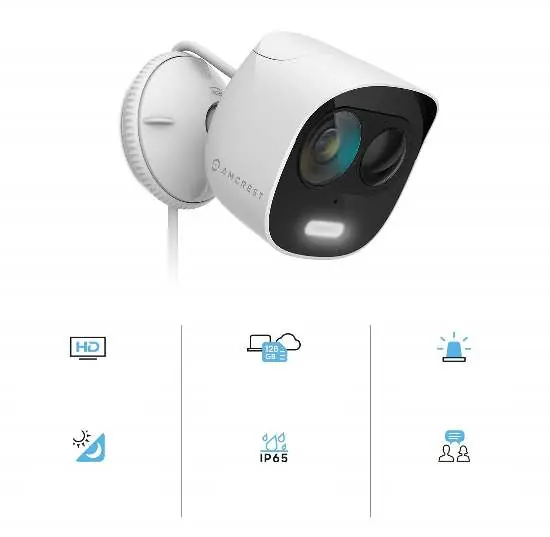
The camera features a 2.8mm lens, PIR motion detection, a built-in microphone, a spotlight, and a built-in speaker. It includes a microSD card slot and a factory reset button located under a security lid on the top of the camera.
Physical installation
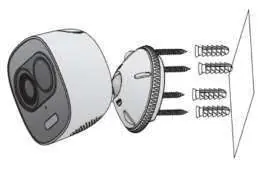
The camera is IP65 weather-resistant and suitable for outdoor use. Ensure the mounting surface can support at least 3x the weight of the device. Use the included installation map sticker to mark holes for the wall anchors. Secure the mounting bracket to the surface using the provided screws and anchors, then attach the camera to the bracket.
App setup
Download the Amcrest Smart Home app from the Google Play or App Store. Register an account, log in, and tap Add Device. Scan the QR code on the camera or manually enter the serial number. Follow the on-screen instructions to connect the camera to your 2.4GHz Wi-Fi network. Once connected, you can name your device and set the time zone.
Motion detection and alerts
Motion detection is enabled by default. You can adjust sensitivity (1-6, default 3), set motion schedules, and define specific activity zones to reduce false alerts. The camera supports email notifications and snapshots. You can also enable the spotlight and siren to trigger automatically upon motion detection.
Cloud storage and microSD recording
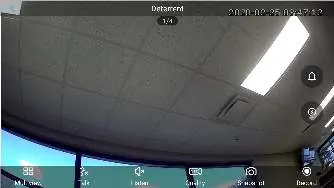
The camera supports optional Amcrest Smart Home Cloud storage for motion-based recordings. Alternatively, you can use a microSD card for local storage. If using a microSD card, insert it into the slot on the top of the camera. Recordings on the microSD card can be viewed via the app, but cannot be downloaded directly to your smartphone; you must remove the card and use an adapter on a computer to view or transfer files.
Advanced configuration
The camera can be added to Amcrest NVR/DVR systems, Amcrest Surveillance Pro software, or Blue Iris by obtaining the device's IP address from your network. Ensure the camera is set up in the Amcrest Smart Home app first before attempting to add it to third-party software.
Troubleshooting
If you cannot locate the SSID during setup, close the app, restart your mobile device, and try again. If the device status appears red in NVR/DVR software, verify the password. To perform a factory reset, hold the reset button on the top of the camera for 30-45 seconds.
Manufacturer information
Amcrest
Practical help
Common problems
SSID not found during app setup
Close the app completely, power your mobile device off and back on, then retry the setup process.
Device status is red in NVR/DVR
Click on Modify/Edit in the NVR/DVR software and ensure the password for the device is correct.
Cannot download microSD recordings via app
Recordings on the microSD card cannot be downloaded via the app. Remove the card and use an SD card adapter on a computer.
Before use
- Ensure you have a 2.4GHz Wi-Fi network.
- Check that the installation surface can support 3x the device weight.
- Prepare a Class 10 or higher microSD card (up to 128GB) formatted to FAT32 if local storage is needed.
- Have a Phillips head screwdriver and drill (if mounting on concrete/brick) ready.
- Ensure the camera is powered with a 5V, 2.0A USB connection.
Specs in practice
- Field of View
- 133° diagonal field of view for wide coverage.
- Operating Temperature
- -4°F to 122°F, suitable for various environments.
Images and diagrams
- The camera features a microSD card slot and factory reset button located under a security lid on the top of the unit.
- The mounting bracket allows for adjustment and secure attachment to flat surfaces.
Model compatibility
- Not a Power over Ethernet (PoE) device; requires 5V, 2.0A USB power.
- Not a dual-band device; requires 2.4GHz Wi-Fi.
- Compatible with Amcrest NVR/DVR, Amcrest Surveillance Pro, and Blue Iris.

Manual page author
Michael Turner
Technical manual editor
Reviews PDF manuals for structure, safety notes, and practical product details so readers can find the right information quickly.