Electronics / Cameras
User Manual for Amcrest 1080P Wi-Fi Video Doorbell
Quick guide for the Amcrest 1080P Wi-Fi Video Doorbell (AD110). Includes installation steps, wiring diagrams, app setup, and troubleshooting.
Table of contents
Manual images
Click an image to enlargeQuick guide from the manual
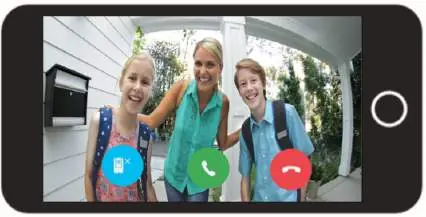
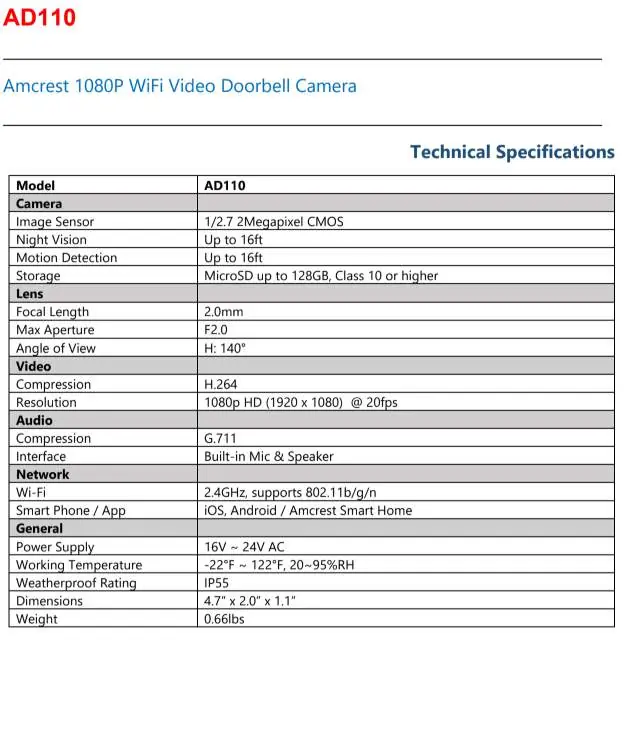
The Amcrest 1080P Wi-Fi Video Doorbell (AD110) requires a 16V-24V AC power source to function. It is designed to work with existing doorbell wiring and chimes. If you do not have existing wiring, a transformer with 16V-30V AC is required. The device supports 2.4GHz Wi-Fi networks only. Ensure you have the Amcrest Smart Home app installed on your mobile device before beginning the setup process.
Device Overview
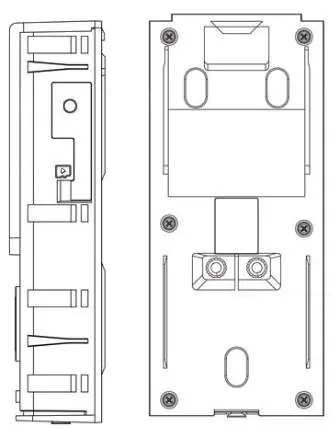
The front panel features a PIR sensor, camera, IR lights, speaker, indicator light, call button, and microphone. The rear panel contains the microSD card slot, reset/config button, and power input ports.
Physical Installation
Important: Turn off the circuit breaker before starting installation. If installing on concrete, stucco, or brick, a 15/64 masonry drill bit is required.
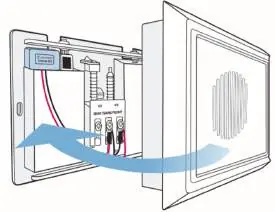
Installing the Chime Kit
The included Chime Kit allows the doorbell to sync with your existing chime system. If you do not have a chime, this step is not necessary.
- Turn off the power at the breaker.
- Remove the cover of your existing chime.
- Loosen the screws labeled FRONT and TRANS.
- Slide the connecting wires from the Amcrest Chime Kit underneath the screws and retighten.
- Replace the chime cover and secure the Chime Kit with the included adhesive.
Installing the Doorbell
- Remove the existing doorbell and disconnect the wires.
- Mark the drill holes using the mounting bracket as a guide.
- Secure the bracket to the wall using the included screws (use wall anchors for concrete/brick).
- Connect the existing doorbell wiring to the terminal screws on the back of the Amcrest doorbell.
- Secure the doorbell to the mounting bracket.
- Insert a microSD card (optional, up to 128GB, Class 10 or higher) into the side slot.
App Setup
- Download the Amcrest Smart Home app and register an account.
- Turn the circuit breaker back on and wait for the doorbell to power up.
- In the app, tap Add Device and scan the QR code on the back of the doorbell.
- Press the reset/config button on the side of the doorbell to enable the hotspot.
- Follow the in-app instructions to connect the doorbell to your 2.4GHz Wi-Fi network.
Features and Settings
The Amcrest Smart Home app allows you to configure various settings, including:
- Motion Detection: Adjust sensitivity (1-6) and set activity zones to reduce false alerts.
- Motion Schedules: Set specific times for the device to record motion events.
- Cloud Storage: Optional subscription service for storing recordings.
- MicroSD Recording: Local storage for motion-based recordings.
- Firmware Updates: Check for and install updates via the app settings.
Troubleshooting
- Chime constantly ringing: Ensure the Chime Kit is properly installed and check for wiring shorts or improper voltage.
- Cannot hear audio: Check that the microphone toggle for the Amcrest Smart Home app is enabled in your smartphone's settings.
- Unable to locate SSID: Restart your mobile device and ensure you are connecting to a 2.4GHz network.
Manufacturer information
Amcrest
Practical help
Common problems
Chime constantly ringing
Ensure the included Chime Kit is properly connected to your existing chime. Check for wiring shorts and verify the voltage is between 16V-24V AC.
Cannot hear audio during a call
Check your smartphone's app settings to ensure the microphone permission is enabled for the Amcrest Smart Home app.
Unable to locate Wi-Fi SSID during setup
Close the app, restart your mobile device, and ensure you are connecting to a 2.4GHz Wi-Fi network.
Before use
- Ensure a 16V-24V AC power source is available.
- Verify your Wi-Fi network is 2.4GHz.
- Download the Amcrest Smart Home app.
- Prepare a 15/64 masonry drill bit if installing on concrete or brick.
- Ensure the circuit breaker is turned off before starting installation.
Specs in practice
- Power Supply
- 16V-24V AC required.
- Weatherproof Rating
- IP55 rated.
Images and diagrams
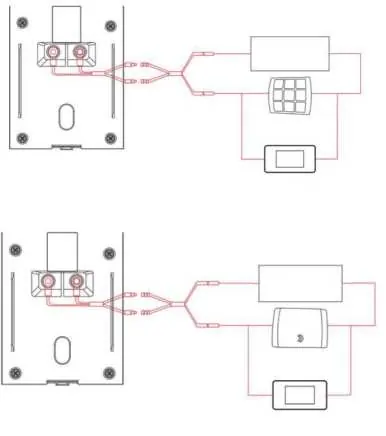
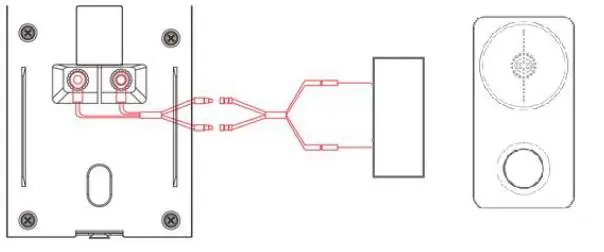
- Wiring Diagrams: Illustrates connections for mechanical, electronic, and wireless chime systems.
- Front Panel: Identifies the PIR sensor, camera, IR lights, speaker, indicator light, call button, and microphone.
Model compatibility
- Not a dual-band device (2.4GHz only).
- Compatible with Blue Iris, Amcrest NVR, and Amcrest DVR.
- Requires 16V-24V AC power.

Manual page author
Michael Turner
Technical manual editor
Reviews PDF manuals for structure, safety notes, and practical product details so readers can find the right information quickly.