Furniture / Storage Cabinets
JAGGER 1DN Hinged Shelf Assembly Instructions
Assembly guide for the Anrex JAGGER 1DN hinged shelf. Includes parts list, hardware identification, step-by-step assembly instructions, and maintenance tips.
Quick answers from the manual
Quick answer
- This manual provides assembly instructions for the Anrex JAGGER 1DN hinged shelf, including safety warnings, maintenance tips, and a step-by-step assembly guide. p. 1, 6, 7, 8
Key actions
- Assemble the unit according to the 10-step guide provided in the manual. p. 6, 7, 8
First start
- Check the product quality and completeness in the store upon purchase. p. 2, 3
Problems and fixes
Loose screw connections
Periodically tighten all screw connections.
p. 2, 3Maintenance and reset
- Dust the product with a slightly damp soft cloth. Do not use chemical cleaners. p. 2, 3
Technical specifications
| Parameter | Value | Meaning | Pages |
|---|---|---|---|
| Warranty | 24 months | Warranty period from date of sale. | p. 2, 3 |
Where to find it in the PDF
- Assembly Instructions p. 1, 6, 7, 8
- Parts and Hardware p. 4, 5
Table of contents
Manual images
Click an image to enlargeQuick guide from the manual
This document provides the necessary steps to assemble the Anrex JAGGER 1DN hinged shelf. Before beginning, ensure you have all parts listed and the required tools. The assembly should be performed by qualified personnel. Always keep this manual for future reference or in case of a warranty claim.
Safety and Care
To ensure the longevity and safety of your furniture, please adhere to the following guidelines:
- Environment: Do not install furniture near heating devices, against damp walls, or in rooms with relative humidity exceeding 70%.
- Temperature: Furniture elements should not be heated above +40°C.
- Usage: Do not step on horizontal panels or windows during assembly or use.
- Cleaning: Use a slightly damp, soft cloth for dusting. Do not use chemical cleaning agents.
- Maintenance: Periodically tighten all screw connections.
- Moving: Remove all contents before moving the unit. Lift the unit to move it; do not drag it to avoid damaging the supports.
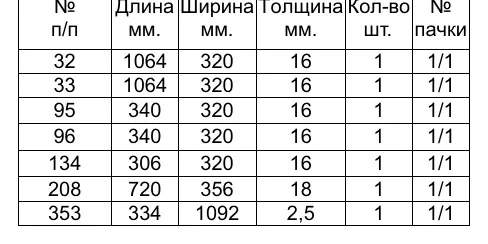
Parts List
The unit consists of several panels identified by numbers (32, 33, 95, 96, 134, 208, 353). Refer to the parts list table in the manual for specific dimensions and quantities of each panel.
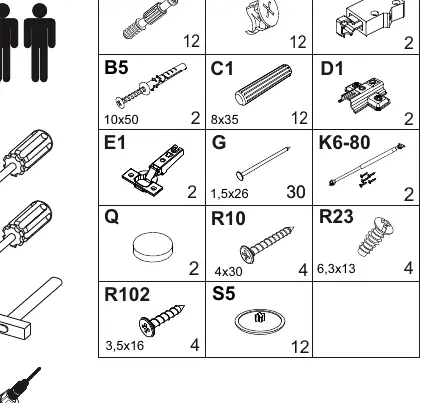
Hardware
The assembly requires various hardware components, including cam locks (A1, A2), wooden dowels (C1), screws (R10, R102, R23), hinges (E1), and gas lifts (K6-80). Ensure all hardware is accounted for before starting.
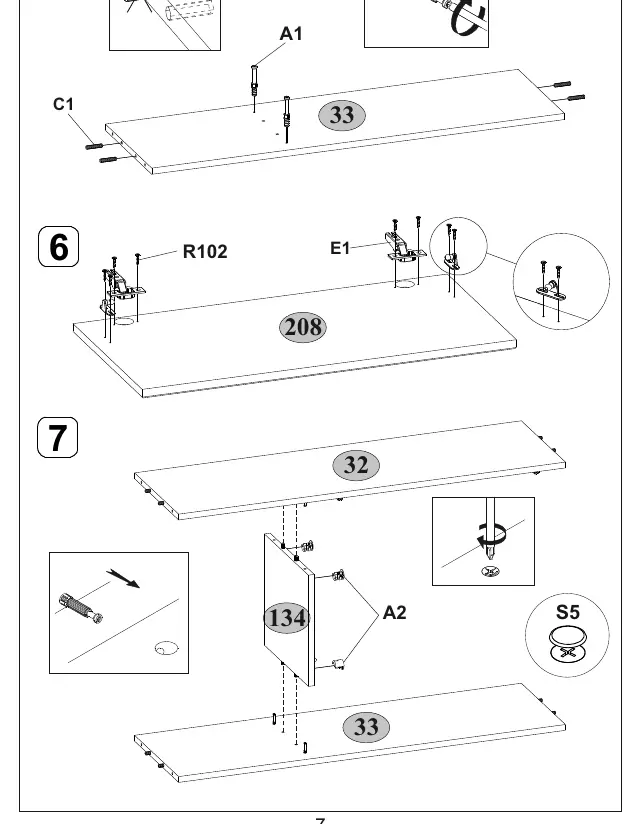
Assembly Steps
Follow these steps to assemble the unit:
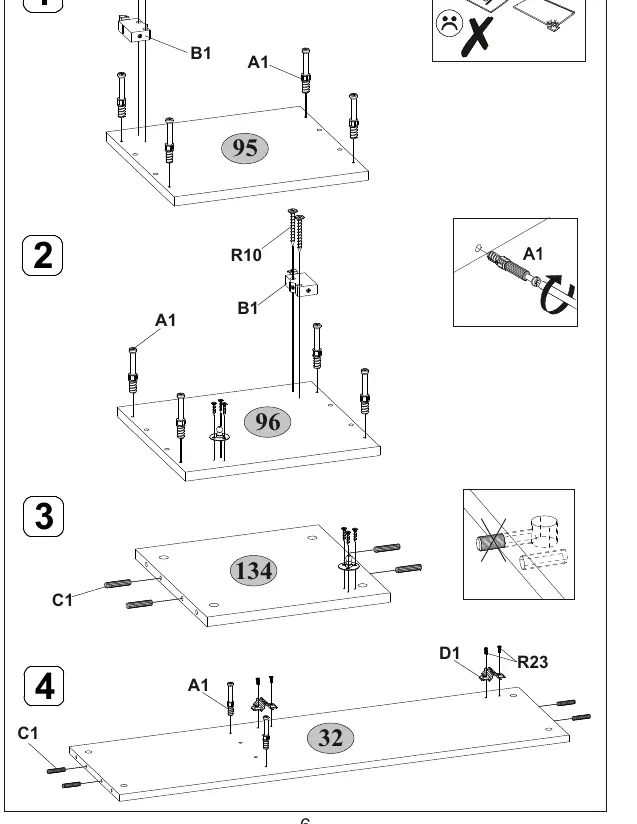
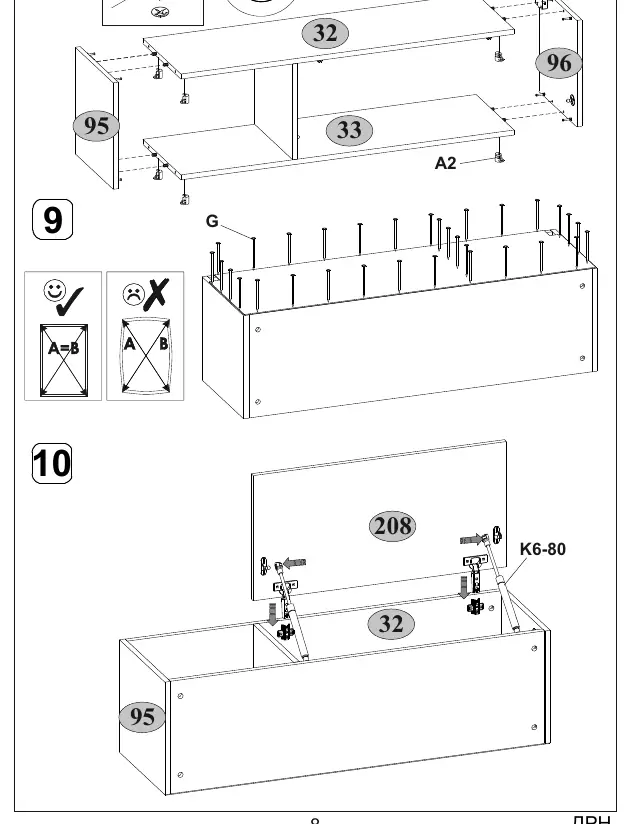
- Preparation: Install hardware (A1, B1, R10) into panels 95 and 96.
- Frame Assembly: Connect panels using dowels (C1) and cam locks (A1).
- Hinge Installation: Attach hinges (E1) to panel 208.
- Final Assembly: Assemble the main frame, attach the back panel, and install the door mechanism (K6-80) to complete the unit.
Practical help
Common problems
Loose screw connections
Periodically check and tighten all screw connections to maintain stability.
Moving the furniture
Completely empty the unit of all contents before moving. Lift the unit to avoid damaging the supports.
Before use
- Check the quality and completeness of the product in the store upon purchase.
- Ensure the room humidity is below 70%.
- Verify that the installation location is not near heating devices or damp walls.
- Ensure you have the necessary tools for assembly.
Images and diagrams
- Steps 1-4: Preparing side and internal panels with cam locks and dowels.
- Steps 5-7: Assembling the main structure and attaching hinges.
- Steps 8-10: Finalizing the frame, attaching the back panel, and installing the gas lift mechanism.
Model compatibility
- The product is part of the JAGGER furniture collection.
- Meets GOST 16371-2014 and TR TS 025/2012 requirements.

Manual page author
David Miller
Documentation analyst
Organizes user manual content into clear summaries, with attention to model details, product context, and everyday usability.