Furniture / Storage Cabinets
Assembly Instructions for Anrex OSKAR 1V1D Cabinet-Showcase
Complete assembly guide for the Anrex OSKAR 1V1D cabinet-showcase. Includes parts list, hardware identification, step-by-step assembly diagrams, and essential safety and maintenance guidelines.
Quick answers from the manual
Quick answer
- This manual provides assembly instructions for the Anrex OSKAR 1V1D cabinet-showcase, including safety warnings, maintenance tips, and a parts list. p. 1, 2, 3
Key actions
- Assemble the cabinet frame according to the diagrams provided in the manual. p. 3
- Periodically tighten screw connections. p. 2
Maintenance and reset
- Dust the product with a slightly damp soft cloth. Do not use chemical cleaners. p. 2
Where to find it in the PDF
- Safety and Warranty p. 1, 2
- Assembly Diagrams and Parts List p. 3
Table of contents
Manual images
Click an image to enlargeQuick Guide
This document provides instructions for the assembly of the Anrex OSKAR 1V1D cabinet-showcase. Before beginning, ensure you have all parts listed in the manual and the necessary tools. The assembly should be performed by qualified personnel if possible. Periodically check and tighten screw connections during the product's service life.
Assembly Instructions
The assembly process is divided into three main stages as shown in the diagrams:
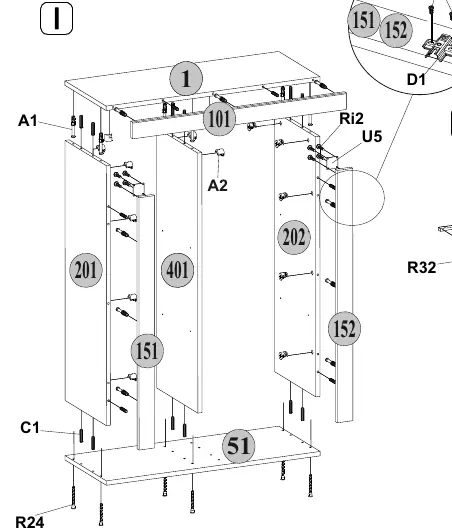
- Stage I: Frame assembly. Connect the main vertical and horizontal panels using the provided hardware (A1, C1, R24, etc.).
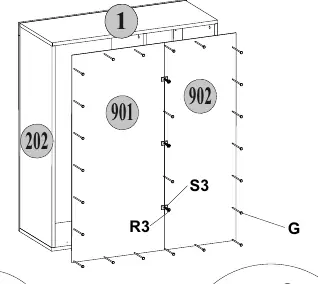
- Stage II: Back panel and door attachment. Secure the back panels and attach the door mechanisms.
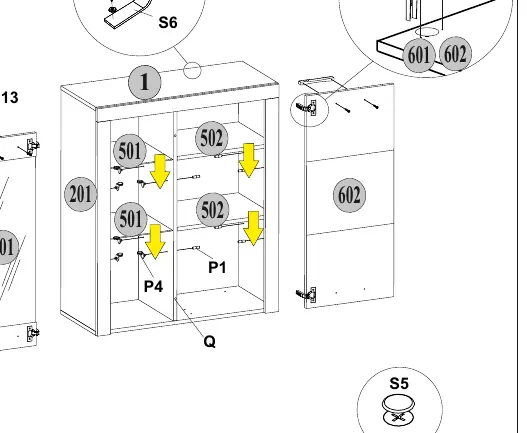
- Stage III: Final adjustments. Install shelves and ensure all components are aligned and secured.
Refer to the parts list on page 3 to identify all components (numbered 1 through 902) and hardware (A1 through Q) before starting.
Safety and Maintenance
To ensure the longevity and safety of your furniture, adhere to the following guidelines:
- Installation: Do not install near heating devices or against damp walls.
- Environment: Maintain room relative humidity below 70%.
- Temperature: Do not expose furniture elements to temperatures exceeding +40°C.
- Usage: Do not step on horizontal shields or windows during assembly or use.
- Cleaning: Do not use chemical cleaners. Dust with a slightly damp, soft cloth.
- Protection: Avoid contact with water and direct sunlight to prevent warping and discoloration.
Warranty Information
The manufacturer provides a 24-month warranty from the date of sale, covering repair or replacement if operating rules are followed. The lifetime of the furniture is estimated at 5 years. Claims should be made directly to the trading organization where the furniture was purchased, presenting the instruction manual and a copy of the sales receipt.
Practical help
Common problems
Loose screw connections
Periodically check and tighten all screw connections during the product's service life.
Warping or discoloration
Avoid installing in direct sunlight, near heating devices, or in rooms with high humidity (>70%).
Before use
- Check the quality and completeness of the product in the store upon purchase.
- Ensure the assembly area is clear and suitable for furniture installation.
- Verify all parts against the parts list provided in the manual.
- Do not use chemical cleaners for maintenance.
- Ensure the furniture is not placed near heating devices or damp walls.
Specs in practice
- Warranty Period
- 24 months from the date of sale.
- Product Lifetime
- 5 years.
- Humidity Limit
- Relative humidity in the room should not exceed 70%.
- Temperature Limit
- Furniture elements should not be heated above +40°C.
Images and diagrams
- Diagram I: Main frame assembly using panels 201, 202, 401, 51, 101, 151, 152.
- Diagram II: Back panel (901, 902) and door attachment.
- Diagram III: Final assembly including shelves (501, 502) and door installation (601, 602).
Model compatibility
- Part of the OSKAR modular furniture collection.

Manual page author
Michael Turner
Technical manual editor
Reviews PDF manuals for structure, safety notes, and practical product details so readers can find the right information quickly.