Furniture / Bedroom Furniture
Assembly Manual for Anrex Oskar 1D2N Bedside Cabinet
Comprehensive assembly guide for the Anrex Oskar 1D2N bedside cabinet. Includes parts list, hardware identification, step-by-step assembly instructions, and maintenance tips.
Quick answers from the manual
Quick answer
- This manual provides assembly instructions for the Anrex Oskar 1D2N bedside cabinet, including safety guidelines, parts lists, and step-by-step assembly diagrams. p. 1, 2, 3
Key actions
- Assemble the main frame p. 3
- Attach back panels p. 3
- Install door hinges p. 3
Problems and fixes
Loose connections
Periodically tighten screw connections.
p. 2Where to find it in the PDF
- Safety and Warranty p. 1, 2
- Assembly Diagrams and Parts p. 3
Table of contents
Manual images
Click an image to enlargeImportant Information
This document provides assembly instructions for the Anrex Oskar 1D2N bedside cabinet. Before beginning assembly, verify that all parts listed in the parts table are present. Ensure you have a clear, flat workspace to assemble the furniture. Periodically tighten screw connections during the product's service life to maintain stability.
Safety and Maintenance
- Humidity: Do not install the furniture in rooms with relative humidity exceeding 70%.
- Temperature: Do not expose furniture elements to heat sources above 40°C.
- Cleaning: Use a slightly damp, soft cloth for dusting. Do not use chemical cleaning agents.
- Usage: Do not step on horizontal panels or windows during assembly or use.
- Moving: Remove all loads (e.g., mattress) before moving the cabinet. Lift the product to avoid damaging the supports.
- Sunlight: Avoid installing in direct sunlight to prevent warping and discoloration.
Parts List
The cabinet consists of several panels identified by numbers (e.g., 28, 45, 139, 248, 250, 266, 369, 504, 925). Refer to the parts table in the manual for specific dimensions and quantities of each component.
Assembly Instructions
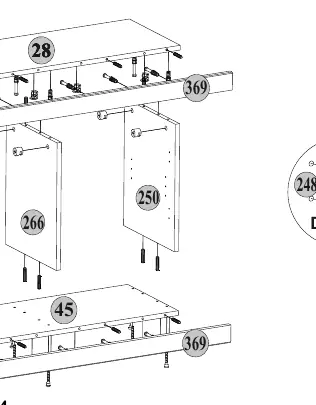
Step I: Frame Assembly
Assemble the main frame using panels 28, 45, 369, 248, 250, and 266. Secure the structure using hardware A1, A2, C1, N2, and R24 as shown in the diagram.
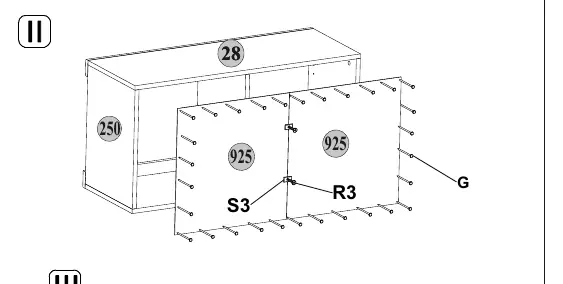
Step II: Back Panel Attachment
Attach the back panels (925) to the assembled frame using screws R3 and S3.
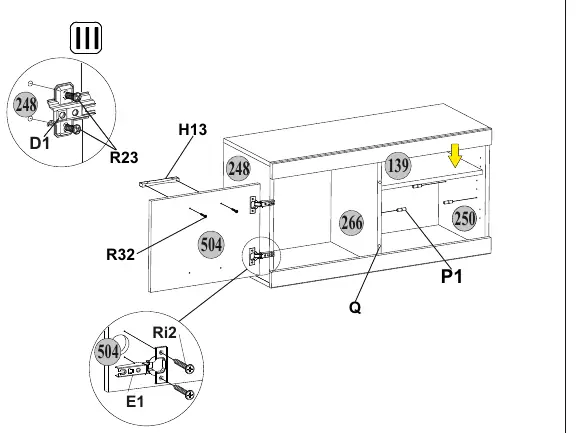
Step III: Door and Hinge Installation
Install the door (139) using hinges E1, D1, and Ri2. Secure the hinges to the frame and door as indicated in the diagram.
Warranty
The manufacturer provides a 24-month warranty from the date of sale, provided the user has not violated operating rules. The estimated lifetime of the furniture is 5 years. Claims should be made directly to the retailer with the sales receipt and this manual.
Practical help
Common problems
Loose screw connections
Periodically check and tighten all screw connections during the product's service life.
Moving the cabinet
Remove all items from the cabinet and lift it to prevent damage to the supports.
Before use
- Check the quality and completeness of the product immediately upon purchase.
- Verify all hardware components (A1, A2, C1, etc.) are present.
- Ensure the assembly area is clean and flat.
- Read all safety warnings regarding humidity and heat.
Specs in practice
- Relative Humidity
- Must be below 70% to prevent damage.
- Heat Resistance
- Do not expose to temperatures above 40°C.
- Warranty Period
- 24 months from the date of purchase.
Images and diagrams
- Step I: Shows the connection of the main structural panels using cam locks and dowels.
- Step II: Shows the attachment of the back panel using small screws.
- Step III: Shows the mounting of the door hinges to the cabinet frame.
Model compatibility
- This cabinet is part of the 'OSKAR' furniture collection.

Manual page author
David Miller
Documentation analyst
Organizes user manual content into clear summaries, with attention to model details, product context, and everyday usability.