Automotive / Electric Bikes
User Manual for Aostirmotor S18-1500W Electric Bike
Comprehensive user guide for the Aostirmotor S18-1500W electric bike. Includes assembly instructions, battery maintenance, LCD display settings, controller troubleshooting, and essential safety checks.
Table of contents
Quick Guide from the Manual
Before riding your Aostirmotor S18-1500W, perform the following functional checks: test the brake system, throttle, and power system; ensure tire pressure is at 30 psi; check front wheel lug-nuts; verify battery charge level; and ensure the braking system is adjusted and operates freely.
Assembly Instructions
Follow these steps to assemble your electric bike:
- Open the package and take out the tool box.
- Remove the bicycle from the package and place it on a soft surface to avoid scratches. Cut the tie securing the front wheel.
- Remove the protective foam, open the accessory kit, and remove the tool kit.
- Invert the bicycle and remove the large fixing bolt on the front fork.
- Place the front wheel on the front fork and position the disc brake pad in the middle of the disc brake caliper.
- Use the supplied 15mm flat tool to tighten the two bolts.
- Tie the key to the handlebar clamp, cut the zipper, and use the Allen wrench from the tool kit to remove the clamp.
- Place the handlebar in the middle position, install the rod clamp, and tighten the screws with the Allen wrench.
- Install the LCD display on the handlebar, tighten the screws, and connect the green connecting wire.
- Grasp the bicycle light, unscrew the lens, remove the plastic insulator, re-tighten the lens, connect the red cable, and connect the light to the screw above the front fork.
- Install the pedals. The right pedal rotates clockwise, and the left pedal rotates counter-clockwise.
- Push the seat into the column, fix it in the desired position, and tighten the screws.
Battery Installation & Maintenance
To install and maintain the battery:
- Check the lock core situation before installation.
- Turn the key counter-clockwise to make the lock cylinder downward.
- Align the slider to install the battery.
- There are two lock positions; the locking principle is the same. The No. 3 port is the charging port.
- Turn the key clockwise to lock the battery.
- Press down the key and turn it counter-clockwise to unlock.
- Maintenance: When not using the battery for a long time, charge it 1-2 times every month. Keep the key properly. Keep the battery environment dry; do not stay in the rain for a long time. Use a universal meter to test battery attenuation regularly.
LCD Display Settings
To enter the menu, press the M button twice (time interval must be within 0.3s). Use UP or DOWN to navigate and M to confirm.
- Brightness: Adjust 2.1-5.
- Clock: Set Year/Month/Day/Hour/Min/Sec.
- Auto Off: Set 2.1-9 (default is 5 minutes).
- Wheel: Set 2.16/18/20/22/24/26/27/27.5/28/29/30/31/32 inch.
- Advance Setting: Default password is '1801'.
- Password: Default password is '0000'.
- Screen Direct: Change display mode Y/X.
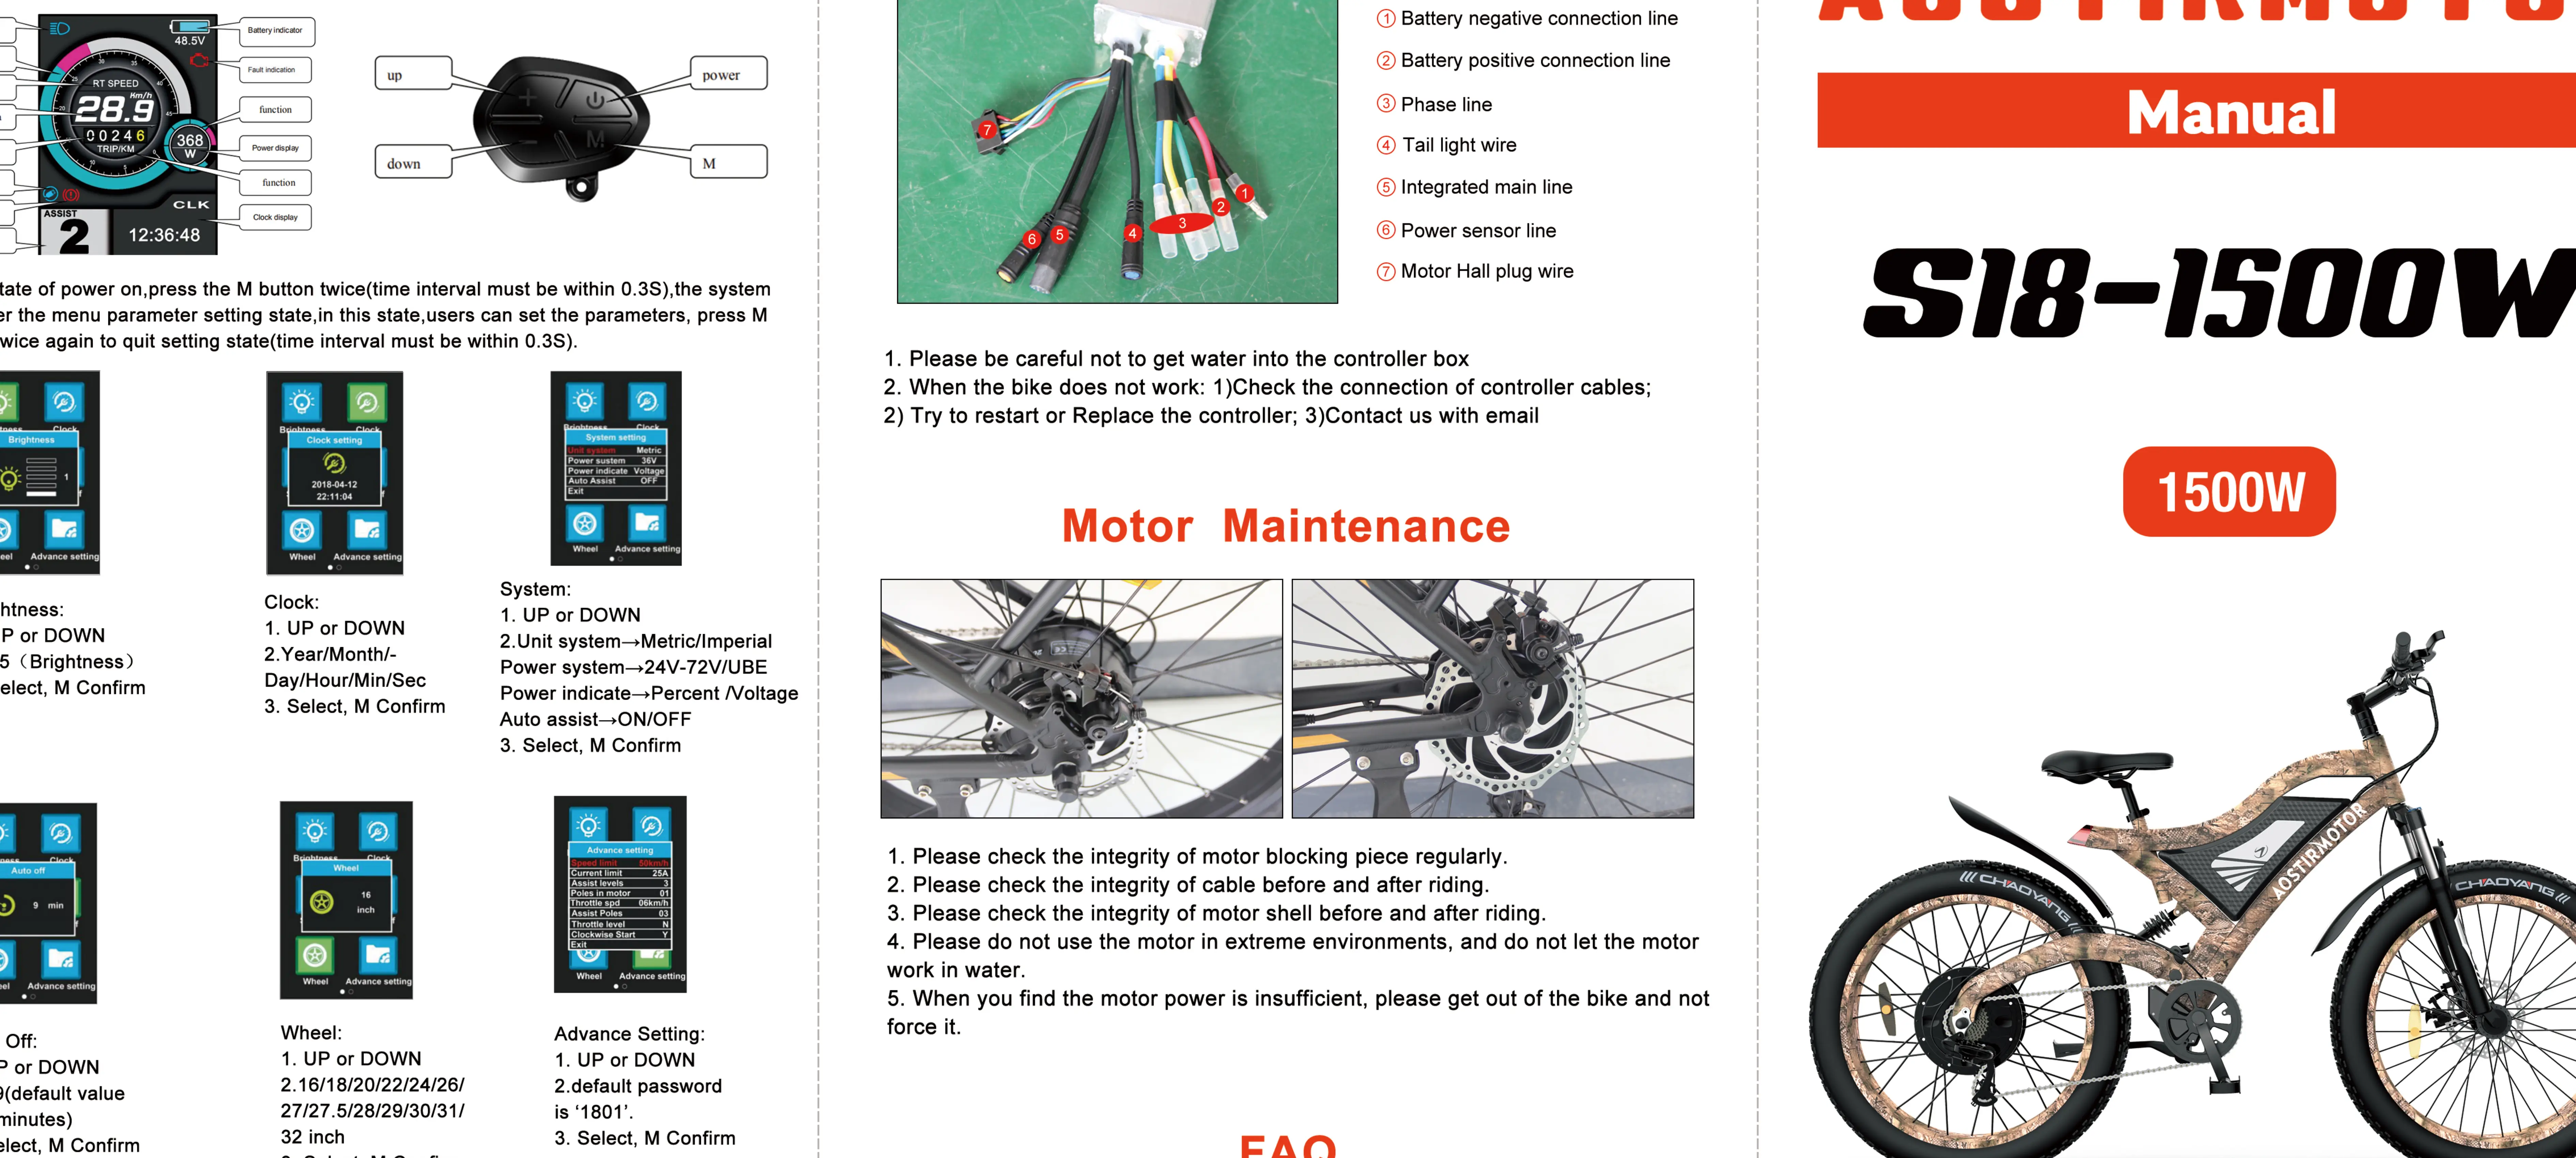
Controller & Motor Maintenance
Controller: Be careful not to get water into the controller box. If the bike does not work, check the controller cables, try to restart or replace the controller, or contact support.
Motor: Check the integrity of the motor blocking piece regularly. Check the integrity of the cable before and after riding. Check the integrity of the motor shell. Do not use the motor in extreme environments, and do not let the motor work in water. If motor power is insufficient, get off the bike and do not force it.
Manufacturer information
Aostirmotor
Practical help
Common problems
Bike does not work
Check controller cables, try to restart or replace the controller, or contact support.
Insufficient motor power
Get off the bike immediately and do not force the motor.
Battery maintenance
Charge 1-2 times every month if not in use. Keep dry and avoid rain.
Before use
- Test brake system, throttle, and power system.
- Check tire pressure (should be 30 psi).
- Check front wheel lug-nuts.
- Check battery charge level.
- Ensure braking system adjustment and free operation.
Images and diagrams
- LCD Display: Shows speed, battery level, assist level, and settings menu.
- Battery Lock: 3 positions for locking, unlocking, and charging.
Model compatibility
- Not for use in rain (water damage risk).
- Not for use in under-voltage condition.
- Screen visibility may decrease in temperatures below -10°C.

Manual page author
David Miller
Documentation analyst
Organizes user manual content into clear summaries, with attention to model details, product context, and everyday usability.