Automotive / Electric Bikes
User Manual for Heybike Ranger S-1000 Electric Bike
Quick guide for the Heybike Ranger S-1000 electric bike. Includes assembly instructions, display settings, maintenance tips, and troubleshooting steps.
Table of contents
Manual images
Click an image to enlargeQuick Guide
This manual provides essential information for the safe operation and maintenance of the Heybike Ranger S-1000. Before riding, ensure the battery is fully charged, check that all latches and quick releases are secure, and verify tire pressure. Riders under 16 years old must obtain parental permission. Do not ride in rainy conditions or after consuming alcohol or medication.
Product Overview
The bike features a front suspension fork, disc brakes, a hub motor, and an integrated tail light. The handlebar includes the LCD display, gear shifter, and throttle controls.
Specifications
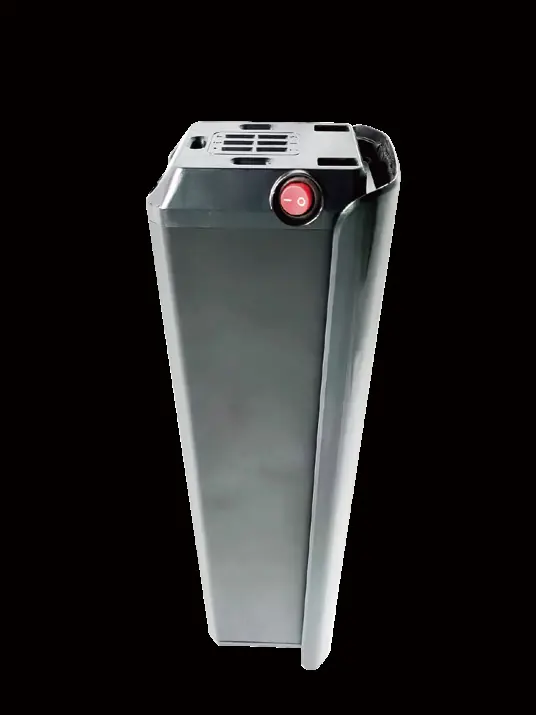
The Ranger S-1000 is equipped with a 1000W motor and a 48V 14.4Ah battery. It has a maximum speed of 32mph (51km/h) and a maximum load capacity of 400 lbs (181.4kg). The charging time is approximately 3-4 hours. The bike is rated IPX4.
Assembly Instructions
Follow these steps to assemble your bike:


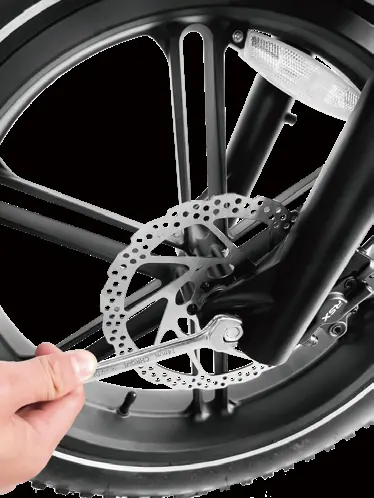

- Front Wheel: Remove fork protection, place the wheel into the fork mount, feed the stud bolt through, and tighten firmly.
- Head Tube: Loosen the fastening screw, remove the washer, place the handlebar onto the head part, and tighten the screws.
- Headlight & Fender: Fasten the headlight and fenders above the front fork using the provided stud bolt and screws.
- Pedals: Thread the right pedal clockwise and the left pedal counter-clockwise onto the cranks. Ensure the chain runs smoothly.
Adjustments
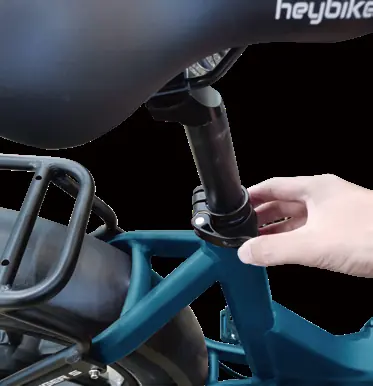
Seatpost: Open the quick-release lever to adjust the seat height. Do not raise the seat beyond the minimum insertion marking etched into the seat post.
Front Suspension: Use the lockout lever on the top-right of the fork to lock or unlock the suspension. Use the preload adjustment knob on the top-left to soften or stiffen the resistance.
Battery and Charging
The battery can be charged while attached to or detached from the bike. To remove, turn the key to the unlock position. Always use the original charger. The LED on the charger turns red when charging and green when fully charged. Ensure the battery is turned off before removing or installing it.
Display Settings
The digital display shows battery level, speed, PAS level, and odometer. To enter personalized parameter settings, turn the display on, ensure the bike is stationary, and press the plus and minus buttons simultaneously for 2 seconds. Parameters include backlight brightness (01P), metric/imperial units (02P), and wheel diameter (05P). Do not adjust settings 09P-11P and 16P as they are not supported.
Maintenance
Perform regular maintenance to ensure safety. Weekly, check drivetrain alignment, wheel trueness, and frame condition. Monthly, clean and lubricate the drivetrain, check brake pad alignment, and inspect cables. Every 6 months, have a certified mechanic perform a tune-up, including greasing the bottom bracket and inspecting cables.
Troubleshooting
If the bike does not turn on, check for insufficient battery power, faulty connections, or a blown fuse. If the motor does not respond, check for loose wiring or a damaged throttle. For reduced range, check tire pressure and ensure the battery is fully charged.
Practical help
Common problems
The bike does not turn on
Charge the battery, clean and repair connections, install the battery correctly, or replace the discharge fuse.
Irregular acceleration or reduced top speed
Charge or replace the battery, replace the throttle, or align/replace the magnet ring.
The motor does not respond
Repair or reconnect loose wiring, tighten or replace the throttle, or check the motor.
Reduced range
Adjust tire pressure, check connections, balance the battery, or adjust the brakes.
The battery will not charge
Check charger connections, replace the charger, or replace the charge fuse.
Before use
- Ensure the battery is fully charged.
- Check that all latches, levers, and quick releases are secure.
- Verify tire pressure is correct.
- Inspect the braking system.
- Wear a helmet.
- Ensure the bike is turned off before battery installation/removal.
Specs in practice
- Charging Time
- 3-4 hours.
Images and diagrams
- The display shows battery level, speed, PAS level, and odometer.
- Assembly involves installing the front wheel, head tube, headlight, and pedals.
Model compatibility
- Not intended for use by children under 16.
- Do not use in rainy conditions.
- Settings 09P-11P and 16P are not supported on this model.

Manual page author
David Miller
Documentation analyst
Organizes user manual content into clear summaries, with attention to model details, product context, and everyday usability.