Power / Uninterruptible Power Supplies
User Manual for APC Back-UPS Pro BR 1000/1350/1500 MS
Quick guide for the APC Back-UPS Pro BR 1000/1350/1500 MS. This manual covers battery installation, equipment connection, operation settings, display interface, troubleshooting, and technical specifications.
Table of contents
Manual images
Click an image to enlargeQuick Guide from the Manual
This document provides essential instructions for the APC Back-UPS Pro BR 1000/1350/1500 MS. Key procedures include connecting the internal battery, setting up equipment, and configuring the unit's sensitivity. Always inspect the package for damage upon receipt and ensure the unit is used indoors in a well-ventilated area.
Battery Installation
The UPS is shipped with the battery disconnected. Follow these steps to connect it:
- Lay the UPS with the battery door facing up.
- Press the tabs downwards and pull the battery door away from the unit.
- Lift the battery 30 degrees upward using the handles to expose the connector.
- Connect the red wire.
- Push the battery back into the unit and replace the battery door.
Connecting Equipment
The rear panel features different types of outlets:

- Battery Backup with Surge Protection: Connect critical equipment like desktop computers, monitors, and modems here. These provide power during outages.
- Surge Protection Only: Connect peripherals like printers, fax machines, or scanners that do not require battery backup. These provide full-time surge protection even if the UPS is off.
- Data Ports: Use the USB or serial port to connect to a computer for PowerChute software configuration.
- Coaxial Ports: Provide surge protection for cable modems or similar equipment.
Operation and Settings
Power Saving Display: You can configure the display to be continuously illuminated or to darken after inactivity. Press and hold the DISPLAY button for two seconds to toggle modes.
Unit Sensitivity: Adjust the sensitivity to control when the UPS switches to battery power:
- Ensure the UPS is connected to AC power but is OFF.
- Press and hold the POWER button for six seconds until the LOAD CAPACITY bar flashes.
- Press POWER again to cycle through sensitivity options (Low, Medium, High).
- The UPS will beep to confirm your selection.
Display Interface and Alarms
The front panel display provides real-time status:
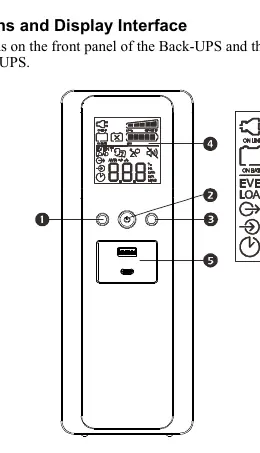
- On Line: Supplying conditioned AC power.
- On Battery: Supplying battery backup power (beeps four times every 30 seconds).
- Load Capacity: Indicates the power draw in 20% increments.
- Replace Battery: Indicates the battery is nearing the end of its life and should be replaced.
- System Error: An error number will appear; refer to the troubleshooting section.
Troubleshooting
If the UPS fails to switch on, ensure it is securely connected to an AC outlet, the circuit breaker is not tripped, and the internal battery is connected. If the OVERLOAD indicator is illuminated, disconnect non-essential equipment. If the SYSTEM ERROR indicator is on, match the error code on the display with the error list in the manual and contact technical support if necessary.
Specifications
The units support a nominal input voltage of 120V. Typical recharge time is 16 hours. Operating temperature range is 32 to 104 degrees Fahrenheit (0 to 40 degrees Celsius). Battery replacement parts are specific to the model: APCRBC160 for BR1000MS, APCRBC161 for BR1350MS, and APCRBC163 for BR1500MS.
Practical help
Common problems
Back-UPS will not switch on
Ensure it is connected to AC power, the circuit breaker is not tripped, the internal battery is connected, and the AC input voltage is within range.
Back-UPS does not provide power during an outage
Ensure equipment is plugged into 'Battery Backup' outlets, not 'Surge Only' outlets.
Replace Battery indicator is illuminated
The battery has reached the end of its useful life; replace the battery cartridge as soon as possible.
Overload indicator is illuminated
The connected equipment is drawing more power than the UPS can provide; disconnect non-essential items.
Before use
- Inspect package contents for damage.
- Connect the internal battery (shipped disconnected).
- Ensure air vents are not blocked.
- Connect the UPS power cable directly to a wall outlet.
- Install PowerChute Personal Edition software (Windows only) for configuration.
Specs in practice
- Maximum Load
- The maximum wattage the UPS can support before overloading.
- Transfer Time
- The maximum time (8ms) it takes to switch to battery power during an outage.
- Typical Recharge Time
- The time required (16 hours) to fully charge the battery.
Images and diagrams
- Battery connection diagram shows the 5-step process: opening the door, lifting the battery, connecting the red wire, and re-inserting.
- Rear panel diagram identifies the data ports, ground screw, wiring fault indicator, coaxial ports, circuit breaker, and various outlets.
Model compatibility
- PowerChute Personal Edition software is compatible with Windows operating systems only.
- For Mac OSX, use the native shutdown feature provided by the computer.

Manual page author
Michael Turner
Technical manual editor
Reviews PDF manuals for structure, safety notes, and practical product details so readers can find the right information quickly.