Smart Home / Smart Plugs & Strips
User Manual for Schneider Electric Easy UPS SRVS Series 1000VA/2000VA/3000VA
Quick guide for the Schneider Electric Easy UPS SRVS Series (1000VA, 2000VA, 3000VA). Includes installation, operation, display navigation, troubleshooting, and configuration settings.
Table of contents
Manual images
Click an image to enlargeQuick guide from the manual
This document provides essential instructions for the Schneider Electric Easy UPS SRVS Series (1000VA, 2000VA, 3000VA). Before installation, ensure the package is undamaged and the environment is suitable for indoor use with adequate ventilation (20 cm clearance on all sides). The UPS is shipped with the internal battery disconnected; you must connect the battery connectors before initial startup.
Installation
The UPS is designed for rack-mount installation. Use the provided rack-mount brackets and screws to secure the unit into a 19-inch rack enclosure. It is recommended to install the battery pack at the bottom of the rack and the UPS above it due to the weight. Ensure all electrical work is performed by a qualified electrician.

Start Up
To start the UPS:
- Connect the internal battery connectors.
- Reinstall the front bezel.
- Connect equipment to the UPS (avoid extension cords).
- Connect the UPS to the utility power outlet.
- Press the Power On/Off button on the front panel.
The battery will charge to 90% capacity during the first five hours of normal operation.
Operation and Display
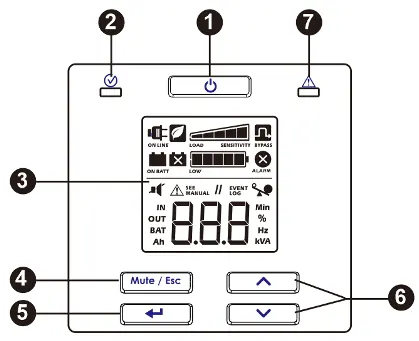
The front panel features an LCD display and control buttons:

- Power On/Off: Turns the UPS on/off and resets alarms.
- Mute/Esc: Acknowledges audible alarms and exits sub-menus.
- Enter: Selects menu items.
- Up/Down: Navigates through menus and display screens.
The LCD displays status icons such as On Line, On Battery, Replace Battery, Bypass, Overload, and Battery Charge level.
Configuration
You can configure UPS parameters via the display interface. Navigate to the 'Set' menu using the Enter button, then use the Up/Down buttons to adjust settings such as Output Voltage, Audible Alarm, Green Mode, Minimum battery capacity to restart, and Low battery state indication.
Troubleshooting and Alarms
The UPS indicates errors via audible beeps and display codes:
- SC: Short circuit at output.
- OL: Overload condition.
- dCH: DC voltage error.
- Hot: Temperature rising above limits.
- CH9: Charger error.
If the UPS does not turn on, check the power connection and the input thermal circuit breaker on the rear panel. For complex issues, contact Schneider Electric customer support.
Manufacturer information
Schneider Electric
Practical help
Common problems
UPS will not turn on
Check power cable connection, ensure battery is connected, and check if the input thermal circuit breaker on the rear panel has tripped.
UPS operating on battery while connected to utility
Check for high, low, or distorted input voltage/frequency. Try a different outlet on a different circuit.
UPS not supplying power to connected equipment
Ensure the UPS is turned on. If it has shut down, perform the 'Cold start' procedure. Check battery connection.
Alarm LED illuminated or constant beeping
Check the display for error codes (e.g., SC, OL, dCH, Hot, CH9) and refer to the Alarms and System Errors section.
Before use
- Inspect package contents for damage upon receipt.
- Ensure the installation location is indoors, sturdy, and free from excessive dust/humidity.
- Allow 20 cm clearance on all four sides of the UPS.
- Connect the internal battery connectors (shipped disconnected).
- Ensure all electrical connections are performed by a qualified electrician.
- Charge the battery modules if the unit has been in storage.
Specs in practice
- Input Voltage
- 230 Vac Nominal.
Images and diagrams
- Front panel: Includes Power On/Off button, Status LED, LCD display, Mute/Esc, Enter, and Up/Down navigation buttons.
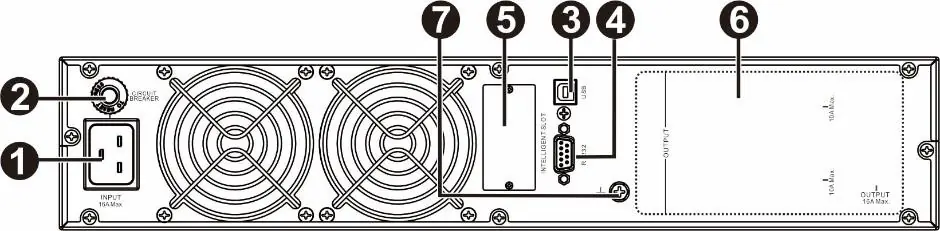
- Rear panel: Features AC input, input circuit breaker, USB port, RS-232 port, intelligent card slot, and ground screw.
Model compatibility
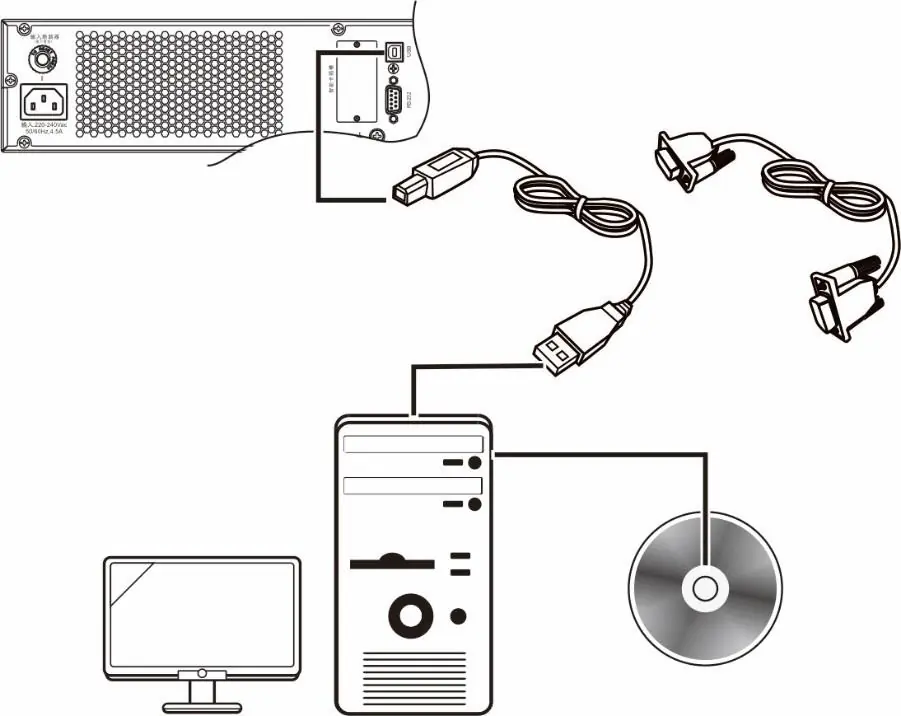
- Compatible with SchneiderUPS management software for unattended shutdown and monitoring.
- Use only interface kits supplied or approved by Schneider Electric.
- Supports rack-mount installation in 19-inch enclosures.

Manual page author
David Miller
Documentation analyst
Organizes user manual content into clear summaries, with attention to model details, product context, and everyday usability.