Lighting / Fixtures
Artemide Stellar Nebula 0152420APP Pendant Light Installation Guide
Quick installation and maintenance guide for the Artemide Stellar Nebula pendant light. Includes wiring diagrams for 120V and 120-277V systems, mounting instructions, and cleaning requirements.
Table of contents
Manual images
Jump to the sectionQuick guide from the manual
This document provides essential installation and maintenance instructions for the Artemide Stellar Nebula pendant light. Ensure all electrical work is performed by a qualified professional in accordance with local codes. The fixture is designed for indoor use only.
Installation
Before starting, ensure the power supply is disconnected. The installation requires careful handling of the fixture components.
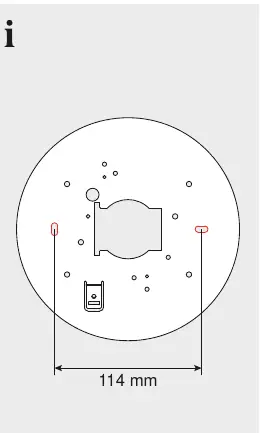
- Prepare the ceiling mounting surface, ensuring the mounting holes are spaced 114 mm apart.
- Secure the mounting plate to the ceiling junction box.
- Pass the electrical wires through the mounting plate.
- Connect the wires according to the specific dimming system used (see Wiring section).
- Attach the fixture canopy to the mounting plate and secure it firmly.
Wiring
The fixture supports two dimming configurations:
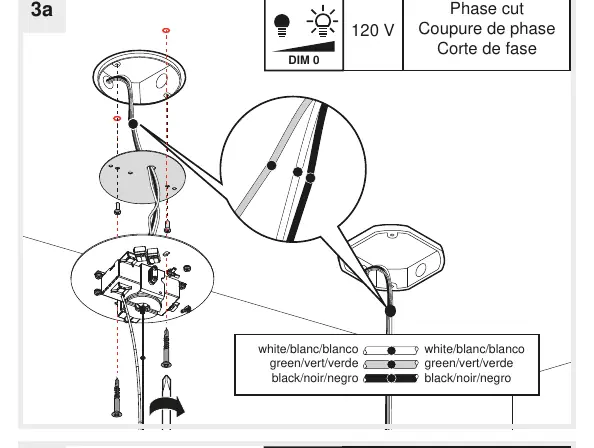
- Phase cut (120V): Connect white to white, green to green, and black to black.
- 0-10V dimming (120-277V): Connect white to white, green to green, black to black, and grey to grey/purple to purple for the 0-10V control signal.
Cleaning and Maintenance
To maintain the appearance of the fixture, clean only with a soft cloth dampened with water. Do not use chemical detergents, solvents, or abrasive cleaning agents, as these may damage the surface finish.

Contact Information
For technical support or inquiries, contact Artemide at their respective regional offices: Artemide (Italy) tel. +39 02 935 181, Artemide Inc. (USA) tel. 631 694 9292, or Artemide Ltée/Ltd. (Canada) tel. 514 323 6537.
Manufacturer information
Artemide S.p.A.
Practical help
Common problems
Fixture surface damage
Avoid using chemical detergents or abrasive cleaners. Use only water and a soft cloth.
Incorrect dimming performance
Ensure the wiring matches the specific dimming protocol (Phase cut for 120V or 0-10V for 120-277V).
Before use
- Verify the power supply is disconnected before installation.
- Ensure the ceiling junction box can support the weight of the fixture.
- Check that the mounting surface allows for a 114 mm hole spacing.
- Identify the dimming system (Phase cut or 0-10V) available at the installation site.
Images and diagrams
- Page 3 shows the physical mounting plate dimensions and the sequence for attaching the fixture to the ceiling.
- Page 4 provides detailed wiring color codes for both Phase cut and 0-10V dimming setups.
- Page 6 illustrates the correct cleaning method using only water.
Model compatibility
- Indoor use only.
- Requires professional installation.
- Compatible with Phase cut dimming at 120V.
- Compatible with 0-10V dimming control at 120-277V.

Manual page author
David Miller
Documentation analyst
Organizes user manual content into clear summaries, with attention to model details, product context, and everyday usability.