Power / Batteries Chargers
Asus Eee PC 1015PX HDD and Cooling Fan Replacement Guide
Step-by-step instructions for accessing the hard drive and replacing the cooling fan on the Asus Eee PC 1015PX laptop.
Table of contents
Manual images
Jump to the sectionOverview of the Repair Process
This guide provides instructions for accessing the internal components of the Asus Eee PC 1015PX, specifically focusing on the cooling fan and the hard drive compartment. Performing these repairs requires patience and the use of appropriate tools to avoid damaging the delicate plastic casing and internal ribbon cables.
Safety and Preparation
Before beginning any disassembly, ensure the laptop is completely powered off and disconnected from any power source. The most critical first step is to remove the battery to prevent accidental short circuits. Always work on a clean, flat surface and keep track of all removed screws, as they may vary in size and length.
Accessing the Internal Components
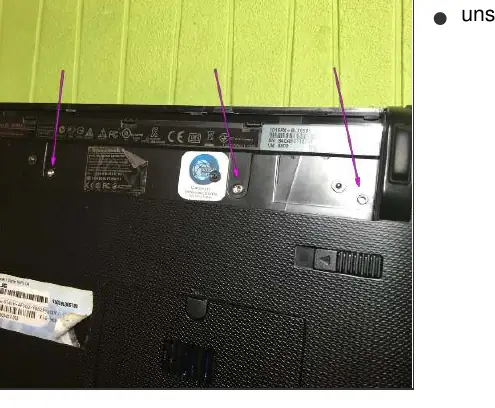
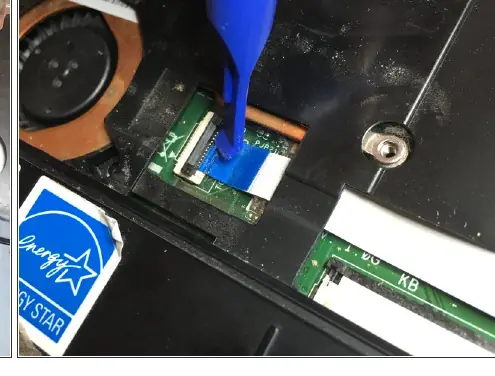
The disassembly process begins by removing the screws located on the bottom of the chassis. Once the base screws are removed, you must carefully unlock the keyboard hooks using a screwdriver. After the keyboard is released, gently pry up the sides to unclip the keyboard along its perimeter. Be extremely cautious when lifting the keyboard, as it is connected to the motherboard via a delicate ribbon cable. You must open the small black side latches on the connector to safely release this cable.
Removing the Cooling Fan and Heatsink
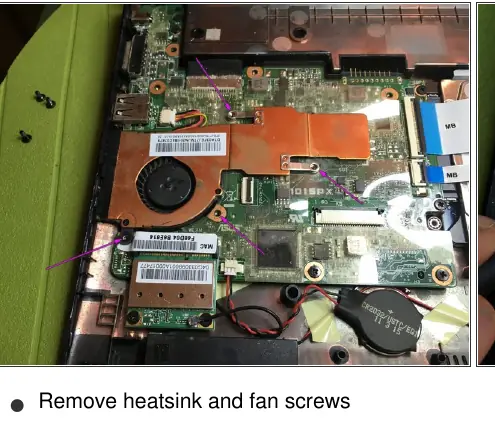
After removing the keyboard and disconnecting the necessary ribbon cables, you will need to remove the screws securing the trackpad block. Once the trackpad is removed, you gain access to the motherboard area where the heatsink and cooling fan are located. Remove the screws holding the heatsink and fan assembly in place and disconnect the fan's ribbon cable. When replacing the fan, it is essential to clean the old thermal paste from the processor and the heatsink surface using an appropriate cleaning agent. Apply a fresh layer of high-quality thermal paste before reattaching the heatsink to ensure optimal heat dissipation.
Hard Drive Access
If your goal is to replace or upgrade the hard drive, you can access it once the internal housing is exposed. Locate the two ribbon cables connected to the drive and carefully unhook them. Remove the two securing screws to lift the hard drive out of its bay. To reassemble the device, follow all the steps in reverse order, ensuring that all ribbon cables are securely seated and latches are locked before closing the chassis.
Manufacturer information
ASUSTeK Computer Inc.
Practical help
Common problems
Keyboard stuck or difficult to remove
Ensure all keyboard hooks are fully unlocked using a screwdriver and that the perimeter clips are released with a flat opening tool.
Overheating issues
Clean the cooling fan and replace the old thermal paste on the processor and heatsink with new thermal compound.
Before use
- Power off the laptop completely
- Disconnect the power adapter
- Remove the battery
- Prepare a set of precision screwdrivers
- Have a flat opening tool ready
- Prepare high-quality thermal paste for reassembly
Images and diagrams
- Purple arrows indicate screw locations for chassis and component removal
- Yellow arrows indicate specific screw locations for hard drive removal
- Ribbon cables require opening black side latches before removal
Model compatibility
- This guide is specific to the Asus Eee PC 1015PX model

Manual page author
Emily Carter
User documentation editor
Prepares concise manual descriptions and highlights the most useful setup, operation, and maintenance information for readers.