Furniture / Media Furniture
Assembly Instructions for Atlantic Summit Media Storage Cabinet
Quick assembly guide for the Atlantic Summit media storage cabinet. Includes step-by-step instructions, parts list, and essential wall-mounting safety procedures.
Table of contents
Quick guide from the manual
This manual provides assembly instructions for the Atlantic Summit media storage cabinet. Before beginning, ensure you have a clear workspace and the necessary tools: a Phillips screwdriver and a hammer. The unit is designed to be assembled in steps, utilizing cam locks and wood dowels for structural integrity. Wall mounting is required for safety.
Parts List
Before starting assembly, verify all components are present:
- Panels: A (Top), B (Side), C (Side), D (Shelf/Divider), E (Base), F (Adjustable Shelves), G (Back Panel), H (Back Panel).
- Hardware: Wood dowels (J), Cam screws (K), Cam locks (L), Wood screws (M), Shelf pins (N), Nails (O).
Assembly Instructions
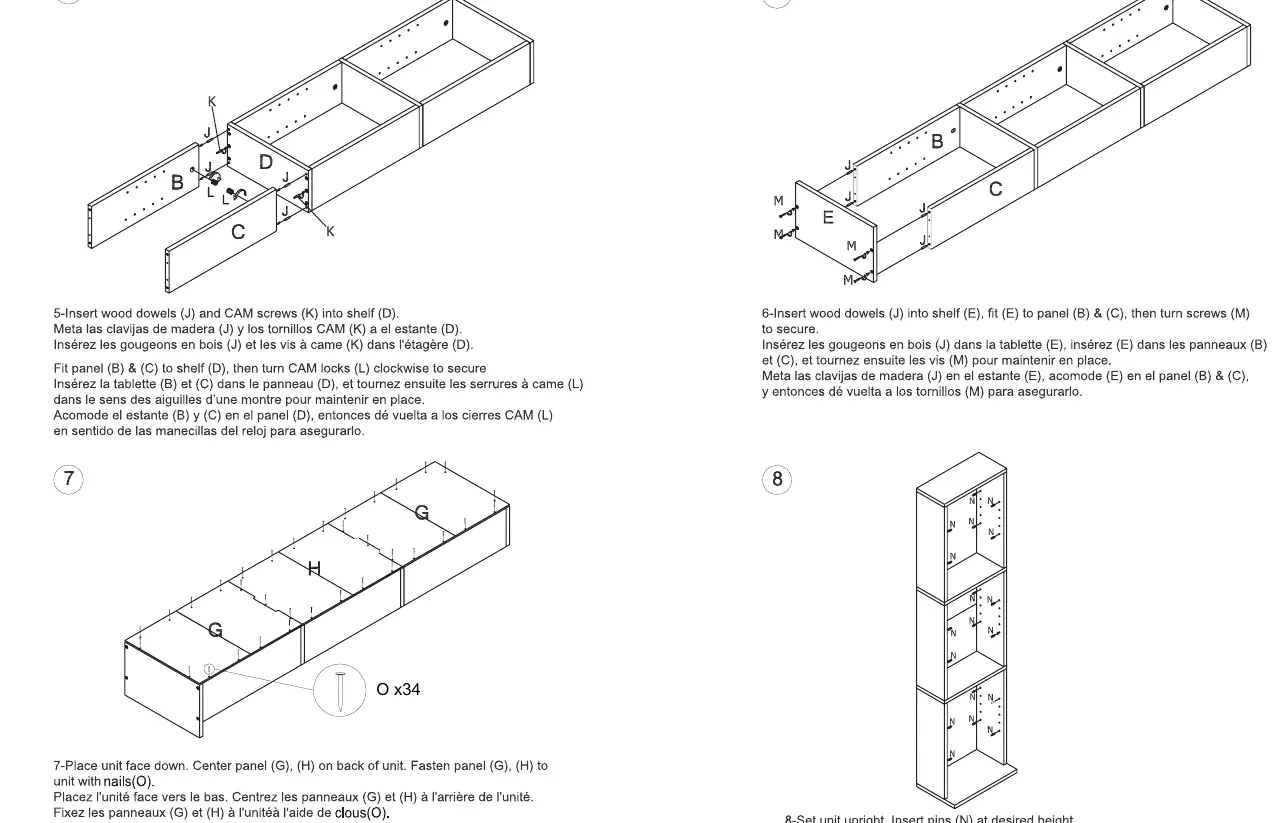
- Prepare Shelves: Insert wood dowels (J) and cam screws (K) into shelf (A).
- Assemble Frame: Insert wood dowels (J) into shelf (D), fit (D) to panels (B) and (C), then secure with screws (M).
- Connect Panels: Repeat the process to connect panels (B) and (C) to the remaining shelves (D) using dowels (J) and cam locks (L).
- Attach Base: Insert wood dowels (J) into base (E), fit to panels (B) and (C), and secure with screws (M).
- Attach Back Panels: Place the unit face down. Center back panels (G) and (H) on the back of the unit and fasten securely using nails (O).
- Final Setup: Set the unit upright. Insert shelf pins (N) at your desired height and place the adjustable shelves (F) onto the pins.
Wall Mounting Safety
For safety, it is essential to secure the unit to the wall. Use the provided metal mounting brackets (B), plastic wall anchors (A), wood screws (C), and dry-wall screws (D).
- Mark the wall position based on the unit height.
- Drill a hole and insert the plastic anchor (A).
- Attach the bracket (B) to the wall and secure the unit to the bracket using the provided screws.
- If your wall type is different (e.g., concrete), contact a local hardware store for appropriate fasteners.
Warranty Information
This product includes a one-year limited warranty covering defects in material or workmanship for purchases made in the U.S.A. and Canada. The warranty excludes claims resulting from misuse, accidents, or damage not related to manufacturing defects.
Practical help
Common problems
Unit instability
Ensure the unit is properly secured to the wall using the included mounting bracket and hardware.
Difficulty inserting shelves
Ensure shelf pins (N) are inserted at the desired, level height before placing shelves (F).
Before use
- Verify all parts are present according to the parts list.
- Ensure you have a Phillips screwdriver and a hammer.
- Clear a workspace on a flat, level surface.
- Identify the correct panels (A-H) before starting assembly.
Images and diagrams
- Assembly uses cam locks and wood dowels. Ensure cam locks are turned clockwise to secure panels.
- The back panel (G, H) is attached using nails (O).
- Wall mounting is required for safety.
Model compatibility
- Wall mounting hardware is included for wood studs/drywall. Contact a local hardware store if your wall type requires different fasteners.

Manual page author
Michael Turner
Technical manual editor
Reviews PDF manuals for structure, safety notes, and practical product details so readers can find the right information quickly.