Tools / Laser Engraving Accessories
User Manual for ATOMSTACK Glacier 120W/90W Laser Engraver
Comprehensive user guide for the ATOMSTACK Glacier 120W/90W laser engraver. Includes assembly instructions, safety guidelines, software setup (LightBurn), maintenance, and troubleshooting.
Table of contents
Manual images
Click an image to enlargeQuick guide from the manual
This manual provides essential instructions for the ATOMSTACK Glacier 120W/90W laser engraver. Key operations include proper assembly, connecting the water chiller, configuring the software (Atomstack Studio or LightBurn), and following safety protocols. Always ensure the water chiller is turned on before operating the laser to prevent damage.
Safety Statements and Warnings
This is a Class 4 laser product. Users must wear OD5+ safety goggles to protect against direct, reflected, and scattered laser light. The machine must be used in a horizontal position and firmly fixed. Do not leave the machine unattended during operation. Ensure the workplace is clean and free of flammable materials.
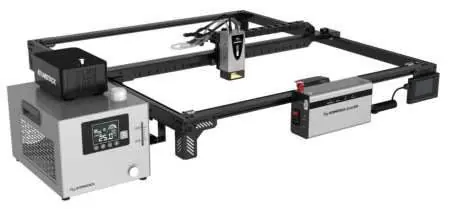
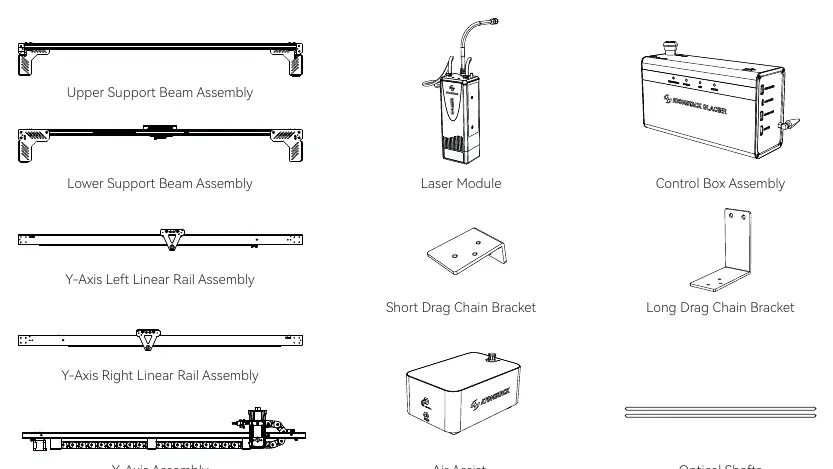
Package Contents
The package includes the upper and lower support beams, laser module, control box assembly, Y-axis linear rails, X-axis assembly, air assist, optical shafts, and necessary cables, brackets, and tools.
Device Installation
Follow these steps for assembly:
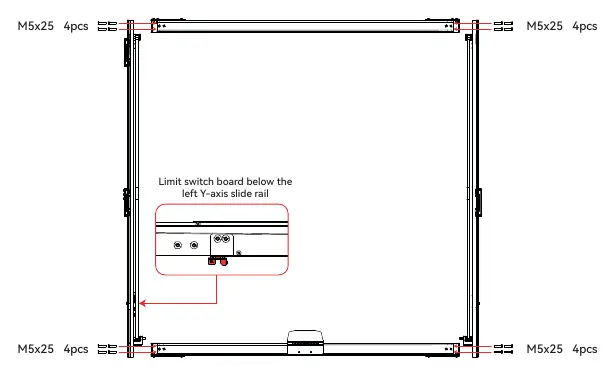
- Assemble the Y-axis linear rails onto the support beams using M5x25 screws.
- Secure the control box to the lower support beam.
- Install the X-axis assembly onto the Y-axis sliders.
- Assemble the optical shafts and couplings.
- Install the Y-axis drag chain brackets.
- Mount the laser module onto the Z-axis and connect the air tube.
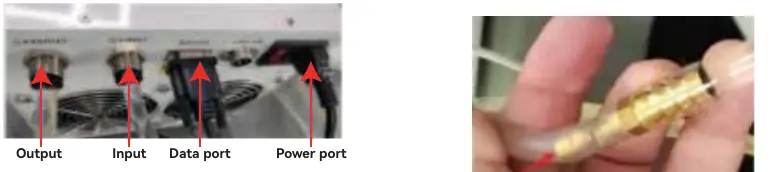
- Connect all wiring, including limit switches and motor cables.
- Connect the water chiller and air assist system.
- Fill the water chiller with the appropriate antifreeze/water mixture.
Product Status and Indicators
The control box features a power switch and emergency stop button. Status indicators include:
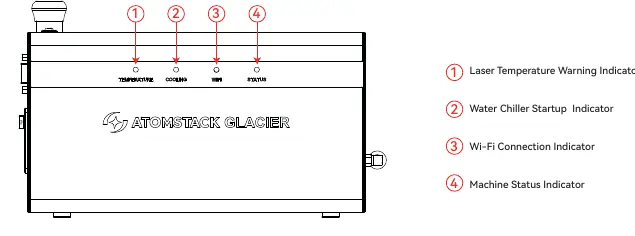
- Laser Temperature: Green (16-40°C), Yellow (40-50°C), Red flashing (>50°C or <16°C).
- Water Chiller: Green (Normal), Red flashing (Abnormal).
- Wi-Fi: Green (Connected), Blue (Connecting), Red (Failure).
- Machine Status: Green (Standby/Operating), Red (Abnormal).
Feature Introduction
- Overclock Mode: Increases laser power by 20%. Use sparingly.
- Water Chiller Protection: Monitors flow rate and temperature.
- Tilt Alarm: Stops the machine if tilted between 15° and 20°.
- Flame Detection: Automatically stops the machine if a flame is detected.
- Power-Off Resume: Allows resuming engraving after a power outage.
Machine Maintenance
Perform the following maintenance weekly:
- Wipe upper and lower optical shafts with a lint-free cloth and anhydrous ethanol.
- Clean the laser nozzle and protective window.
- Clean the honeycomb plate and base plate.
Control Software
The machine supports Atomstack Studio (PC/App) and LightBurn. For LightBurn, import the provided configuration file (AtomStack_Glacier_120W.lbdev) to ensure correct settings.
FAQs
If the machine does not respond, check the emergency stop button and USB key. LaserGRBL is not compatible due to the 460800 baud rate. Refer to the manual for specific alarm codes (e.g., E4 for water flow abnormality).
Practical help
Common problems
Machine does not respond when powered on
Check if the emergency stop button is pressed; rotate clockwise to release. Ensure the USB key is inserted.
Auto-focusing failure
Check if the object is within the auto-focusing range or if it is made of soft material that causes the limit switch to sink.
LaserGRBL software not working
LaserGRBL is not compatible with this machine due to the 460800 baud rate.
Homing failure
Check if the Z-axis auto-focusing is working, as homing starts with the Z-axis. Inspect X and Y-axis limit switches.
Before use
- Check control box voltage (default 230V, adjust if 110V)
- Check water chiller voltage
- Wear OD5+ safety goggles
- Ensure workspace is clean and free of flammable materials
- Place a metal plate below the bottom
- Turn on the water chiller before using the machine
Specs in practice
- Laser Temperature Range
- Normal operating range is 16°C to 40°C. Above 50°C or below 16°C triggers an alarm.
- Overclock Mode
- Increases laser power by 20% over standard power; use sparingly to preserve laser lifespan.
Images and diagrams
- Assembly diagrams show screw locations (M5x25, M5x10, M3x45) for the frame and control box.
- Wiring diagrams illustrate connections for the mainboard, X/Y axis cables, and Y-axis motor.
- Water chiller diagram shows the closed circulation loop with 10mm and 8mm tubes.
- Status indicator diagram identifies the four LED indicators on the control box.
Model compatibility
- Compatible with Atomstack Studio (PC and App).
- Compatible with LightBurn (requires importing the provided .lbdev configuration file).
- LaserGRBL is NOT compatible.

Manual page author
Michael Turner
Technical manual editor
Reviews PDF manuals for structure, safety notes, and practical product details so readers can find the right information quickly.