Tools / Drills
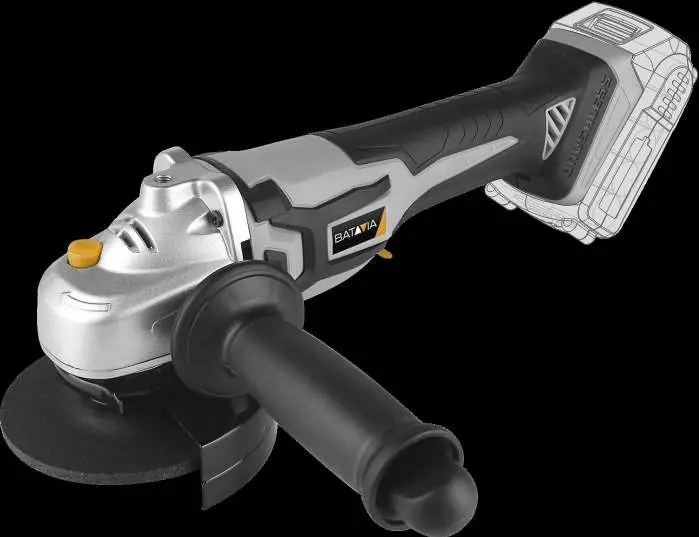
Batavia 18V Cordless Angle Grinder User Manual
Quick guide for the Batavia 18V Cordless Angle Grinder (BT-CBAG001). Includes assembly, disc installation, operation, safety warnings, and maintenance instructions.
Table of contents
Manual images
Jump to the sectionQuick guide from the manual
This manual provides essential safety and operating instructions for the Batavia 18V Cordless Angle Grinder (Model BT-CBAG001). Always read the full safety warnings before use to prevent electric shock, fire, or serious injury. The tool is designed for grinding masonry and steel without water. For cutting operations, a special protection guard (13b, not included) must be used.
Assembly
Before any assembly or maintenance, ensure the machine is switched off and the battery is removed.

- Installing the additional handle: Screw the handle (12) into one of the three available positions on the gear head to suit your preference. Always operate the tool with the handle installed and hold it with both hands.
- Protective cover: Never use the grinder without the protective cover (4). Align the cover (13a/13b) to protect against sparks and debris. Use the quick lock (14) to secure it; tighten with the hex nut (2) if necessary.
Inserting the grinding disc
- Disconnect the battery.
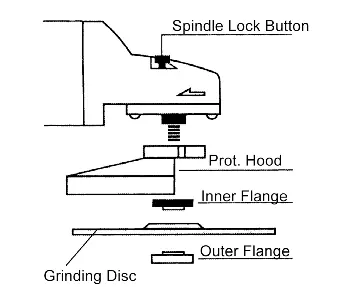
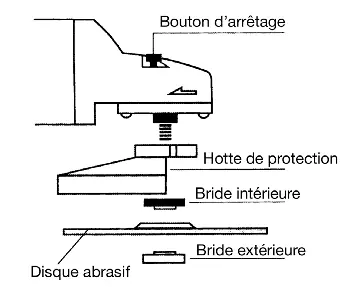
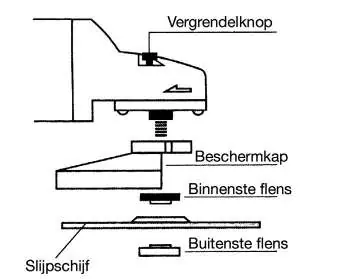
- Press and hold the locking knob (2) to lock the spindle.
- Rotate the spindle by hand until it snaps into place.
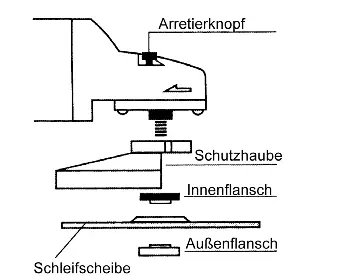
- Place the inner flange (16) on the spindle so it cannot rotate.
- Place the grinding disc (1) on the inner flange.
- Screw on the outer flange (17) and tighten with the face pin wrench (10).
- Note: The outer flange has two sides. For thin discs, screw it with the collar facing up; for thick discs, face it down.
- Spin the disc by hand to ensure it is installed correctly and moves freely.
Operation
To turn on the device, hold down the safety switch (7) and press the ON/OFF switch (8). Release the switch to turn it off. For deburring, use an inclination angle of 30° to 40° with light pressure. For cutting, maintain firm contact with the workpiece and work against the direction of the cut to prevent kickback.
Maintenance and Cleaning
The tool contains no user-serviceable internal parts. Keep ventilation openings and the motor housing clean by wiping with a clean cloth or using low-pressure compressed air. Clean the tool immediately after each use. Do not use solvents or harsh cleaning agents.
Safety
Always wear personal protective equipment, including safety glasses, dust mask, hearing protection, and gloves. Do not use damaged accessories. Be aware of kickback risks when working near edges or corners. This tool generates an electromagnetic field that may affect medical implants; consult your doctor before use.
Manufacturer information
Batavia
Practical help
Common problems
Disc binding or jamming
Switch off the tool immediately and wait for the disc to stop completely. Investigate the cause of binding before resuming.
Excessive vibration
Check that the accessory is correctly mounted and matches the grinder spindle thread. Ensure the disc is not damaged.
Tool overheating
Ensure ventilation openings are clean and free of dust. Do not apply excessive pressure; let the tool do the work.
Before use
- Ensure the battery is removed before assembly or changing discs.
- Check that the protective cover is securely attached.
- Inspect the grinding disc for chips, cracks, or excessive wear.
- Verify the disc is rated for the maximum speed of the tool.
- Ensure the additional handle is securely installed.
- Check that the workpiece is properly clamped.
Specs in practice
- Grinding disc diameter
- Ø 115 mm.
- Drive shaft thread
- M14.
Images and diagrams
- A: Overview of the tool components (1-17).
- B: Protective hood installation and correct grinding angle (30-40°).
- C: Flange and wrench assembly.
- D: Deburring and cutting techniques.
Model compatibility
- Requires MAXPACK 18V battery system.
- Cutting operations require a special protection guard (13b) not included in the package.
- Do not use saw chain or toothed saw blades.

Manual page author
Emily Carter
User documentation editor
Prepares concise manual descriptions and highlights the most useful setup, operation, and maintenance information for readers.