Industrial / Door Controls
User Guide for BEA EAGLE and EAGLE HM Motion Sensor
Quick guide for the BEA EAGLE and EAGLE HM motion sensor. Includes installation, wiring, mechanical adjustments, settings, and troubleshooting steps.
Table of contents
Manual images
Click an image to enlargeQuick Guide from the Manual
The BEA EAGLE and EAGLE HM are unidirectional activation sensors for automatic pedestrian and high-mount doors. Key installation requirements include:
- Mounting Height: EAGLE (6' to 13'), EAGLE HM (10' to 16'6").
- Power Supply: 12-24 VAC/VDC.
- Antenna Selection: Standard EAGLE supports narrow or wide antennas; EAGLE HM supports narrow only.
- Safety: Do not touch electrical parts, avoid vibrations, and do not cover the sensor.
Description and Components
The sensor consists of the following main parts:
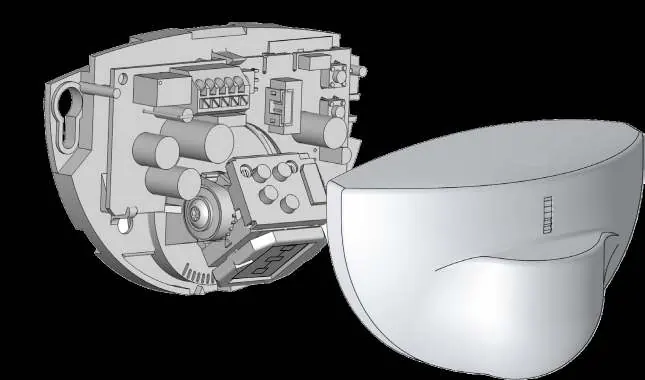
- Main connector for wiring.
- Antenna (Wide or Narrow).
- Push buttons for programming.
- Cover.
Installation and Wiring
Follow these steps to install the sensor:
- Apply the mounting template to the desired location.
- Drill one hole for the cable and two holes for the mounting screws.
- Pull the cable through the hole.
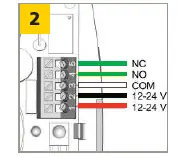
- Connect the wires to the main connector:
- 1: RED - POWER SUPPLY +
- 2: BLACK - POWER SUPPLY -
- 3: WHITE - COM
- 4: GREEN - NO (Normally Open) OR 5: GREEN - NC (Normally Closed)
- Position the cable and mount the sensor firmly.
Mechanical Adjustments
You can adjust the detection field by changing the antenna angle and type:
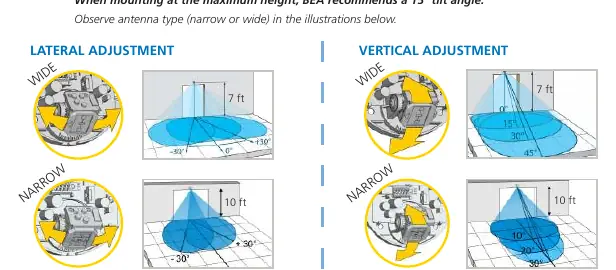
- Antenna Type: Choose narrow or wide based on the required detection zone width.
- Lateral/Vertical Adjustment: Adjust the antenna angle to position the detection field. BEA recommends a 15° tilt angle when mounting at the maximum height.
Settings
The sensor can be programmed using a remote control or the onboard push buttons. Key settings include:
- Zone Size: Adjusts the detection area.
- Immunity Filter: Helps prevent false detections.
- Detection Mode: Choose between two-way, one-way towards, one-way with motion tracking, or one-way away.
- Output Configuration: Set to Active (NO) or Passive (NC).
- Hold-Open Time: Adjusts how long the door stays open.
- Door Control: Set to auto, open, or closed.
Troubleshooting
If you encounter issues, check the following:
- Door remains closed/LED off: Check wiring and power supply. Ensure door control setting (F2) is set to 1 (automatic).
- Door does not react: Check output configuration.
- Door opens/closes constantly: Ensure the sensor is fixed properly, increase immunity filter, or reduce zone size.
- Door opens for no reason: Ensure detection mode is unidirectional, increase immunity filter, or change antenna angle.
- LED flashes quickly after unlocking: Enter the correct access code.
Technical Specifications
- Technology: Microwave and microprocessor.
- Frequency: 24.150 GHz.
- Supply Voltage: 12-24 VAC ±10%; 12-24 VDC +30% / -10%.
- Degree of Protection: IP54.
- Temperature Range: -4 to 131 °F.
For technical support, contact BEA at 1-800-523-2462 or visit www.BEAsensors.com.
Official resources from the manual
Manufacturer information
BEA Sensors
Practical help
Common problems
Door remains closed and LED is off
Check wiring and power supply. Ensure door control setting (F2) is set to 1 (automatic).
Door opens and closes constantly
Ensure sensor is fixed properly, increase immunity filter, or reduce zone size.
Door opens for no reason
Ensure detection mode is unidirectional, increase immunity filter, or change antenna angle.
LED flashes quickly after unlocking
Sensor needs access code. Enter correct code or cycle power to access without code for the first minute.
Before use
- Verify power supply is 12-24 VAC/VDC.
- Check mounting height (Eagle: 6'-13', Eagle HM: 10'-16'6").
- Ensure the sensor is mounted in front of the door (horizontal) or above the door (vertical).
- Select the correct antenna (Narrow or Wide) for the application.
- Ensure the sensor is not near neon lamps or moving objects.
Specs in practice
- Detection mode: motion
- The sensor detects movement within the configured zone.
Images and diagrams
- Wiring diagram shows 5 terminals: 1 (Red/Power+), 2 (Black/Power-), 3 (White/COM), 4 (Green/NO), 5 (Green/NC).
Model compatibility
- EAGLE HM only supports the narrow antenna.
- Standard EAGLE supports both narrow and wide antennas.

Manual page author
Michael Turner
Technical manual editor
Reviews PDF manuals for structure, safety notes, and practical product details so readers can find the right information quickly.