Industrial / Door Controls
User Manual for BEA Eagle Artek Motion Sensor
Quick guide for the BEA Eagle Artek motion sensor. Includes installation, mounting, settings, access code configuration, and troubleshooting steps.
Table of contents
Manual images
Click an image to enlargeQuick guide from the manual
This document provides installation and configuration instructions for the BEA Eagle Artek motion sensor, designed for automatic sliding and swing doors. It covers the setup of the DRO Radar technology, mounting procedures, and access code management.
Product Overview
The Eagle Artek is equipped with DRO Radar technology for digital adjustment of the radar field shape. Key components include:
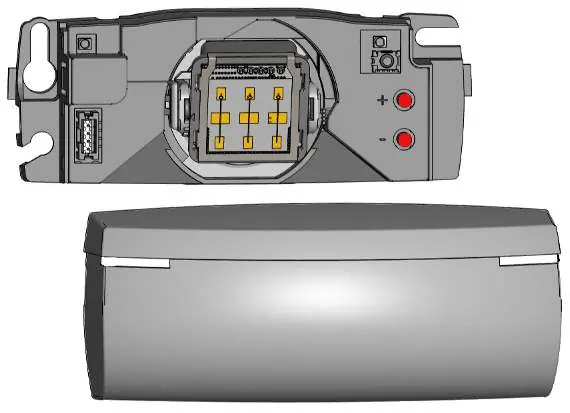
- Main connector
- Antenna
- LEDs
- Push buttons
- Cover
Installation
Use the provided mounting template to mark and drill holes for installation. Ensure the sensor is securely mounted according to the mounting options provided in the manual.
Settings and Access Code
The sensor supports access code configuration (1 to 4 digits), which is recommended if multiple sensors are installed in close proximity.
- Saving an access code: Follow the specific button sequence provided in the manual.
- Deleting a known access code: Follow the specific button sequence provided in the manual.
- Deleting an unknown access code: Cycle power and follow the sequence.
If you forget the access code, cut and restore the power supply. Within 1 minute, you can access the sensor without an access code.
Troubleshooting
If the door remains closed and the LED is off, check the wiring and power supply. If the door does not react as expected, verify the output configuration on the sensor.
Technical Support
For further assistance, contact BEA Tech Support at 1-800-523-2462 or email [email protected].
Manufacturer information
BEA Sensors
Practical help
Common problems
Door remains closed, LED off
Check the wiring and the power supply.
Door does not react as expected
Check the output configuration setting on the sensor.
Before use
- Verify power supply voltage
- Check all wiring connections
- Use the provided mounting template for installation
- Set an access code if multiple sensors are installed close to each other
Images and diagrams
- Page 1: Identification of main connector, antenna, LEDs, push buttons, and cover
- Page 7: Mounting template for drilling
- Page 8: Access code programming sequences
Model compatibility
- Compatible with automatic sliding and swing doors

Manual page author
David Miller
Documentation analyst
Organizes user manual content into clear summaries, with attention to model details, product context, and everyday usability.