Home Appliances / Small Kitchen Appliances
User Manual for Bella Pro Series 6-Slice French Door Toaster Oven
Quick guide for the Bella Pro Series 6-Slice French Door Toaster Oven. Includes operating instructions, cooking functions, shelf positions, cleaning, and air fry charts.
Table of contents
Manual images
Click an image to enlargeQuick Guide
This guide provides essential information for operating your Bella Pro Series 6-Slice French Door Toaster Oven. Always ensure the unit is placed on a level surface with at least 4 inches of clearance on all sides for proper ventilation. Before first use, wash all accessories in warm, soapy water and run the unit empty once to remove manufacturing oils.
Getting to Know Your Toaster Oven
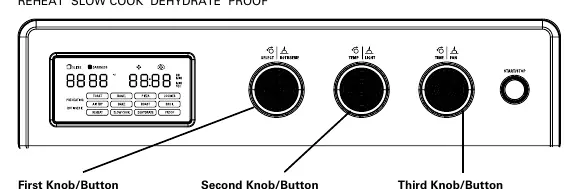
The unit features a backlit display and three control knobs:
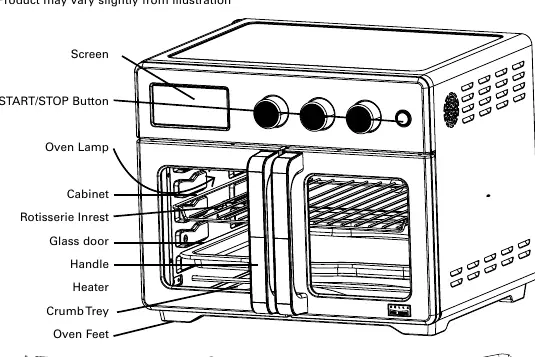
- First Knob/Button: Rotate to select recipes; press to activate the rotisserie function.
- Second Knob/Button: Rotate to adjust temperature; press to toggle the inner light.
- Third Knob/Button: Rotate to adjust time; press to adjust fan speed.
Operating Instructions
General Cooking:
- Plug the unit into a 120V AC outlet.
- Rotate the left knob to select the desired preset recipe.
- Use the middle knob to adjust the temperature if necessary.
- Use the right knob to adjust the cooking time.
- Press the START/STOP button to begin.
Rotisserie Function:
- Force the Rotisserie Spit through the center of the food lengthwise.
- Slide the forks onto each side of the spit and secure them by tightening the set screws.
- Insert the assembled spit into the rotisserie connection inside the unit.
- Plug in the unit and press the left knob to select the Rotisserie function.
- Adjust temperature and time as needed, then press START/STOP.
Cooking Functions
The oven supports various functions including Toast, Bagel, Pizza, Cookies, Air Fry, Bake, Roast, Broil, Reheat, Slow Cook, Dehydrate, and Proof. Each function has default temperature and time settings that can be adjusted. The fan speed is adjustable for most functions except Toast, Bagel, Dehydrate, and Proof.
Shelf Positions
The oven has 3 height positions for the air fryer/dehydrator basket, wire rack, or bake/broil pan:
- Upper: Use for the BROIL function.
- Center: Use for TOAST, BAGEL, PIZZA, COOKIES, AIR FRY, and DEHYDRATE.
- Lower: Use for BAKE, SLOW COOK, ROAST, REHEAT, and WARM.
Warning: Never place the bake/broil pan directly onto the lower heating elements.
Care & Cleaning
Always unplug the unit and allow it to cool completely before cleaning.
- Exterior: Clean with a damp cloth and dry thoroughly.
- Interior: Clean with a mild, non-abrasive cleaner and a plastic scouring pad after each use.
- Accessories: The air fryer/dehydrator basket, bake/broil pan, wire rack, and crumb tray are dishwasher safe.
- Caution: Do not use metal scouring pads, abrasive cleaners, or spray-on oven cleaners, as these can damage the surfaces.
Safety Warnings
- Do not immerse the cord, plug, or appliance in water.
- Do not operate the unit unattended.
- Do not cover the crumb tray or any part of the oven with metal foil, as this causes overheating.
- Do not store materials other than manufacturer-recommended accessories inside the oven.
- If the unit malfunctions, press STOP and unplug it immediately. Do not attempt to repair the unit yourself.
Manufacturer information
bella
Practical help
Common problems
Unit will not operate
Ensure the START/CANCEL button has been pressed.
Display turns off
The unit enters standby mode if no buttons are pressed within 1 minute.
Food not cooking evenly
Check that the shelf position is correct for the selected function and ensure adequate air circulation around the unit.
Before use
- Remove all packaging materials and labels.
- Place on a level surface with at least 4 inches of clearance on all sides.
- Wash accessories (basket, pan, rack, crumb tray) in warm, soapy water.
- Run the unit empty once to remove manufacturing oils.
- Ensure the crumb tray is installed at the bottom.
Specs in practice
- 3 Shelf Positions
- Adjustable heights for different cooking functions (Upper for Broil, Center for Toast/Air Fry, Lower for Bake/Roast).
Images and diagrams
- First Knob: Selects recipes and activates rotisserie.
- Second Knob: Adjusts temperature and toggles inner light.
- Third Knob: Adjusts time and fan speed.
Model compatibility
- Use only manufacturer-recommended accessories.
- Do not use metal scouring pads.

Manual page author
Emily Carter
User documentation editor
Prepares concise manual descriptions and highlights the most useful setup, operation, and maintenance information for readers.