Garden / Swimming Pools
Installation and User Guide for Bestway Hydrium Oval Pool
Complete installation and maintenance guide for the Bestway Hydrium Oval Pool. Includes step-by-step assembly instructions, safety guidelines, water chemistry maintenance, and winterization procedures.
Quick answers from the manual
Quick answer
- This manual provides instructions for installing and maintaining the Bestway Hydrium Oval Pool. Key steps include site preparation, assembly of the steel wall and liner, filling the pool to 90% capacity, and ongoing water chemistry maintenance. p. 25, 26
Key actions
- Assemble the pool on a flat, level surface. p. 25
- Fill the pool to 90% capacity (up to the welding line). p. 26
First start
- Assemble when the ambient temperature is above 15ºC (59ºF). p. 25
Problems and fixes
Liner folds
Smooth out the bottom liner starting from the center outwards when the pool is 2/3 full.
p. 26Technical specifications
| Parameter | Value | Meaning | Pages |
|---|---|---|---|
| Assembly Time | Approx. 3 hours | Estimated time with 2-3 people. | p. 25 |
Where to find it in the PDF
- Assembly Instructions p. 5, 6, 7, 8
- Maintenance p. 26, 27
Table of contents
Manual images
Click an image to enlargeQuick guide from the manual
This guide provides essential information for the installation and maintenance of the Bestway Hydrium Oval Pool. Key requirements include a flat, level surface, 2-3 people for assembly, and an ambient temperature above 15ºC (59ºF) for easier liner handling. The pool should be filled to 90% capacity (up to the welding line).
Safety Information
Read and follow all instructions.
- Continuous, active, and vigilant supervision of weak swimmers and non-swimmers by a competent adult is required at all times.
- Designate a competent adult to supervise the pool each time it is being used.
- Never dive into any shallow body of water.
- Do not use the swimming pool when using alcohol or medication.
- Keep rescue equipment (e.g., a ring buoy) and a working phone with emergency numbers near the pool.
- Do not leave the drained pool outside, as it is liable to deformation due to wind.
Setup Instructions
Choosing the Correct Location:
- The surface must be flat, smooth, and capable of supporting the total weight of the water and users.
- Position the pool away from objects children could use to climb into the pool.
- Ensure the side with the water inlet and outlet is facing the power source for the filtration system.
- Avoid surfaces like mud, sand, gravel, or balconies.
Assembly:
- Compare parts in the box to the parts list.
- Install the ladder (if included) before starting the pool installation.
- Place the Ground Cloth in the selected area.
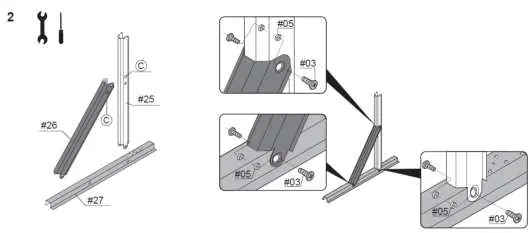
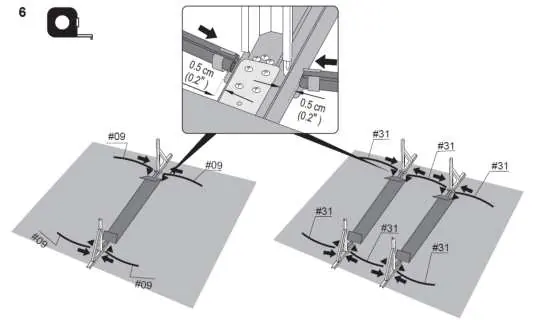
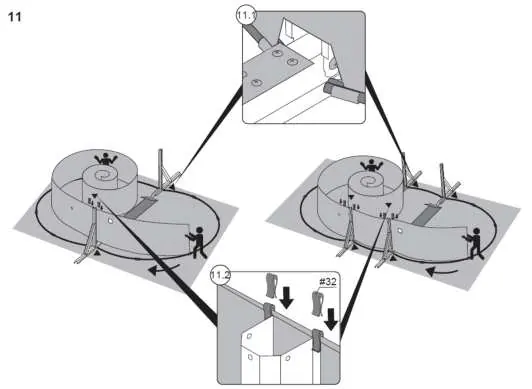
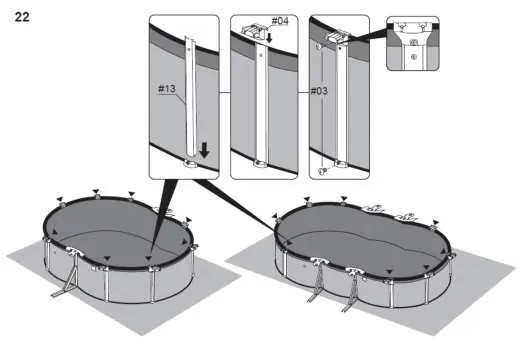
- Follow the step-by-step illustrations for assembling the steel wall, PVC rails, and connectors.
- Important: During steel wall installation, lift and place it inside the PVC rails without applying vertical pressure to avoid deformation.
Filling the Pool
- Fill the pool with tap water until it reaches the welding line (90% capacity).
- Do not overfill, as this could cause the pool to collapse.
- When 90% full, check that the distance between the water surface and the top of the rails is consistent all around. If not, the surface is not level.
Maintenance
Water Maintenance:
- Use pool chemicals (chlorine or bromine tablets) with a chemical dispenser or floater. Do not throw chemicals directly into the water.
- Maintain water chemistry within the specified parameters (e.g., pH 6.8 to 7.6, Free active chlorine 0.3 to 1.5 mg/l).
- Use a pool skimmer and vacuum cleaner regularly to remove dirt.
Winterization & Storage
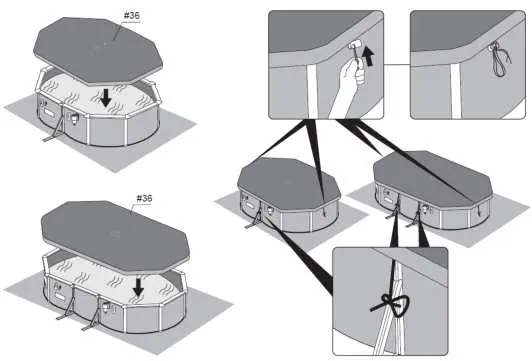
- Ensure the water level is at least 10 cm (3.9") lower than the pool inlet A before winter.
- Place an inflatable item (like a pool pillow) on the water surface to support the pool cover.
- For storage, ensure the liner is completely clean and dry. Sprinkle with talcum powder to prevent sticking. Store in a dry place between 15ºC and 38ºC.
Manufacturer information
Bestway
Practical help
Common problems
Liner is difficult to assemble
Leave the liner in the sun for one hour to make it more pliable.
Pool wall deformation
Ensure the surface is perfectly flat and level. Do not apply vertical pressure during wall installation.
Water leakage
Check valves and seams when the pool is 90% full. Use the provided underwater adhesive repair patch for leaks.
Before use
- Ensure the surface is flat, smooth, and capable of supporting the total weight.
- Check for overhead power lines or underground pipes.
- Verify all parts are present according to the manual.
- Have 2-3 people available for assembly.
- Prepare a pool ladder (if not included).
Specs in practice
- Ambient Temperature
- Assemble when the temperature is above 15ºC (59ºF) for easier liner handling.
Images and diagrams
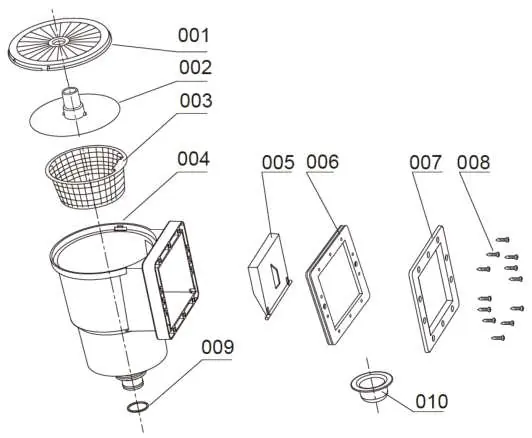
- Diagrams show the step-by-step assembly of the steel wall, PVC rails, and skimmer installation.
- Specific diagrams illustrate the correct water level and winterization steps.
Model compatibility
- If a pump or ladder is included, refer to their specific manuals.
- The ladder must match the pool size.

Manual page author
Michael Turner
Technical manual editor
Reviews PDF manuals for structure, safety notes, and practical product details so readers can find the right information quickly.