Automotive / Lighting Accessories
Operating and Installation Instructions for Blaupunkt 12V LED Headlamp
Quick guide for installing and troubleshooting Blaupunkt 12V LED headlamps. Includes installation steps for H4, H7, H8, H11, H16, HB3, and HB4 models, safety precautions, and technical specifications.
Table of contents
Manual images
Click an image to enlargeQuick Guide from the Manual
This manual provides instructions for the installation and operation of Blaupunkt 12V LED headlamps. These lamps are designed for 12V vehicle systems. Before installation, ensure the headlamp is compatible with your vehicle and that the product is free of defects. Note that these products are not intended for sale in the USA or Canada. If you encounter a warning signal on your dashboard after installation, a warning canceller adaptor may be required.
Structure and Functions
The LED headlamps are available in various models (H4, H7, H8/H11/H16, HB3/HB4) with the following general specifications:
- Operating Voltage: 12V
- Power: 26W ±10%
- Luminous Flux: 2400lm ±20%
- Water Resistant Rating: IP67
- Lifespan: 20,000 hours
- Colour Temperature: 5000K & 6000K
Installation
General Preparation: Open the vehicle hood, locate the original halogen bulb, and remove it from the housing.
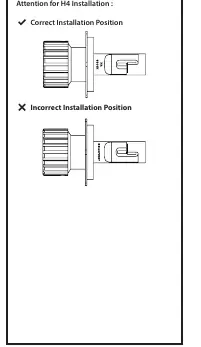
H4 & H7 Installation

- Remove the cap plate from the headlamp.
- Insert the cap plate into the headlight housing and secure it with the retaining spring clip.
- Install the headlamp into the housing and turn clockwise to secure it.
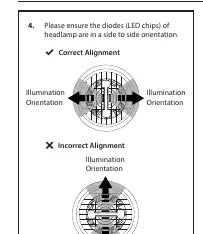
- Ensure the LED chips are in a side-to-side orientation for correct beam alignment.
- Connect the headlamp cable to the vehicle wiring harness.
H8/H11/H16 & HB3/HB4 Installation
- Install the headlamp directly into the headlight housing and turn clockwise to secure it (do not remove the cap plate).
- Ensure the LED chips are in a side-to-side orientation.
- Connect the headlamp cable to the vehicle wiring harness.
Troubleshooting
If you experience issues, consult the following solutions:
- One headlamp doesn't work: The headlamp may have burned out; replace with a new one.
- Both headlamps don't work: Check for a blown fuse, incorrect wiring connections, or no power to the circuit.
- Dim headlight: Check for a broken alternator, power supply issues, or a weak car battery.
- Bulb does not light up: Remove the bulb, turn it 180°, and reinstall it.
Warnings and Safety
Do not modify the product or expose it to dust, grease, or scratches. Avoid looking directly at the operating headlamp to prevent eye damage. Allow the headlamp to cool to room temperature before replacing it. After installation, verify the correct light/beam pattern, ensure indicators are working, confirm wiring is connected correctly, and ensure covers are properly reinstalled.
Manufacturer information
Blaupunkt
Practical help
Common problems
One headlamp does not work
The headlamp may have burned out; replace with a new headlamp.
Both headlamps do not work
Check for a blown fuse, incorrect wiring connections, or no power to the circuit/bad ground.
Dim headlight
Check for a broken alternator, power supply issues, or a weak car battery.
Bulb does not light up
Remove the bulb, turn it 180°, and reinstall it.
Warning signal light appears on dashboard
A warning canceller adaptor may be needed.
Before use
- Ensure the vehicle uses a 12V system.
- Verify the correct bulb model (H4, H7, H8/H11/H16, or HB3/HB4) for your vehicle.
- Inspect the headlamp for any defects before installation.
- Ensure the vehicle is turned off before starting installation.
- Verify you have the necessary tools to access the headlight housing.
Specs in practice
- Operating Voltage
- 12V (Compatible with standard passenger vehicle electrical systems).
- Water Resistant Rating
- IP67 (Protected against dust and temporary immersion in water).
- Luminous Flux
- 2400lm ±20% (Indicates the brightness output of the LED).
Images and diagrams
- H4/H7 installation requires removing the cap plate first, securing it with the spring clip, then inserting the bulb.
- H8/H11/H16 and HB3/HB4 models are installed directly into the housing without removing the cap plate.
- Correct LED alignment requires the diodes to be in a side-to-side orientation.
Model compatibility
- Not for sale in the USA or Canada.
- Fit for 12V vehicles only.
- Warning canceller adaptor may be required for some vehicles.

Manual page author
David Miller
Documentation analyst
Organizes user manual content into clear summaries, with attention to model details, product context, and everyday usability.