Tools / Inspection Cameras
Bosch GIC 12V-5-27 C Digital Inspection Camera User Manual
Quick guide for the Bosch GIC 12V-5-27 C digital inspection camera. Learn about setup, battery operation, menu navigation, data transfer, and troubleshooting.
Table of contents
Manual images
Click an image to enlargeQuick guide from the manual
This guide provides essential information for operating the Bosch GIC 12V-5-27 C digital inspection camera. Always read the full safety instructions provided in the original manual before use.
Safety instructions
Warning: Do not operate the camera in explosive atmospheres. Remove the battery before any work on the camera. Keep magnetic accessories away from medical implants (e.g., pacemakers) and magnetic data storage media.
Product description
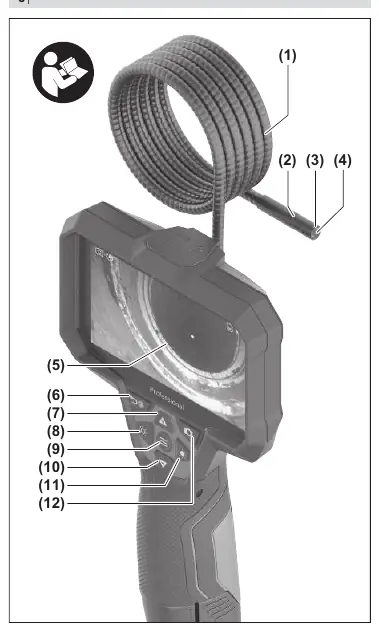
The inspection camera is designed for inspecting dark or hard-to-reach areas. It can also be used to move or remove small, light objects (e.g., small screws) when the supplied accessories are attached to the camera head.
Assembly
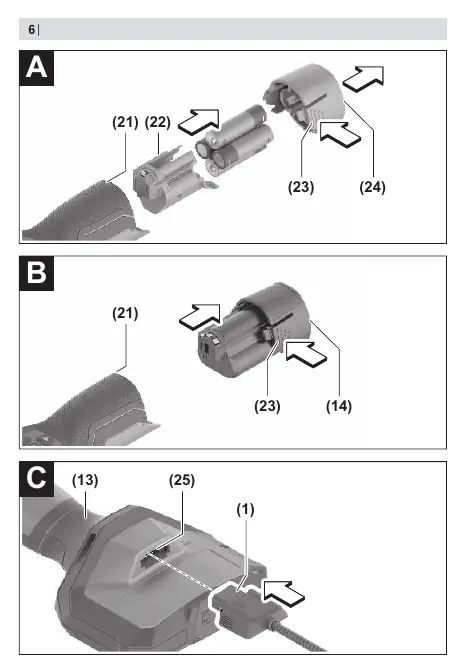
The camera can be powered by a Bosch Li-ion battery, standard AA batteries, or NiMH rechargeable batteries using the supplied battery adapter.

Battery operation
- Battery Adapter: Insert the receptacle into the bay. Place batteries in the receptacle as shown on the cap. Slide the cap over the cover until it clicks into place.
- Li-ion Battery: Slide the charged battery into the port until it clicks into place.
Camera cable and accessories
- Camera cable: Push the connector into the camera connection until it clicks.
- Accessories: The mirror, hook, or magnet can be fitted onto the camera head. Push the accessory all the way onto the camera head.
Operation
To switch on, press the On/Off button or the centre button. Use the left and right buttons to regulate the camera head light. Use the up and down buttons to zoom in or out. Press the centre button to access the main menu.
Data transfer
Photos and videos can be saved to a Micro-SD card. If no card is inserted, photos are saved to the internal memory (video recording is not possible without a card). Data can be transferred to a PC via the USB Type-C interface.
Troubleshooting
If the display shows a warning, check the internal memory or Micro-SD card status. Delete files or restart the camera if necessary. If problems persist, contact an authorized Bosch service centre.
Maintenance
Keep the camera clean. Clean the camera lens regularly and check for lint. Do not immerse the handheld device in water. The built-in coin cell must only be replaced by authorized service personnel.
Manufacturer information
Bosch
Practical help
Common problems
Internal memory almost full or full
Delete files from the internal memory or insert a Micro-SD card.
Micro-SD card almost full or full
Delete files from the Micro-SD card.
Error in internal memory
Restart the inspection camera. If the problem persists, contact an authorized Bosch service centre.
Error in Micro-SD card
Remove the Micro-SD card and insert it again. Check the card in another device.
Before use
- Ensure the camera cable is properly connected.
- Check the battery charge level.
- Ensure the lens is not fogged up.
- Check the work area for electrical cables or hazardous substances.
Specs in practice
- Display size
- 5 inches
- Display resolution
- 1280 x 720 pixels
- Field of view
- 75 degrees
- Focus distance
- 30-80 mm
Images and diagrams
- Page 3: Overview of components (1-12).
- Page 4: Battery insertion (13-15).
- Page 5: Ports and accessories (16-20).
- Page 6: Assembly steps A, B, C.
- Page 7: Assembly steps D, E, F.
Model compatibility
- Compatible with Bosch 10.8V and 12V Li-ion batteries.
- Compatible with AA batteries using the AA1 battery adapter.

Manual page author
David Miller
Documentation analyst
Organizes user manual content into clear summaries, with attention to model details, product context, and everyday usability.