Automotive / Exhaust Systems
Installation Instructions for BRExhaust 106-0161 Exhaust Kit
Quick guide for installing the BRExhaust 106-0161 exhaust kit. Includes step-by-step installation procedures, safety warnings, torque specifications, and maintenance tips.
Table of contents
Quick guide from the manual
This document provides installation instructions for the BRExhaust 106-0161 exhaust kit. Key requirements include disconnecting the vehicle battery, cleaning the existing flange, and adhering to a maximum torque of 30 ft-lb for clamps. Professional installation is recommended for all products.
Installation steps
- Preparation: Disconnect the vehicle’s battery before removing the OEM exhaust system to prevent electrical accidents and reset the computer.
- Removal: Remove the existing exhaust system. Only remove parts that will be replaced.
- Cleaning: Clean the existing flange with a wire brush to ensure proper sealing.
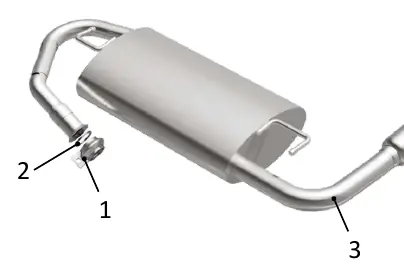
- Mounting: Connect item 3 to the existing isolators.
- Assembly: Attach item 3 to the existing exhaust using items 1 and 2.
- Clearance Check: Ensure the new exhaust is not contacting any portion of the underbody of the vehicle or drivetrain.
- Tightening: Tighten all clamps and bolts starting from the rear of the vehicle. Do not exceed 30 ft-lb when tightening clamps.
Bill of materials
- 1: 167871
- 2: 167872
- 3: 167870
Safety and maintenance
Safety: When working on, under, or around any vehicle, exercise caution. Always allow the vehicle's exhaust system to cool before removal to prevent severe burns. If working without a lift, consult the vehicle manual for correct lifting specifications. Always wear safety glasses and ensure a safe work area.
Maintenance: Check all clamps after 50 miles of driving and retighten if necessary.
Technical Support: 1-800-631-7271
Practical help
Common problems
Exhaust contacting vehicle underbody
Ensure the new exhaust is not touching any portion of the underbody or drivetrain during installation.
Loose clamps after installation
Check all clamps after 50 miles of driving and retighten if necessary.
Before use
- Allow the vehicle's exhaust system to cool completely before removal
- Disconnect the vehicle's battery
- Clean the existing flange with a wire brush
- Ensure a safe work area and wear safety glasses
- Consult vehicle manual for lifting specifications if not using a lift
Specs in practice
- Clamp Torque
- Do not exceed 30 ft-lb when tightening clamps.
Images and diagrams
- The diagram illustrates the assembly of the exhaust components, showing the connection points for items 1, 2, and 3.
Model compatibility
- Professional installation is recommended for all products.

Manual page author
David Miller
Documentation analyst
Organizes user manual content into clear summaries, with attention to model details, product context, and everyday usability.