Automotive / Car Audio
User Manual for Caliber CA 100V4 Car Amplifier
Quick start guide and installation manual for the Caliber CA 100V4 4-channel car amplifier. Includes wiring diagrams, power connection steps, signal input setup, and amplifier adjustments.
Table of contents
Manual images
Click an image to enlargeQuick guide from the manual
The Caliber CA 100V4 is a 4-channel car amplifier designed for high-quality audio output. This guide covers the essential installation and setup procedures. Always disconnect the vehicle's battery ground before beginning any electrical work. Ensure the amplifier is mounted in a location with at least 5cm of ventilation space on all sides to prevent overheating.
Features

- Stereo output with Pulse Width Modulated (PWM) MOSFET power supply.
- Variable input sensitivity (RCA input 0.2V to 3V).
- Thermal, overload, and short-circuit protection.
- Built-in High/Low Pass Filter.
- Chrome-plated power and speaker connectors.
Mounting
The amplifier must be installed on a flat surface. Mark the mounting surface using the amplifier as a template, drill 2.5mm holes, and secure the unit with the supplied self-tapping screws. Ensure that power and signal cables enter and leave the amplifier in a straight line to avoid malfunctions and noise interference.
Installation & Power
Proper power connection is critical for performance and safety:
- +12V Terminal: Connect directly to the vehicle battery using a cable of at least 15mm². Do not connect to the car fuse box.
- Fuse: Install an extra fuse or circuit breaker within 30cm of the battery.
- Ground (GND): Fasten securely to the vehicle chassis. Ensure all paint and insulation are removed from the contact area to ensure a solid connection.
- Remote (REM): Connect to the remote output of your radio/head unit. If your radio lacks this output, a separate switch must be installed to control the amplifier's on/off function.
Signal Input
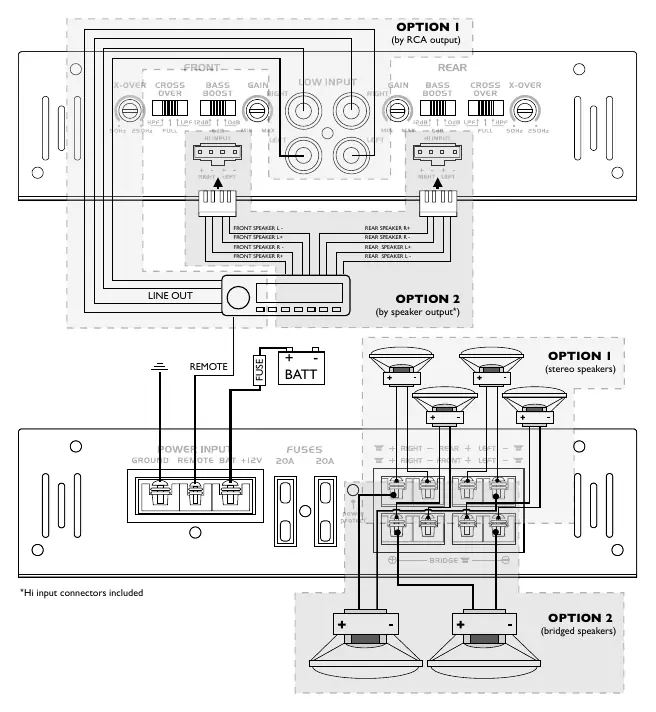
The amplifier offers two signal input methods. Never use the High Input and RCA Input at the same time.
- RCA Input: Connect RCA outputs from your radio to the RCA input terminals of the amplifier. Ensure the Right output of the radio connects to the Right input of the amplifier, and the Left to the Left.
- High Level Input: Use the loudspeaker output from your radio and the special High Level input plug included in the box.
Amplifier Adjustments
Follow these steps to tune your audio:
- Set the input level adjustment knob to the minimum.
- Set the volume of your radio to 3/4 of the maximum.
- Adjust the Bass Boost to your personal preference.
- Slowly turn up the input level until you hear the amplifier begin to distort (clip). If you have turned up the Bass Boost too much, the amplifier will clip immediately; in this case, reduce the Bass Boost and restart the input level adjustment.
Safety & Warranty
The amplifier is protected against thermal, overload, and short-circuit issues. If a problem occurs, turn off the device immediately. The unit should be kept away from moisture and direct sunlight. Caliber provides a 12-month warranty if installed by an authorized dealer, or 30 days if installed by the user.
Manufacturer information
Caliber Europe
Practical help
Common problems
Audio distortion
Reduce the input level or Bass Boost setting. The amplifier may be clipping.
Amplifier does not turn on
Check the Remote (REM) connection and ensure the +12V and Ground connections are secure.
Overheating
Ensure there is at least 5cm of ventilation space around the amplifier and it is not in direct sunlight.
Before use
- Disconnect the vehicle battery ground terminal.
- Use a power cable of at least 15mm².
- Install a fuse within 30cm of the battery.
- Remove paint from the chassis at the ground connection point.
- Verify that the High Input and RCA Input are not connected simultaneously.
Specs in practice
- Max power output
- 4x 75W/4Ω or 2x 500W/4Ω (bridged).
- Frequency response
- 5Hz-42kHz.
- Input Sensitivity
- 0.2 - 3V (RCA input).
Images and diagrams
- Option 1 (RCA): Connects radio RCA outputs to amplifier RCA inputs.
- Option 2 (Speaker Output): Uses high-level input connectors for radios without RCA outputs.
- Power Input: Shows connections for Ground, Remote, and +12V Battery.
Model compatibility
- Compatible with 12V vehicle electrical systems.
- Do not use High Input and RCA Input simultaneously.

Manual page author
David Miller
Documentation analyst
Organizes user manual content into clear summaries, with attention to model details, product context, and everyday usability.