Electronics / PA Systems
User Manual for Califone 1216-USB Stereo USB Jackbox
Quick guide for the Califone 1216-USB Stereo USB Jackbox. Learn how to set up, connect to your computer, manage audio inputs/outputs, and troubleshoot common issues.
Table of contents
Quick guide from the manual
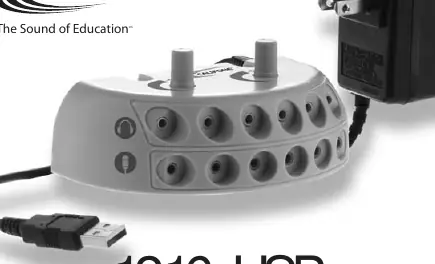
The Califone 1216-USB is a stereo jackbox designed for educational and audio-visual environments. It allows for 6 headphone outputs and 6 microphone inputs via a single USB connection to a computer. Unlike traditional passive jackboxes, this unit requires an external power supply to function.
Package Contents
- Jackbox with attached USB cord
- 6V power adapter
- Owner's Manual
Initial Set-Up
The 1216-USB requires active power to operate. Follow these steps to set up the device:
- Locate the power connector at the rear of the jackbox unit.
- Plug the included 6V power adapter into the jackbox.
- Plug the adapter into a standard 120V 50-60Hz AC outlet. Ensure the plug blades are fully inserted.
- The unit does not have an on/off switch; it is powered on as soon as it is plugged into the wall outlet.
Connecting to a Computer via USB
The jackbox connects to your computer via the attached USB cable. When connected, the computer should recognize it as a new audio device.
- Plug the USB cable into your computer's USB port.
- If using Windows XP or later, the system should automatically recognize the device.
- To set the Jackbox as the default audio device: Open the Sounds and Audio Devices control panel, go to the Audio tab, and select C-Media USB Headphone Set for both Sound Playback and Sound recording.
- If the device is not recognized, you may need to download drivers from your operating system manufacturer.
Connecting Headsets or Microphones
The jackbox features dedicated rows for inputs and outputs:
- Headphones: Connect up to 6 headphones to the green headphone outputs (top row). Use the green volume knob on the top of the unit to control the master volume for all headphones.
- Microphones: Connect up to 6 microphones to the pink microphone inputs (bottom row). Use the microphone volume knob on the top of the unit to control the master volume for all microphones.
Note: For individual volume control, it is recommended to use headphones that have built-in volume controls.
Troubleshooting
If you encounter issues, check the following:
- Unit does not operate: Ensure the USB cord is plugged in and the PC recognizes the new USB device.
- No sound in headphones: Verify the device is selected as the computer's audio output device and the headphone volume knob is turned up.
- No sound from microphones: Verify the device is selected as the computer's audio input device and the microphone volume knob is turned up.
- Unclear or distorted sound: Ensure the power adapter is securely plugged into both the wall and the jackbox.
Service and Repair
If service is required, contact your Califone dealer. For factory assistance, you can reach out via:
- Website: www.califone.com/techsupport.php
- Phone: 800.722.0500 (Toll-free in US) or 818.407.2428
- Address: Califone International Inc., 1145 Arroyo Ave. Suite #A, San Fernando, CA 91340
Always have your model and serial number available. Do not ship the unit to the factory without prior authorization.
Official resources from the manual
Practical help
Common problems
Unit does not operate
Check if the USB cord is securely plugged in and if the PC operating system recognizes the new USB device.
No sound output to the headphones
Ensure the device is selected as the computer's audio output device, the headphone volume knob is turned up, and the computer's internal volume is set correctly.
No sound from microphones
Ensure the device is selected as the computer's audio input device and the microphone volume knob is turned up.
Sound is unclear or distorted
Verify the power adapter is plugged into the wall and the jackbox, and that it is providing power.
Before use
- Inspect the shipping carton for signs of damage.
- Verify all package contents (Jackbox, USB cord, 6V power adapter).
- Ensure a standard 120V 50-60Hz AC outlet is available.
- Check that the USB cable is not damaged.
Specs in practice
- Listening Positions
- 6 (supports up to 6 headphones simultaneously).
- Microphone Inputs
- 6 (supports up to 6 microphones simultaneously).
- Power Supply
- AC 120V – 60Hz (6V Adapter included).
Images and diagrams
- Top row (green jacks): Headphone outputs.
- Bottom row (pink jacks): Microphone inputs.
- Top knobs: Master volume controls for headphones and microphones respectively.
Model compatibility
- Designed to work with computers via USB.
- Requires Windows XP or later for standard plug-and-play functionality.
- Older operating systems (Windows 98 or earlier) may require specific drivers.

Manual page author
Emily Carter
User documentation editor
Prepares concise manual descriptions and highlights the most useful setup, operation, and maintenance information for readers.