Home Appliances / Hair Dryers
User Manual for Carbest VanHeat 2.0-DH & 4.0-DH Diesel Parking Heater
Comprehensive user guide for the Carbest VanHeat 2.0-DH and 4.0-DH diesel parking heaters. Includes installation instructions, electrical wiring, operation via LCD controller, maintenance, and troubleshooting error codes.
PDF source: Français · summary: English
Quick answers from the manual
Quick answer
- The Carbest VanHeat 2.0-DH and 4.0-DH are diesel parking heaters for vehicles. Installation requires careful placement of air intake/exhaust, fuel lines, and electrical wiring. Operation is managed via an LCD controller. p. 1, 11, 54
Key actions
- Mounting the heater p. 31, 33
- Connecting fuel lines p. 42, 47
- Electrical wiring p. 49, 50
First start
- Ensure air is purged from fuel lines. The pump runs for 90 seconds during the first start. p. 63
Show 4 more answers Show less
Problems and fixes
E10
Check fuel line, fuel level, exhaust blockage, or fuel type.
p. 66
E30/E31
Check battery voltage.
p. 66Maintenance and reset
- Run the heater for 10 minutes every four weeks if not used for a long period. p. 63
Technical specifications
| Parameter | Value | Meaning | Pages |
|---|---|---|---|
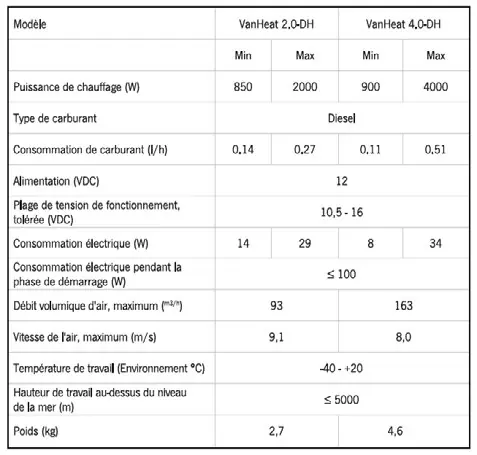
| Voltage | 12V | Operating voltage | p. 15 |
| Fuel Consumption | 0.14-0.27 l/h (2.0-DH) / 0.11-0.51 l/h (4.0-DH) | Fuel usage per hour | p. 15 |
Where to find it in the PDF
- System Description p. 11, 12, 13, 14
- Technical Specifications p. 15
- Installation p. 30, 31, 32, 33
- Operation p. 54, 55, 56, 57
- Troubleshooting p. 65, 66
Table of contents
Manual images
Click an image to enlargeQuick guide from the manual
The Carbest VanHeat 2.0-DH and 4.0-DH are diesel-powered air heaters designed for vehicles. This manual provides essential information for installation, operation, and maintenance. Key safety requirements include ensuring proper ventilation, keeping the exhaust system clear, and maintaining correct fuel line installation. The system is managed via an LCD controller, which also displays error codes for troubleshooting.
System Description
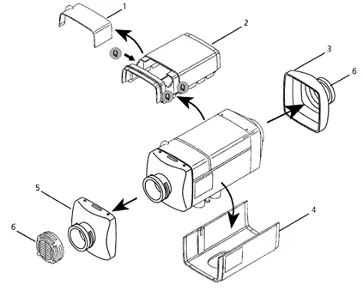
The heater consists of a combustion chamber, a fuel pump, and a control unit. Air is drawn in by a turbine, heated by the heat exchanger, and blown into the vehicle. The system monitors temperature and operational parameters to ensure safe and efficient heating.
Installation
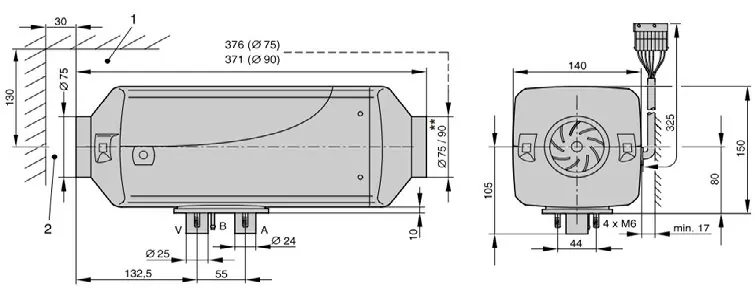
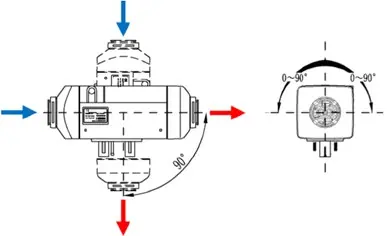
Mounting
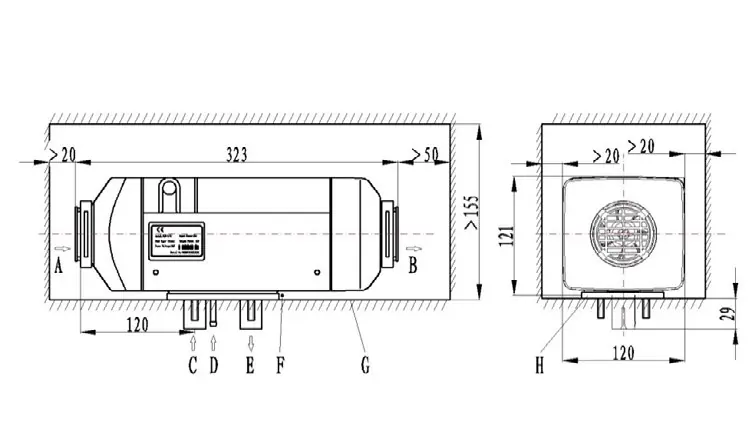
- Ensure the heater is mounted in a location that allows for proper air intake and exhaust.
- The heater can be mounted in various positions, but the exhaust pipe should ideally point vertically downwards.
- Use the provided mounting plate and rubber seal to ensure a secure and airtight installation.
- Maintain sufficient clearance around the heater for maintenance access.
Fuel Supply
- Use a T-junction to connect to the vehicle's existing fuel system if necessary.
- Ensure fuel lines are secured and free from kinks or damage.
- The fuel pump must be mounted at an angle between 15 and 35 degrees for optimal operation.
Electrical System
- Connect the main wiring harness to the heater and the vehicle's 12V battery.
- Ensure all electrical connections are secure and protected from corrosion.
- Use the provided fuse holder and ensure the correct fuse rating is used.
Operation
The LCD controller allows you to:
- Set the date and time.
- Program start/stop timers.
- Adjust heating power or set a target temperature (5-35°C).
- View and clear error codes.
- Access diagnostic information.
Maintenance
- Before each heating season, have the system checked by a qualified technician.
- Keep air intake and exhaust openings free from dirt, snow, or debris.
- If the heater is not used for a long period, run it for at least 10 minutes every four weeks to ensure mechanical parts remain functional.
- Replace the fuel filter, fuel lines, and hose clamps every 2 years.
Troubleshooting
If the heater fails to start or shuts down, check the LCD for an error code. Common issues include fuel supply problems (E10), battery voltage issues (E30/E31), or overheating (E40/E41/E42). Always turn off the system and wait at least 5 seconds before attempting a restart.
Manufacturer information
Carbest
Practical help
Common problems
Heater does not start
Check the fuse, ensure there is sufficient fuel in the tank, and verify that the desired temperature is higher than the current ambient temperature.
LCD screen does not light up
Check for a blown fuse or incorrect electrical wiring.
Error code displayed
Refer to the error code table in the manual (e.g., E10 for fuel issues, E30/E31 for battery issues) and perform the recommended action.
Before use
- Check fuel lines for leaks or damage
- Ensure air intake and exhaust openings are not blocked
- Verify battery voltage is within the 10.5-16V range
- Check all electrical connections for corrosion or looseness
Show more Show less
Specs in practice
- Heating Power
- 850-2000W (2.0-DH) or 900-4000W (4.0-DH)
Images and diagrams
- Fig 2: Exploded view of heater components
- Fig 3: Electrical connection ports on the control unit
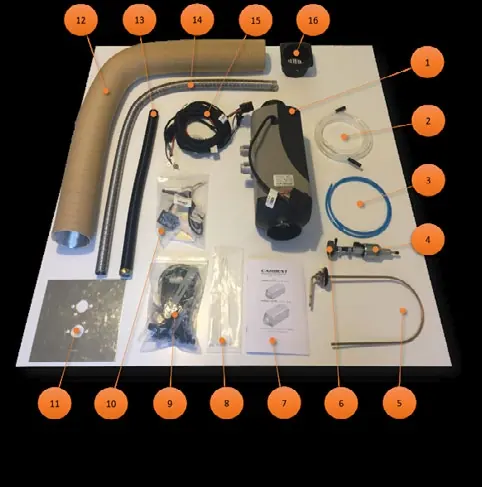
- Fig 11/14: Standard kit components list
- Fig 32: Correct fuel pump mounting angle (15-35 degrees)
Model compatibility
- Not suitable for long-term use in residential buildings, tiny houses, or garages.
- Do not use for heating or drying people or animals directly.
- Installation in vehicles transporting dangerous goods is prohibited.

Manual page author
David Miller
Documentation analyst