Garden / Outdoor Furniture
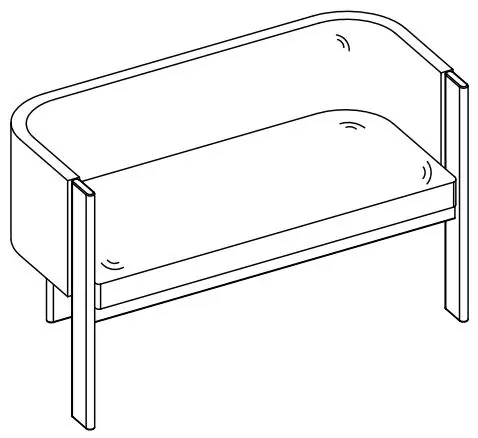
Installation Guide for Christopher Knight Home Vescari 2-Seater Loveseat
Quick assembly guide for the Christopher Knight Home Vescari 2-Seater Loveseat (Model N771P384798). Includes parts list, hardware requirements, step-by-step assembly instructions, and care tips.
Quick answers from the manual
Quick answer
- This document provides assembly instructions for the Christopher Knight Home Vescari 2-Seater Loveseat (Model N771P384798). It includes a parts list, hardware identification, and a 9-step assembly process. p. 1, 2, 3, 4
Key actions
- Assemble with 2 adults p. 4
- Use furniture pads to prevent floor scratches p. 1
First start
- Ensure all parts (A-F) and hardware (1-12) are present before beginning assembly. p. 2, 3, 4
Problems and fixes
Stains
Use mild soap solution and damp cloth.
p. 1Where to find it in the PDF
- Care & Maintenance p. 1
- Parts List p. 2
- Hardware List p. 3
- Assembly Steps p. 4, 5, 6, 7
Table of contents
Manual images
Click an image to enlargeImportant Information
This document provides assembly instructions for the Christopher Knight Home Vescari 2-Seater Loveseat. Please read the entire manual before beginning assembly. The product is intended for residential use only and should be placed on a flat, level surface.
Care and Maintenance
- Flooring Protection: Furniture may scratch floors. We recommend using furniture pads.
- Cleaning: Dust and pick-up spills using a clean, non-colored, lint-free cloth. Stains may be removed with a mild soap solution and damp cloth. Do not use harsh cleansers or polish.
- Placement: Do not place furniture under direct sunlight or near heating/cooling vents. Do not place outdoors.
- Usage: Do not put hot items directly on the surface. Do not write on the furniture without a padded barrier. Children should not climb or jump on the furniture.
Parts and Hardware
Before starting, ensure all parts and hardware are present. The set may ship in multiple boxes.
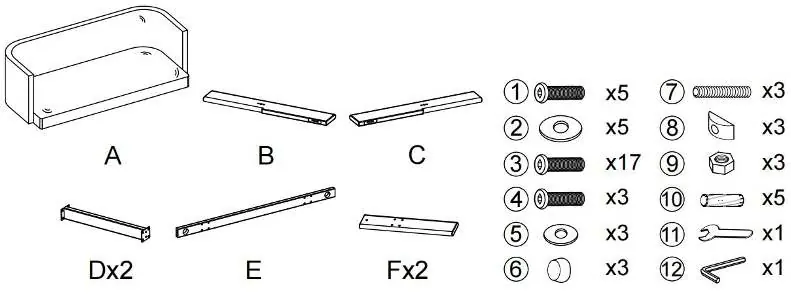
- Parts: Seat Frame (A), Front Leg-B (B), Front Leg-C (C), Side Stretcher (D), Front Stretcher (E), Back Leg (F).
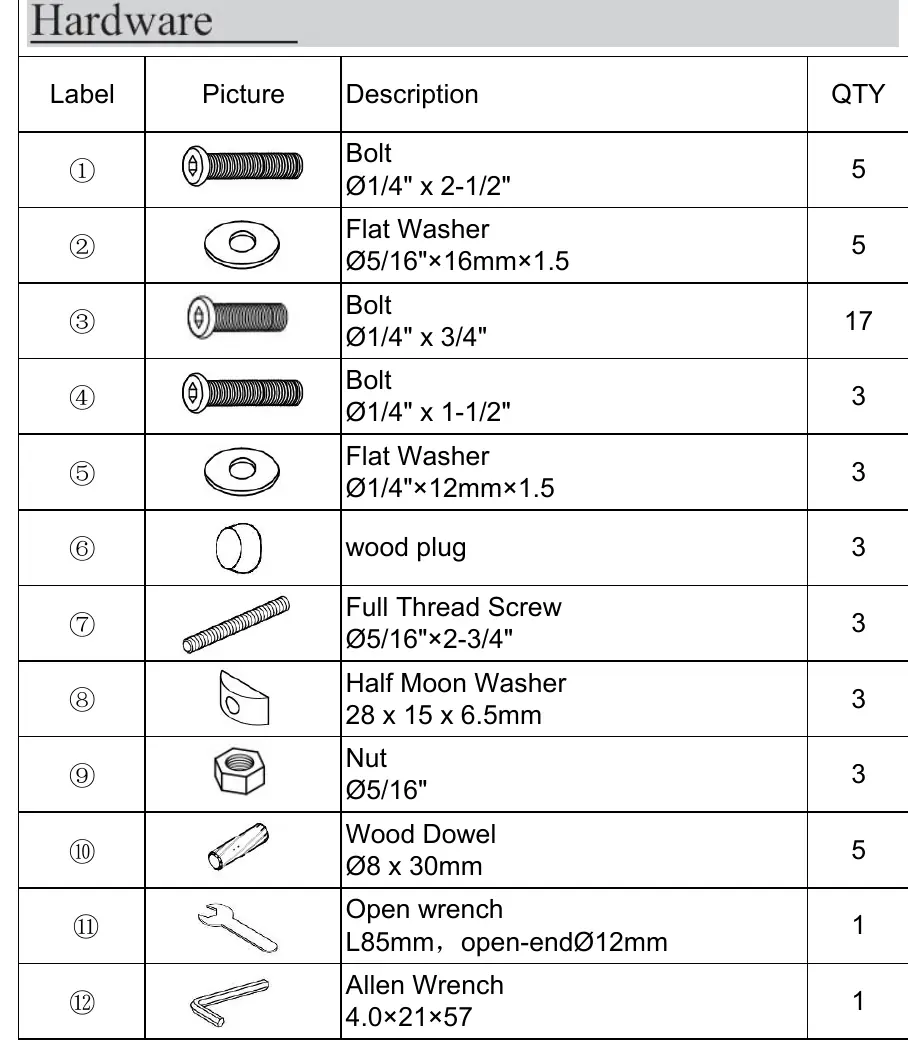
- Hardware: Includes various bolts (1, 3, 4), washers (2, 5, 8), screws (7), nuts (9), wood plugs (6), wood dowels (10), and tools (11, 12).
Assembly Preparation
- Have 2 adults on hand for assembly.
- Do not assemble on flooring or carpet.
- Assemble on a clean, non-marring surface (e.g., packing foam).
- Save all packaging until assembly is finished.
Assembly Steps


- Step 1: Attach Full Thread Screw (7) and Wood Dowel (10) to Front Legs (B & C).
- Step 2: Attach Front Legs (B & C) to Front Stretcher (E) using Half Moon Washer (8), Nut (9), and Open Wrench (11).
- Step 3: Attach Front Legs (B & C) to Seat Frame (A).
- Step 4: Attach Front Stretcher (E) to Seat Frame (A) using Bolt (1), Flat Washer (2), and Allen Wrench (12).
- Step 5: Attach Side Stretcher (D) to Front Stretcher (E) using Bolt (3). Attach Side Stretcher (D) to Seat Frame (A) using Bolt (1), Flat Washer (2), and Allen Wrench (12).
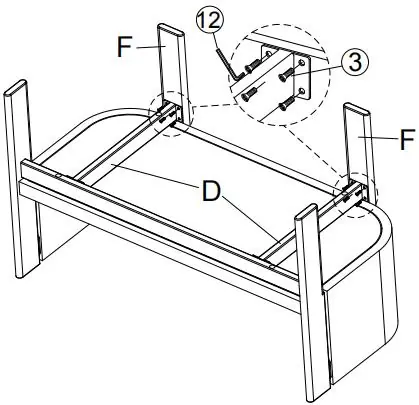
- Step 6: Attach Back Leg (F) to Side Stretcher (D) using Bolt (3) and Allen Wrench (12).
- Step 7: Attach Back Leg (F) to Seat Frame (A) using Bolt (4), Flat Washer (5), and Allen Wrench (12).
- Step 8: Attach wood plug (6) to Back Leg (F).
- Step 9: Ensure the chair is on a flat, level surface before use.
Practical help
Common problems
Furniture scratches floors
Use furniture pads to protect your floors.
Stains on fabric
Remove with a mild soap solution and damp cloth.
Before use
- Have 2 adults available for assembly
- Assemble on a clean, non-marring surface (e.g., packing foam)
- Do not assemble on flooring or carpet
- Check carton for all hardware packs and legs
- Read instructions cover to cover
Images and diagrams
- The manual provides a detailed parts list and hardware list with labels (A-F for parts, 1-12 for hardware) to identify components before starting.
- Step-by-step diagrams illustrate the connection of legs and stretchers to the seat frame.
Model compatibility
- For residential use only.
- Not for commercial use.
- Use only on a flat, level surface.

Manual page author
David Miller
Documentation analyst
Organizes user manual content into clear summaries, with attention to model details, product context, and everyday usability.