Furniture / Sofas & Couches
Installation Guide for Christopher Knight Home 43837481 2-Drawer Nightstand
Complete assembly and installation guide for the Christopher Knight Home 43837481 2-Drawer Nightstand. Includes safety warnings, parts list, step-by-step assembly instructions, and care tips.
Quick answers from the manual
Quick answer
- This guide provides assembly instructions for the Christopher Knight Home 43837481 2-Drawer Nightstand, including safety warnings and maintenance tips. p. 2, 6
Key actions
- Assemble with 2 adults on a clean, non-marring surface. p. 5
First start
- Ensure the product is level; if uneven, adjust the feet. p. 9
Problems and fixes
Uneven product
Adjust the feet.
p. 9Where to find it in the PDF
- Safety Warnings p. 1
- Parts List p. 4
- Assembly Steps p. 6, 7, 8, 9
Table of contents
Manual images
Click an image to enlargeQuick Guide
This guide provides instructions for assembling the Christopher Knight Home 43837481 2-Drawer Nightstand. Please read all instructions before beginning. Ensure you have two adults available for assembly and work on a clean, non-marring surface, such as packing foam. Do not assemble on flooring or carpet to prevent damage.
Parts List
Before starting, verify you have all components:

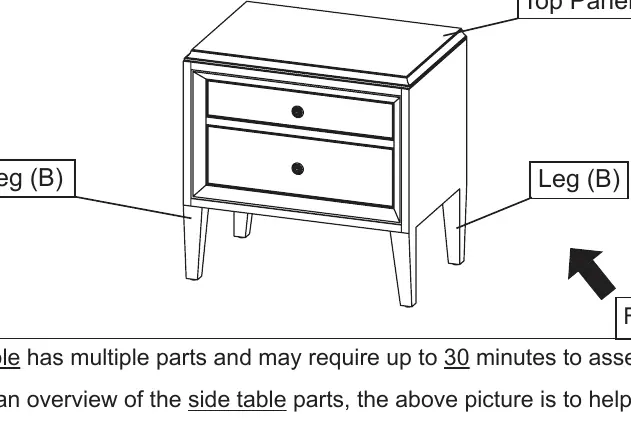
- A: Top Panel (1)
- B: Leg (2)
- Hardware: Bolts (M6*30mm), Flat washers, L-type Hexagon Wrench, Anti-Tipping sheet iron, Nuts, and Screws.
Assembly Instructions
Follow these steps to assemble your nightstand:
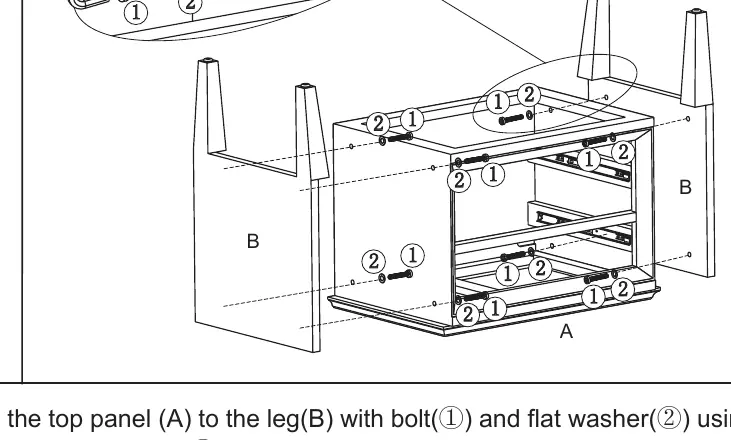
- Preparation: Remove the drawer from the top panel (A).
- Leg Attachment: Attach the top panel (A) to the legs (B) using bolts (1) and flat washers (2) with the provided L-type hexagon wrench (3).
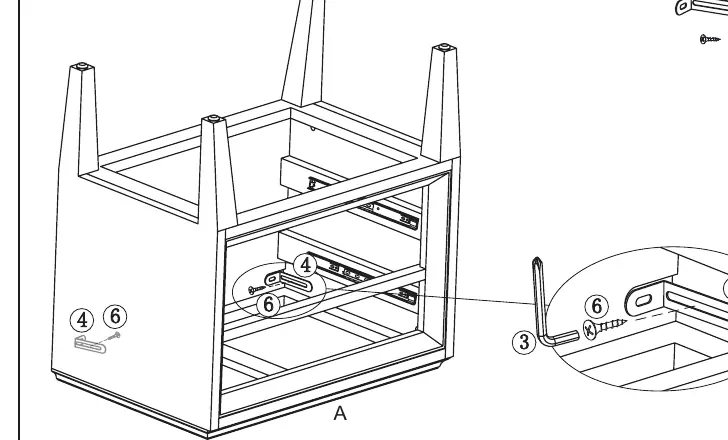
- Anti-Tip Bracket: Attach the long side of the anti-tipping sheet iron (4) to the top panel (A) using screw (6) and the wrench (3).
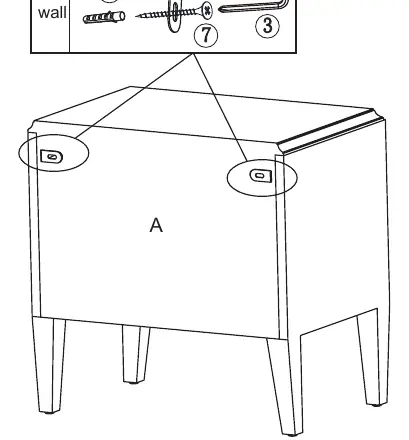
- Wall Mounting: Screw the nut (5) into the wall. Install the short side of the anti-tipping sheet iron (4) onto the wall using screw (7) and the wrench (3).
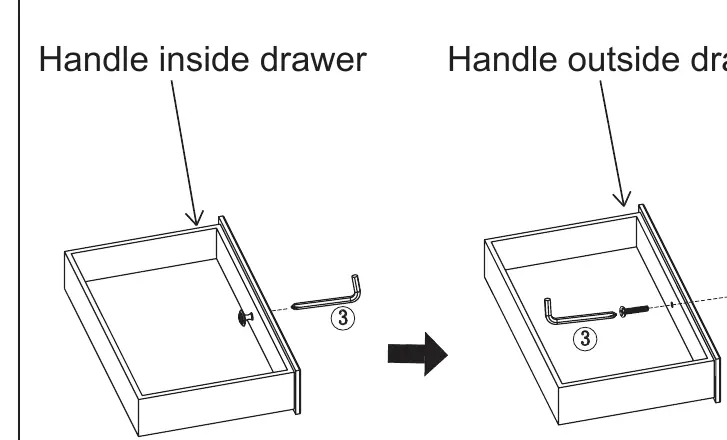
- Handle Installation: Attach the handle to the outside of the drawer using the wrench (3).
- Final Assembly: Insert the drawer back into the top panel (A).
- Leveling: If the assembled product is uneven, adjust the feet.
Care and Maintenance
- For residential use only; not for commercial use.
- Furniture may scratch floors; use furniture pads.
- Do not place hot items directly on the surface.
- Do not clean with harsh cleansers or polish.
- Keep away from direct sunlight and heating/cooling vents.
- Do not write on the surface without a padded barrier.
- For indoor use only.
- Clean stains with a mild soap solution and damp cloth.
- Dust using a clean, non-colored, lint-free cloth.
- Do not allow children to climb or jump on the furniture.
Practical help
Common problems
Product is uneven
Adjust the feet to level the nightstand.
Before use
- Have 2 adults on hand for assembly
- Assemble on a clean, non-marring surface (packing foam)
- Do not assemble on flooring or carpet
- Read instructions cover to cover
- Save all packaging until finished
Images and diagrams
- Overview of parts and orientation
- Step-by-step assembly sequence
- Anti-tip restraint installation details
Model compatibility
- For residential use only
- Not for commercial use

Manual page author
Michael Turner
Technical manual editor
Reviews PDF manuals for structure, safety notes, and practical product details so readers can find the right information quickly.