Furniture / Closet Organizers
Installation Guide for ClosetMaid Suite Symphony 2-Drawer Tower
Complete installation and assembly guide for the ClosetMaid Suite Symphony 2-Drawer Tower. Includes step-by-step instructions for tower assembly, drawer installation, safety warnings, and parts identification.
Quick answers from the manual
Quick answer
- This document provides installation instructions for the ClosetMaid Suite Symphony 2-Drawer Tower and associated drawers. It includes safety warnings, parts lists, and step-by-step assembly procedures. p. 1, 18
Key actions
- Secure unit to wall p. 2, 13, 14
- Assemble tower p. 5, 6, 7, 8
- Install drawers p. 23, 24, 25, 26
Technical specifications
| Parameter | Value | Meaning | Pages |
|---|---|---|---|
| Warranty | 30 days | Manufacturer will replace missing or damaged parts due to defect within 30 days of purchase. | p. 20 |
Where to find it in the PDF
- Tower Parts List p. 3
- Tower Assembly p. 5, 14
- Drawer Parts List p. 21
- Drawer Assembly p. 23, 32
Table of contents
Manual images
Click an image to enlargeQuick Guide from the Manual
This document provides comprehensive installation instructions for the ClosetMaid Suite Symphony 2-Drawer Tower and its compatible drawers. Before beginning, ensure you have all parts listed in the manual and the necessary tools: a screwdriver, hammer, drill, tape measure, and level. Important: All units must be fastened to the wall to prevent tipping. Do not hang the unit on the wall; it is not designed for wall-hanging.
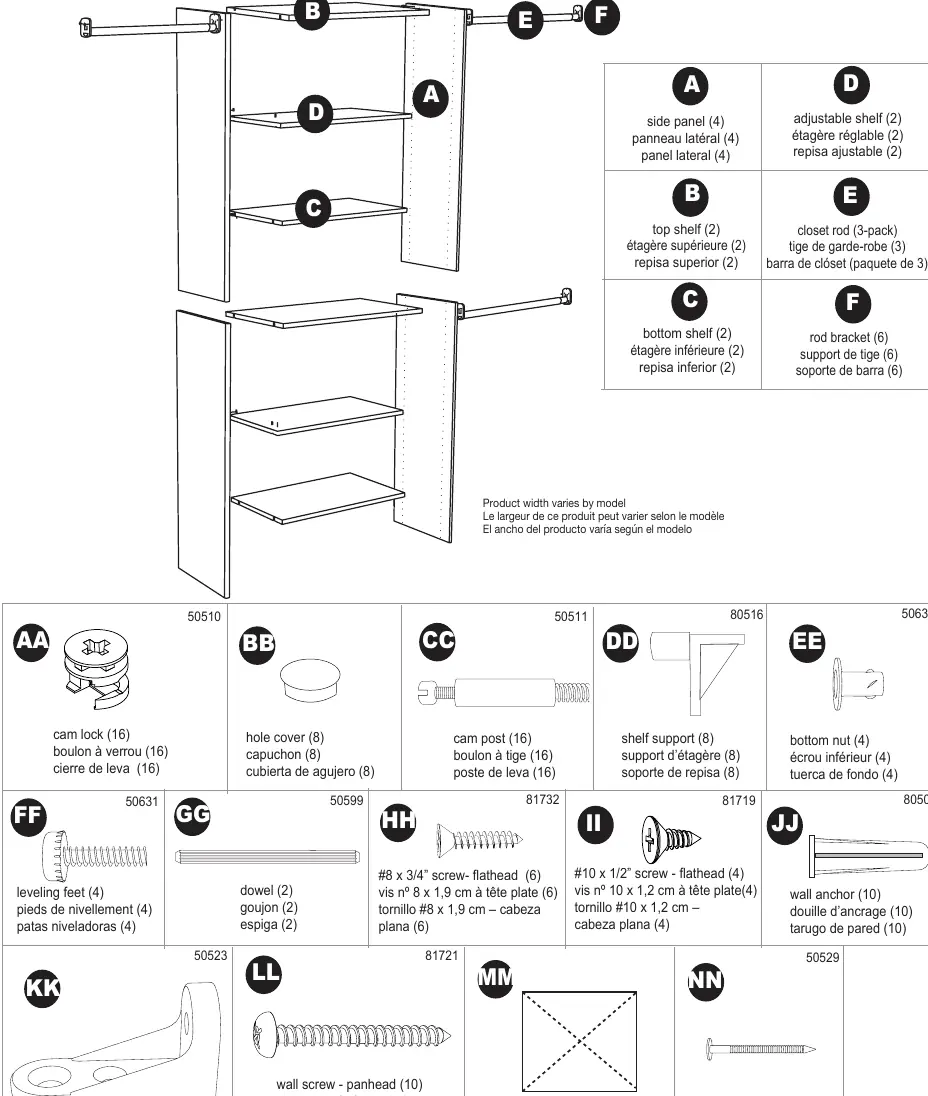
Parts Identification
The manual includes a detailed parts list for both the tower and the drawers. Familiarize yourself with all components, including cam locks, cam posts, dowels, screws, and shelf supports, before starting assembly. Note that product width may vary by model.
Tower Assembly
The tower assembly involves several key steps:
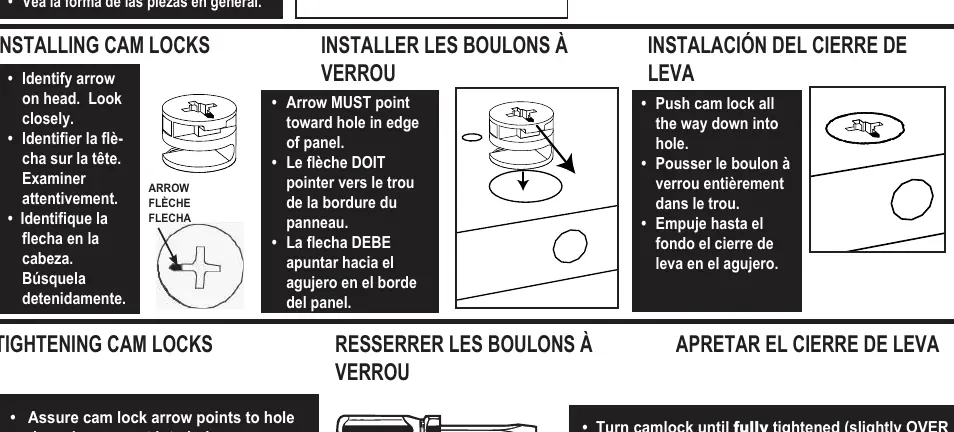
- Cam Lock Installation: Ensure the arrow on the cam lock points toward the hole in the edge of the panel before inserting the cam post. Tighten until fully secured (slightly over half a turn).
- Panel Preparation: Install cam locks and cam posts into the side panels and shelves as indicated in the specific steps.
- Assembly: Attach the bottom and top shelves to the side panels. Ensure finished edges are oriented correctly (usually facing forward or upward as specified in each step).
- Gussets: Attach triangle gussets to the back of the units to ensure stability.
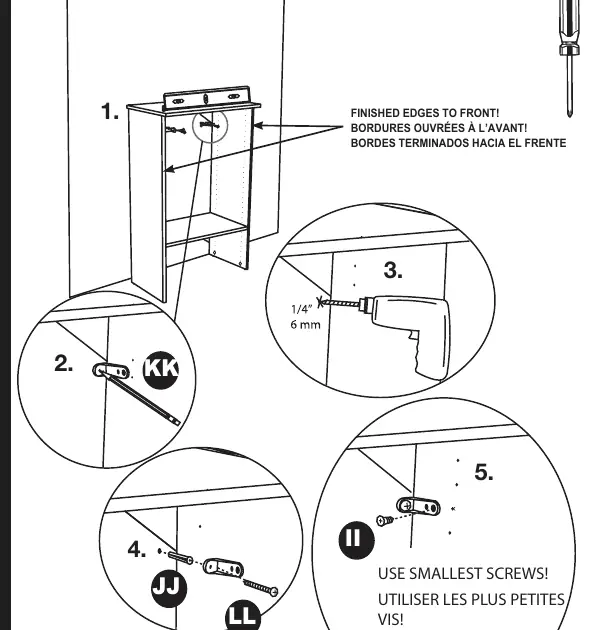
- Wall Mounting: Secure the finished unit to the wall using the provided L-brackets, anchors, and wall screws.
Drawer Assembly
The drawer assembly is a separate process:
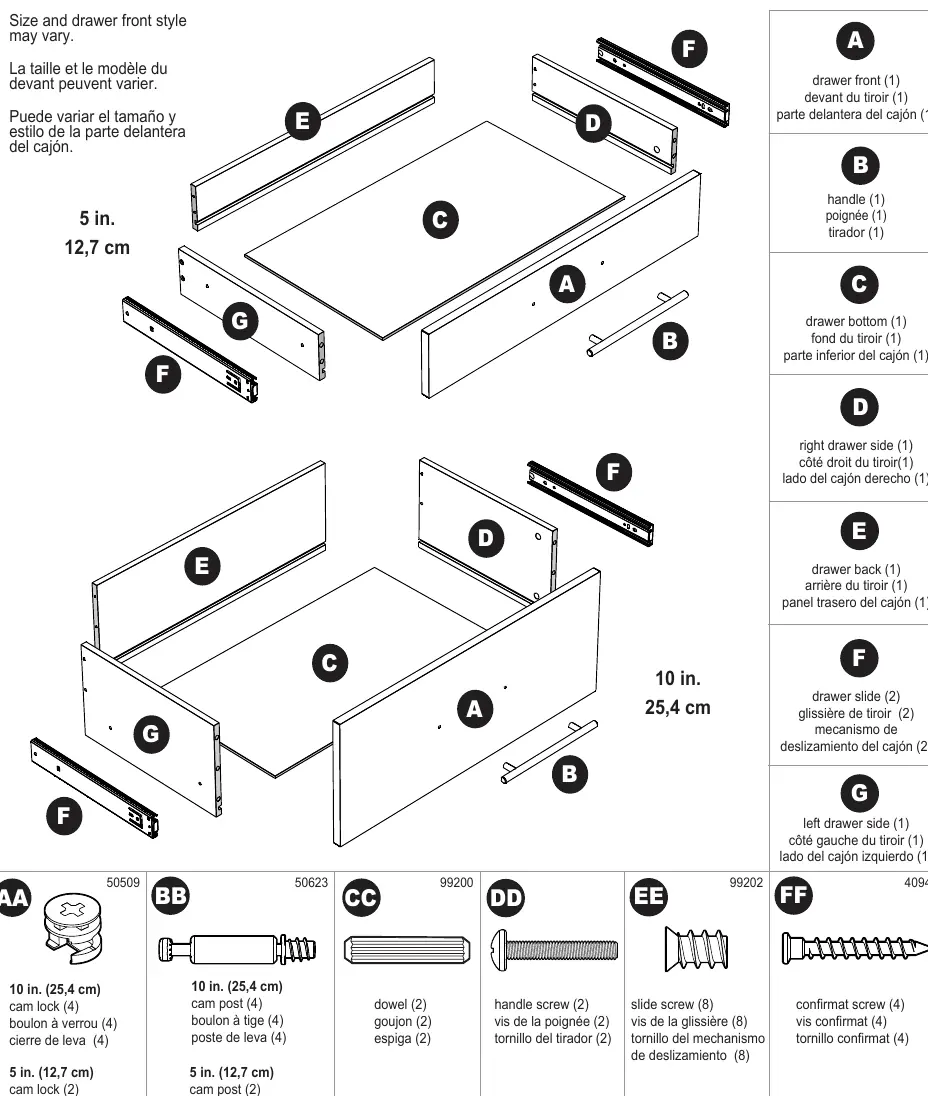
- Drawer Components: Assemble the drawer front, sides, and back using cam locks, dowels, and confirmat screws.
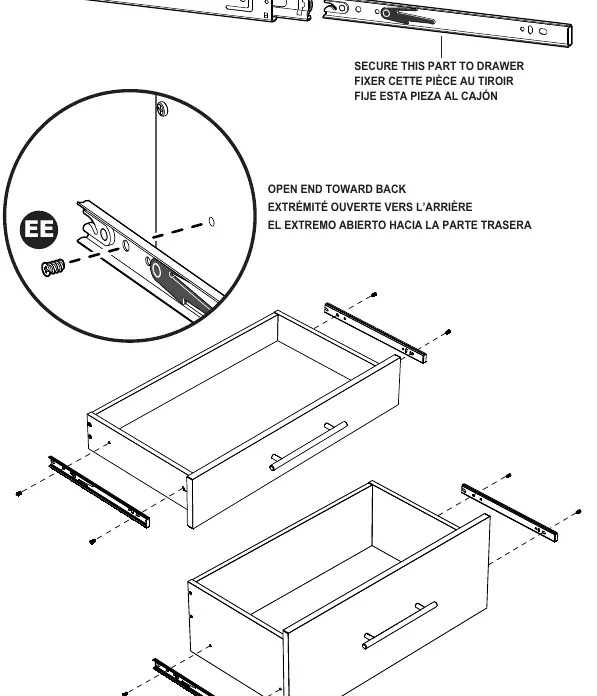
- Drawer Slides: Attach the drawer slides to the drawer sides. Ensure the soft-close mechanism is extended and locked in place.
- Installation: Align the drawer slides with the slides installed on the tower base and push the drawer into place.
Safety and Maintenance
Follow these safety guidelines to prevent injury or damage:
- Overloading: Do not overload the unit. If any shelf, top, or bottom bows or bends greater than 1/2 inch, it is overloaded.
- Stability: Always unload the unit before moving it. Do not climb or step on the unit.
- Work Surface: Protect your work surface during assembly to prevent scratching or damage to table tops or floors.
- Power Tools: Use caution when using power tools and ladders.
Manufacturer information
ClosetMaid
Practical help
Common problems
Unit is unstable or tipping
Ensure the unit is secured to the wall using the provided L-brackets, anchors, and screws. Do not hang the unit on the wall.
Shelves bowing or bending
The unit is overloaded. If any shelf, top, or bottom bows greater than 1/2 inch, remove weight immediately.
Cam locks not tightening
Ensure the arrow on the cam lock points toward the hole in the edge of the panel before inserting the cam post. Tighten until fully secured (slightly over half a turn).
Before use
- Verify all parts are present using the parts list.
- Ensure you have a level, screwdriver, hammer, drill, and tape measure.
- Protect your work surface (table or floor) during assembly.
- Ensure the unit is placed on a level surface.
Specs in practice
- Wall Mounting
- All units must be fastened to the wall to prevent tipping.
- Soft-Close Mechanism
- Feature on drawer slides; ensure it is extended and locked in place during installation.
Images and diagrams
- Exploded view of parts (Page 3)
- Cam lock installation and tightening (Page 4)
- Tower assembly steps (Pages 5-14)
- Drawer assembly steps (Pages 21-32)
Model compatibility
- Tower and drawers are sold separately.
- Product width varies by model.

Manual page author
Emily Carter
User documentation editor
Prepares concise manual descriptions and highlights the most useful setup, operation, and maintenance information for readers.