Furniture / Closet Organizers
Installation Guide for ClosetMaid 12-inch Shelving Support Bracket
Step-by-step installation guide for the ClosetMaid 12-inch shelving support bracket. Learn how to correctly position, drill, and anchor your shelf supports for a secure installation.
Table of contents
Manual images
Click an image to enlargeQuick Installation Guide
This document provides the necessary steps to install the ClosetMaid support bracket. Ensure you have the correct tools and follow the spacing requirements to ensure shelf stability.
Positioning the Brackets
Proper placement is critical for shelf support. Follow these guidelines:
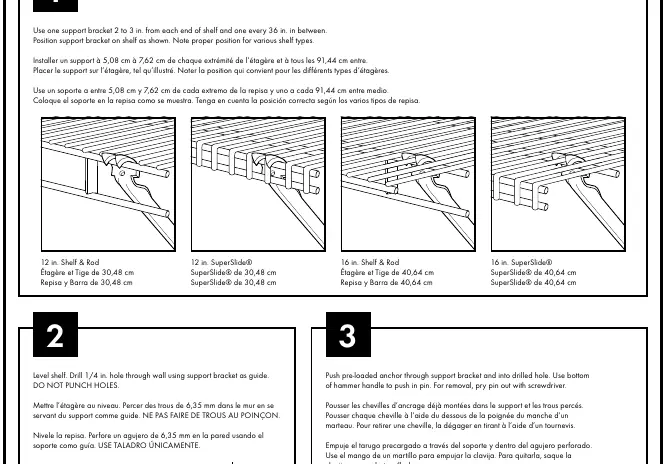
- Use one support bracket 2 to 3 inches from each end of the shelf.
- Place additional support brackets every 36 inches in between.
- Ensure the bracket is positioned correctly based on the specific shelf type (Shelf & Rod or SuperSlide).
Installation Steps


- Leveling and Drilling: Level the shelf against the wall. Use the support bracket as a guide to mark and drill a 1/4 inch hole through the wall. Do not punch holes.
- Anchoring: Push the pre-loaded anchor through the support bracket and into the drilled hole.
- Securing: Use the bottom of a hammer handle to push the pin into the anchor to secure it.
Tools Required
The following tools are required for installation (not supplied):
- Drill
- 1/4 inch drill bit
- Hammer
- Level
- Screwdriver (for pin removal)
Removal
If you need to remove the anchor, pry the pin out using a screwdriver.
Manufacturer information
ClosetMaid
Practical help
Common problems
Difficulty removing the anchor pin
Use a screwdriver to pry the pin out.
Hole size
Ensure you drill a 1/4 inch hole; do not punch holes.
Before use
- Ensure you have a drill and a 1/4 inch drill bit.
- Have a hammer and screwdriver ready.
- Use a level to ensure the shelf is straight before drilling.
- Verify you have enough brackets to place one every 36 inches.
Specs in practice
- Drill hole size
- 1/4 inch (6.35 mm)
- Bracket spacing
- 2-3 inches from ends, every 36 inches (91.44 cm) in between
Images and diagrams
- The diagrams illustrate the correct positioning of brackets for both 'Shelf & Rod' and 'SuperSlide' shelving types.
- The installation sequence shows using the bracket as a template for drilling and using the hammer handle to set the anchor.

Manual page author
Michael Turner
Technical manual editor
Reviews PDF manuals for structure, safety notes, and practical product details so readers can find the right information quickly.