Electronics / Microphones
User Manual for Comica BoomX-D Pro Wireless Microphone
Quick start guide and user manual for the Comica BoomX-D Pro wireless microphone. Learn how to pair transmitters, record audio, adjust gain, and connect to cameras, phones, or computers.
Table of contents
Manual images
Jump to the sectionQuick guide from the manual
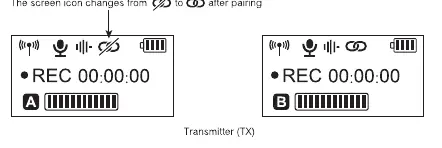
The Comica BoomX-D Pro is a 2.4G digital dual-channel wireless microphone system. Before using, ensure the devices are charged using the provided 3-in-1 cable. The system comes pre-paired from the factory. If you need to re-pair, turn on the transmitter and receiver within one meter, and long-press the pair buttons on both devices until the icon changes from the unlinked symbol to the linked symbol.
Device description
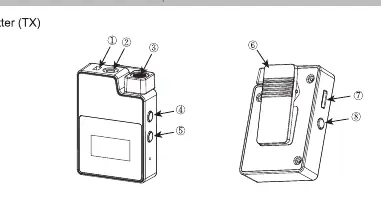
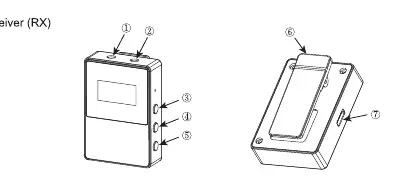
The system consists of a Transmitter (TX) and a Receiver (RX). The TX features an internal microphone, an external mic input, a recording button, and a USB-C port for charging and data transfer. The RX features output ports for cameras and monitoring, gain control buttons, and a mode switch button.
Pairing and setup
To pair the devices manually:
- Turn on the transmitter and receiver within one meter of each other.
- Ensure the screen is on.
- Long-press the pair buttons on both the transmitter and receiver.
- The screen icon will change from the unlinked icon to the linked icon upon successful pairing.
- The first transmitter paired becomes Channel A (left channel), and the second becomes Channel B (right channel).
Transmitter (TX) operation
The transmitter supports both internal and external microphones. When an external microphone is plugged into the 3.5mm TRS port, the internal microphone is automatically disabled. Use the REC button to start or stop internal recording. The device features 16GB of internal memory, allowing for approximately 48 hours of recording. Files are saved in 2-hour segments. When the memory is full, new files will overwrite the oldest ones.
Receiver (RX) operation
The receiver allows for real-time monitoring via the 3.5mm headphone port. Use the power/mode button to switch between Mono, Stereo, and Safety modes. Note that Stereo mode is not available in single-channel or safety mode. Use the A/B channel buttons to adjust output volume from -6dB to +6dB.
Connections and output
The system supports both analog and digital output:
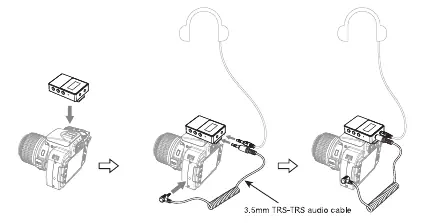
- Camera: Connect the receiver to the camera's hot shoe and use the 3.5mm TRS-TRS audio cable to connect the receiver's output port to the camera's mic input.
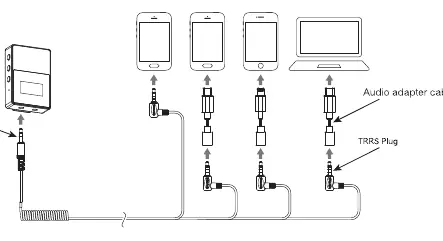
- Smartphone/Computer: Use the 3.5mm TRS-TRRS audio cable. You may need an additional audio adapter cable depending on your device's interface.
- Digital Output: Connect the receiver to USB interface devices using the appropriate USB-C cable.
Maintenance and troubleshooting
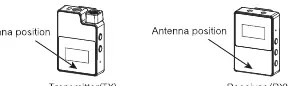
If the device crashes or fails to turn on, press and hold the power button for 10 seconds to reset. To avoid signal interference, keep the transmitter and receiver in line-of-sight and do not block the antenna positions. Avoid using the equipment near heat sources or in damp environments.
Technical specifications
The system operates on a 2.4GHz frequency with a working range of up to 100m in open areas. The transmitter has a battery life of 4.5 hours in recording mode or 15 hours in normal mode. The receiver has a battery life of 12 hours. The audio recording quality is 48kHz/16bit.
Practical help
Common problems
Transmitter does not show audio dynamic bar
Ensure the transmitter and receiver are properly paired.
System crash or failure to turn on
Press and hold the power button for 10 seconds to perform a hard reset.
Poor signal or connection drops
Ensure the transmitter and receiver are in line-of-sight and do not block the antenna positions.
Stereo function not working
Stereo mode is not available when using single-channel or safety mode.
Before use
- Charge the transmitter and receiver using the provided 3-in-1 cable.
- Ensure the transmitter and receiver are paired (check for the linked icon on the screen).
- Select the correct audio cable (TRS for cameras, TRRS for phones).
- Check the screen to ensure the battery is charged and the signal is stable.
- If recording, ensure the REC function is active and memory is available.
Specs in practice
- Working Range
- Up to 100 meters in open areas.
- Internal Memory
- 16GB capacity, supporting approximately 48 hours of recording.
- TX Battery Life
- 4.5 hours with internal recording enabled; 15 hours in normal mode.
- RX Battery Life
- 12 hours of continuous operation.
Images and diagrams
- Transmitter (TX) components: Shows the internal mic, external mic port, REC button, and USB-C port.
- Receiver (RX) components: Shows the monitoring port, output port, and gain control buttons.
- Connection diagrams: Illustrates how to connect the receiver to cameras and smartphones using the correct cables.
Model compatibility
- Universal for USB and 3.5mm interface devices.
- Requires specific adapter cables for smartphones without a 3.5mm jack.
- The orange cable in the 3-in-1 set is for charging and data transmission; black cables are for charging only.

Manual page author
David Miller
Documentation analyst
Organizes user manual content into clear summaries, with attention to model details, product context, and everyday usability.